
Keeping your water from freezing during cold-weather camping is crucial for staying hydrated and safe. Freezing temperatures can quickly turn your water into ice, making hydration difficult and increasing the risk of dehydration, hypothermia, and poor decision-making. Here’s how to prevent it:
- Use insulated bottles: Double-wall vacuum-insulated bottles like Yeti or Hydro Flask are top choices. Wide-mouth designs are better as they freeze slower and are easier to access.
- Pre-fill with hot water: Boiling water cools before freezing, giving you more time. Ensure your bottles can handle high temperatures.
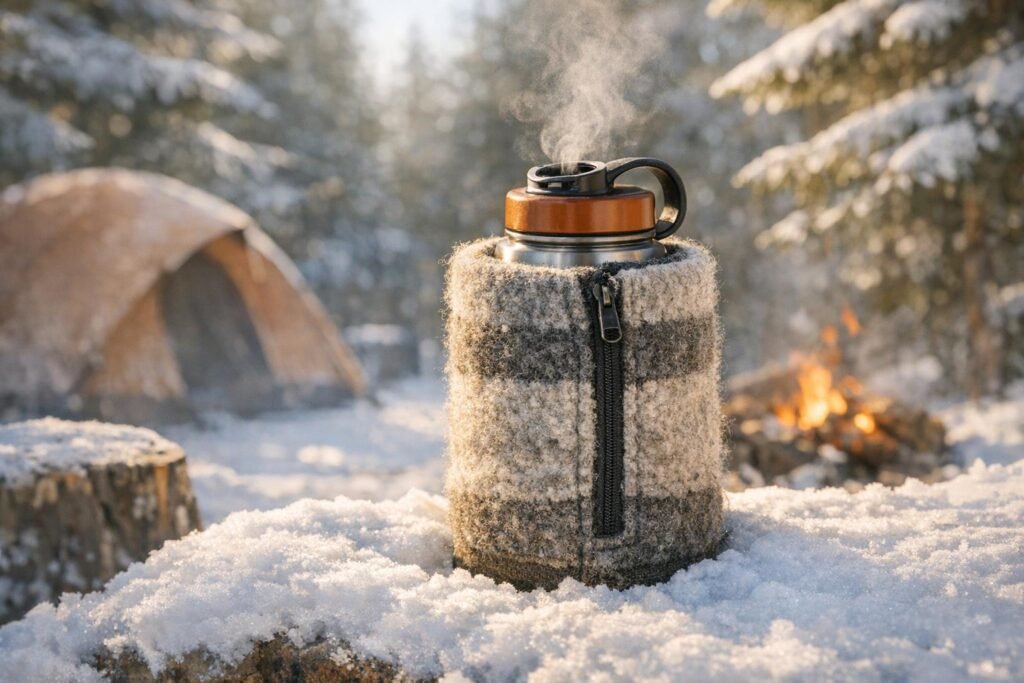
- Insulate creatively: Wrap bottles in wool socks, neoprene sleeves, or spare clothing. Bury them in snow (10 inches deep) or store them inside your sleeping bag at night.
- Store strategically: Keep bottles upside down to prevent the mouth from freezing. Use body heat by carrying water close to your core or inside your jacket.
- Avoid hydration bladders: Hoses and valves freeze quickly. If you must use one, insulate it or blow air back into the tube after each sip.
Pro Tip: If your water freezes, melt snow with a stove, but pack extra fuel as this process requires more energy.
These simple steps can help ensure you stay hydrated and safe, even in sub-zero conditions.
Why Water Freezes and What It Means for Campers
How Cold Temperatures Affect Water Storage
When temperatures drop, water freezes due to four key heat-loss mechanisms: conduction, where heat is transferred through direct contact (like a bottle sitting on frozen ground); radiation, where heat escapes from the surface of the container; convection, where wind carries heat away; and evaporation, which removes heat as water molecules escape into the air. Together, these processes can cause water to freeze quickly in cold conditions.
The type of container you use makes a big difference. For example, narrow-necked bottles freeze faster because ice can easily form a seal across the small opening, locking it shut. On the other hand, wide-mouth bottles take longer to freeze, giving you more time to access the water before it solidifies. Another trick? Store bottles upside down. Since water freezes from the top down, this ensures the ice forms at the bottom, keeping the bottle’s mouth clear for drinking.
Hydration bladders, while convenient, are particularly vulnerable in freezing temperatures. The thin hoses and valves freeze much faster than the main reservoir due to their small volume and surface exposure. Add in harsh conditions like sub-zero temperatures and wind chill, and the freezing process speeds up even more through increased heat loss from conduction and other mechanisms. These challenges make it critical for campers to plan ahead when storing water in the cold.
Health and Safety Risks of Frozen Water
When water freezes, staying hydrated becomes not just inconvenient but potentially dangerous. Limited access to water in freezing weather can lead to serious health issues. For instance, dehydration in cold conditions increases the risk of hypothermia, as your body’s ability to produce heat slows down without enough fluids. Peter Donovan from The Wandering Camper explains:
The body’s metabolism and heat production slow down when there’s insufficient fluid intake.
Experts suggest drinking about one liter of water every two hours during winter activities, but many campers fall short of this recommendation. Dehydration can also impair your cognitive abilities, making it harder to think clearly and make good decisions – something you don’t want to risk in the wilderness. If your water freezes and becomes inaccessible, whether due to a sealed bottle cap or a frozen hydration tube, you might have no choice but to cut your trip short for safety reasons.
Some might consider eating snow as a substitute for drinking water, but this can dangerously lower your core body temperature. Instead, it’s better to monitor your hydration by checking the color of your urine and drinking regularly, even if you don’t feel thirsty. In freezing conditions, thirst isn’t always a reliable signal that your body needs water.
Selecting Insulated Bottles and Containers
Top Insulated Water Bottle Options
When temperatures drop, the right water bottle can mean the difference between staying hydrated or wrestling with a solid block of ice. Double-wall vacuum insulated stainless steel bottles are the go-to choice for harsh cold. For example, the Yeti Rambler 36 oz ($50.00) is crafted from durable 18/8 stainless steel and boasts an impressive 4.7-star rating from over 12,000 reviews, with 93% of users recommending it. Similarly, Hydro Flask wide-mouth bottles perform exceptionally well, keeping liquids hot for hours when pre-filled with boiling water.
If you’re looking for something lighter, wide-mouth Tritan Nalgene bottles (32 oz, weighing just 6.2 oz) are a popular pick among winter campers. While they don’t have built-in insulation, they can safely handle boiling water without leaching chemicals. Pairing them with neoprene sleeves enhances their performance. Philip Werner, founder of SectionHiker, advises:
Use wide-mouth bottles, preferably white-mouth polyethylene bottles that can ‘take’ rapid temperature changes (pouring boiling water into a very cold bottle) without cracking.
Now, let’s explore the key features to look for when selecting insulated containers.
What to Look for in Insulated Containers
Wide-mouth containers are a smart choice for winter conditions. Their larger openings are less likely to freeze shut compared to narrow-neck designs.
Double-wall vacuum insulation is another crucial feature, as it helps retain heat for hours, even in sub-freezing temperatures. However, this type of insulation adds weight – a typical 18 oz vacuum-insulated stainless steel bottle weighs around 11.1 oz, compared to a lighter 32 oz Nalgene bottle at just 6.2 oz. If weight is a concern, single-wall titanium bottles are a great alternative. For example, a 25.3 oz titanium bottle weighs just 5.15 oz, though you’ll need an insulation sleeve since they lose heat faster.
Make sure your containers can handle boiling water safely. Pre-filling bottles with hot water is one of the most effective ways to prevent freezing. Standard hydration bladders, however, are a poor choice in extreme cold. Their thin hoses and valves freeze quickly. If hands-free hydration is a must, consider insulated bladder systems like the Hydrapak Hydrasleeve, which are designed to resist freezing.
How to Prevent Frozen Water Bottles in Extreme Cold (4k UHD)
Insulation Methods to Prevent Freezing
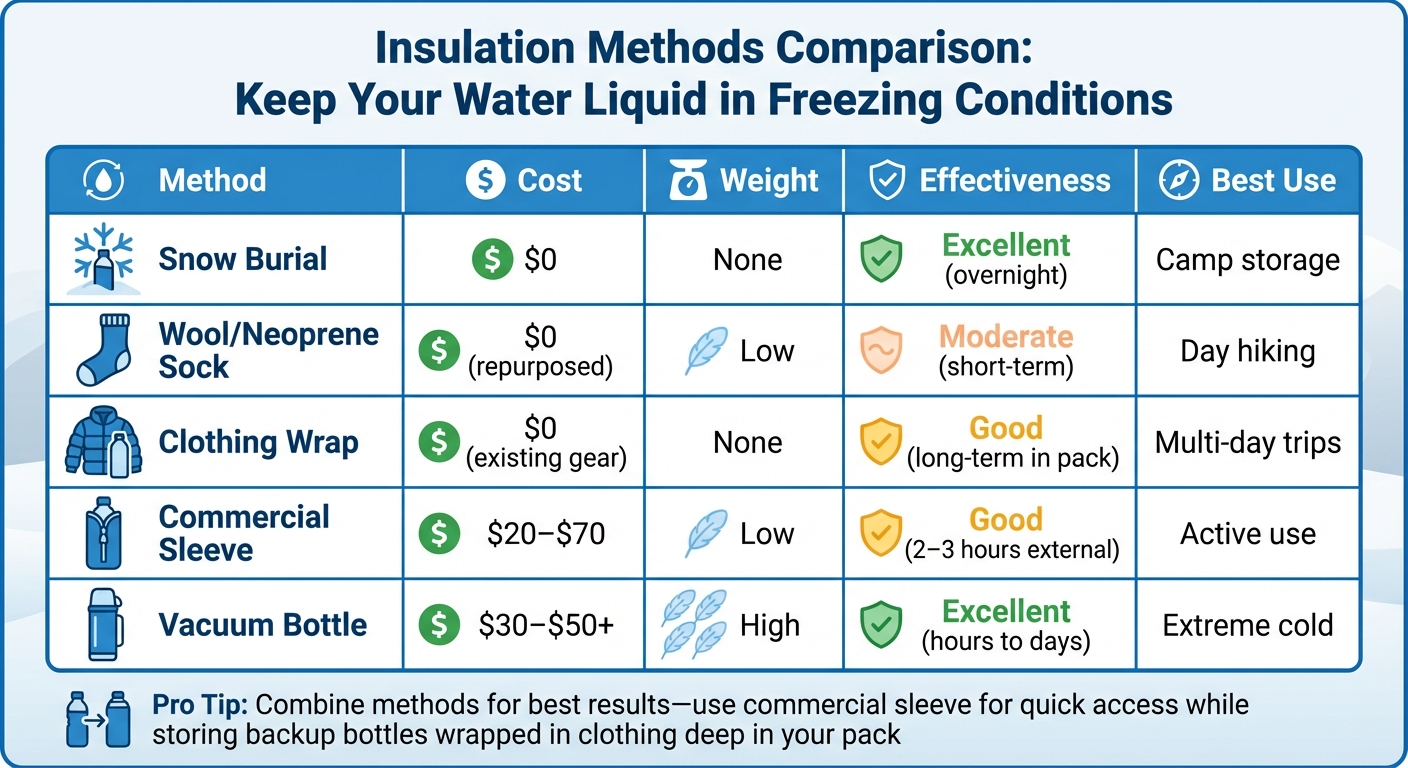
Comparison of Water Insulation Methods for Winter Camping
DIY Insulation Options
Once you’ve chosen the right container, the next step is to insulate it effectively to keep your water from freezing. Here are some simple, low-cost strategies you can try.
Repurposed materials can make excellent insulators. For instance, old wool socks or neoprene "river socks" (with the foot section cut off) can serve as makeshift bottle sleeves. Another option is neoprene wine totes, which you can often find at thrift stores and use to keep your bottles warm.
You can also wrap your bottles in insulated clothing, like a down jacket, and store them in your backpack to take advantage of your body heat. If you’re camping in the snow, bury your water containers about 10 inches beneath the surface to take advantage of snow’s natural insulating properties – even in temperatures as low as −60°F. As Philip Werner, founder of SectionHiker, points out:
Snow is an excellent insulator, and it will prevent your water from freezing overnight.
Another tip is to store bottles upside down and apply a thin layer of Vaseline to the threads to prevent the caps from freezing shut.
Commercial Insulators and Accessories
If you’re looking for added convenience and performance, commercial insulation products can complement your DIY efforts.
Neoprene bottle boots from brands like Forty Below are highly effective in extreme cold and high-altitude conditions. However, due to a global neoprene shortage, these specialized holders can be pricey. For a more affordable option, consider Nalgene’s 32-ounce insulated carriers. If you’re an ultralight backpacker, Hyperlite Mountain Gear offers "The Insulator" for around $70.
Keep in mind that most commercial sleeves are designed to keep water warm for 2–3 hours when carried externally. To extend this time, fill your bottles with boiling water before heading out. As Adam Roy, Editor in Chief at Backpacker, explains:
It’s simple physics: Hot water has to cool off before it can freeze.
That said, Roy also notes a drawback:
The downside: insulated bottles are generally bulkier and heavier than non-insulated ones, which can add a few more ounces to your pack.
Comparing Different Insulation Methods
Here’s a quick comparison of insulation methods based on cost, weight, and effectiveness:
| Method | Cost | Weight | Effectiveness | Best Use |
|---|---|---|---|---|
| Snow Burial | $0 | None | Excellent (overnight) | Camp storage |
| Wool/Neoprene Sock | $0 (repurposed) | Low | Moderate (short-term) | Day hiking |
| Clothing Wrap | $0 (existing gear) | None | Good (long-term in pack) | Multi-day trips |
| Commercial Sleeve | $20–$70 | Low | Good (2–3 hours external) | Active use |
| Vacuum Bottle | $30–$50+ | High | Excellent (hours to days) | Extreme cold |
For the best results, try combining methods. For example, use a commercial sleeve for quick access to one bottle while storing additional bottles deep in your pack, wrapped in spare clothing. This way, you’ll always have liquid water ready when you need it.
sbb-itb-5a98267
Storage Strategies for Cold Weather
Using Body Heat to Keep Water Warm
Your body heat can be a lifesaver when it comes to keeping water from freezing in cold weather. At night, the best way to keep your water liquid is by storing the bottles inside your sleeping bag. The combination of your body heat and the bag’s insulation works to maintain the water’s temperature through the night.
During the day, soft flasks are a better choice than hard-sided bottles – especially when kept close to your body. Adam Roy, Editor in Chief at Backpacker, suggests:
Instead of bringing a hard-sided bottle, use a soft flask and keep it inside your clothing, between your mid-layer and base layer, so your body heat keeps it warm as you move.
For even better results, tuck the flask into an inner jacket pocket or keep it pressed against your core.
When storing water bottles in your sleeping bag, double-check that the caps are tightly sealed to avoid leaks, which could lead to hypothermia. For an added bonus, fill a non-insulated stainless steel bottle with boiling water before bed. As Kristin Hostetter, Head of Sustainability at Outside Interactive, Inc., explains:
If you put a hot, non-insulated stainless steel water bottle in your sleeping bag at night, it will radiate heat like a sauna stone.
This method not only keeps your water from freezing but also warms your sleeping bag, creating a cozier rest.
If your hydration bladder hose freezes during the day, you can quickly thaw it by tucking the tube against your skin under your jacket. Another trick? Blow air back into the tube after each sip. This pushes water back into the reservoir, where it’s less likely to freeze.
Beyond using body heat, where you store your water significantly impacts its temperature.
Storing Water in Protected Areas
Where you stash your water can make all the difference. Water stored deep inside your backpack’s main compartment stays warmer compared to bottles left in outer side pockets. Philip Werner, Founder of SectionHiker, recommends:
Keep the rest of your water inside your backpack in an old wool sock or another insulated sleeve, nestled together with the extra insulated clothing you keep in your pack.
Inside your tent, the temperature is often slightly warmer than the outside air, offering a basic level of protection against freezing. To insulate bottles from the cold ground, place them on a foam pad or some extra gear.
Snow can also be a surprisingly effective insulator. Dig about 10 inches down and bury your water containers – this keeps them shielded from the colder air above. John Godino advises marking the spot for easy retrieval and suggests placing bottles in a stuff sack or plastic bag first to prevent ice from forming directly on them.
Hot Water and Backup Plans
Pre-Filling Bottles with Hot Water
Using boiling water to fill your bottles can delay freezing, giving you precious extra hours of drinkable water. Adam Roy, Editor in Chief at Backpacker, explains it best:
It’s simple physics: Hot water has to cool off before it can freeze. Pour hot water into your vessel in the morning, and instead of being frozen hours later, it will just be cool enough to drink.
Make sure to use bottles that can handle boiling temperatures, like wide-mouth Nalgene or HDPE bottles. Some plastics aren’t built for this and could melt or release chemicals when exposed to high heat. To keep the cap accessible, store bottles upside down so any ice forms at the bottom. A little trick: apply Vaseline or lip balm to the threads to stop the cap from freezing shut.
Want to make your hot water more appealing? Add a flavor packet – it’ll encourage you to hydrate throughout the day. Keep one bottle within easy reach, and pack the rest deep in your backpack, wrapped in extra clothing to help maintain the heat.
If hot water isn’t an option or you need a backup plan, melting snow can serve as a reliable way to get water in emergencies.
Melting Snow or Ice for Emergency Water
When your water supply freezes, turning to snow or ice can save the day. Start with a small amount of liquid water – known as "seed water" – to prevent the snow from scorching and developing an unpleasant taste. Gradually add snow as it melts to keep the process efficient. Keep in mind, though, that melting snow uses more fuel than boiling liquid water, so make sure to pack extra fuel canisters for winter adventures. To keep your stove stable and prevent it from sinking into the snow, place it on a piece of plywood or a specialized base.
Boiling is the most effective way to purify melted snow. The CDC advises boiling water for 1 minute at lower elevations, and for at least 3 minutes if you’re above 6,500 feet, to kill bacteria, viruses, and parasites like Cryptosporidium and Giardia. Chemical treatments like chlorine dioxide can also work, but be aware that cold water takes longer – about 30 minutes compared to 15 minutes in warmer conditions.
Before bed, melt enough snow to fill all your bottles so you’re ready to go in the morning. Here’s a pro tip: once melted, bury the bottles about 10 inches deep in the snow. The snow acts as insulation, keeping the water liquid even in extreme temperatures as low as -60°F.
Conclusion
Keeping water liquid in freezing conditions demands the right gear, proper insulation, and smart storage techniques. Wide-mouth bottles paired with insulation, like neoprene sleeves or even spare clothing, can help reduce the chances of freezing.
Storage matters just as much as gear. Store bottles upside down so the mouth stays accessible, even if ice forms. Use your body heat to your advantage – keep one bottle close by, such as inside your jacket during the day or at the foot of your sleeping bag at night. For longer storage, bury bottles about 10 inches deep in the snow. This keeps them insulated, even when temperatures drop as low as -60°F.
Filling bottles with hot water can slow freezing, and adding a light coating to the threads prevents the cap from sticking.
Don’t underestimate the risks of dehydration in winter. As Philip Werner, founder of SectionHiker, warns:
Dehydration accelerates hypothermia, which you want to avoid, in part because it makes you stupid. Bad decision-making and winter hiking don’t mix well.
Winter hikers need to consume 2–3 liters of water daily. If you’re melting snow for water, plan for extra fuel – about 5–8 ounces per person per day.
FAQs
What’s the best way to keep water bottles insulated in freezing temperatures?
To prevent your water bottles from freezing in cold weather, vacuum-insulated stainless steel bottles work incredibly well. Adding a layer of protection, like a bottle jacket or parka made from neoprene or foam, can make a big difference. For even more insulation, you can wrap the bottle in a wool or fleece sock. These materials are excellent at keeping heat in, helping to stop the water from freezing, even in below-zero temperatures.
How do I keep my hydration bladder from freezing during cold-weather camping?
When venturing out in freezing temperatures, keeping your hydration bladder from freezing is essential for staying hydrated. Here are some effective strategies to help:
- Fill it with warm water: Warm water naturally takes longer to freeze, giving you extra time before it starts to solidify.
- Add insulation: Wrap the bladder in a foam sleeve, neoprene cover, or even spare clothing to help retain heat and slow down freezing.
- Store it upside down: By flipping the bladder, any ice that forms will stay at the bottom, away from the hose and bite valve.
- Protect the hose: Run the drinking tube under your jacket or sleeping bag to keep it warm. After each sip, blow air back into the hose to clear out any remaining water and prevent freezing.
- Keep it close overnight: Place the bladder at the foot of your sleeping bag or inside a waterproof sack to maintain warmth while you sleep.
These straightforward tips can make all the difference in ensuring your water stays drinkable, even in freezing conditions.
Why should you store water bottles upside down when camping in freezing temperatures?
When you store water bottles upside down in freezing conditions, any ice that forms will settle at the bottom of the bottle rather than near the cap. This clever trick keeps the cap from freezing shut, so you can easily access your water when needed. It’s a straightforward way to make sure you stay hydrated during those chilly camping adventures.