
Adventure photography isn’t just about taking pictures of beautiful places. It’s about creating a story that captures emotions, challenges, and the journey itself. Here’s how to make your photos stand out:
- Plan your story: Decide on a theme or emotion to guide your shots. Whether it’s perseverance on a tough trail or the calm of a campsite, keep your focus clear.
- Research your location: Understand the terrain, lighting, and weather to anticipate key moments and find the best angles.
- Document the entire journey: Start with preparation, capture the travel, and include the return to create a complete narrative.
- Master composition: Use techniques like the rule of thirds and leading lines to guide the viewer’s eye and add depth to your shots.
- Play with light: Take advantage of natural light at different times of the day to set the mood, and don’t shy away from dramatic weather.
- Include people: Adding human elements provides scale and emotion, making your photos more relatable.
- Mix wide shots and close-ups: Balance sweeping landscapes with detailed, intimate moments to keep your series engaging.
Improve Your Photography Storytelling: Jonny Roams’ 5 Tips
Planning Your Adventure Photo Story
Turning raw moments into a cohesive adventure narrative starts with thoughtful planning. Adventure photography isn’t just about snapping random outdoor shots; it’s about crafting a story. The difference between a collection of images and a compelling photo story lies in the groundwork you do before you even pick up your camera. This preparation lays the foundation for the techniques we’ll explore later.
Planning Your Story Before You Shoot
Every great adventure photo story begins with a clear vision. Before you head out on your next hike, camping trip, or outdoor journey, take a moment to define the story you want to tell. What’s the deeper narrative connecting your images?
Decide what emotion or experience you want to convey. Are you capturing the grit of tackling a tough trail? The serenity of a remote campsite? Or maybe the camaraderie of a shared adventure? Your theme will act as the thread that ties your story together.
"Emotion lies at the core of a compelling storytelling in adventure photography." – Robert Massey
Themes that resonate with your personal experience often work best. For instance, if you’re escaping city life for the wilderness, you could explore the contrast between urban and rural environments. Or, if your trip is about self-discovery, you might focus on moments of reflection and personal growth in nature.
Your subject is the heart of your story. Whether it’s you, your travel companions, or the landscape itself, the subject should embody the narrative you’re trying to share. Consider how your subject interacts with the environment and which moments will best highlight their role in your adventure.
Keep it simple. Stick to one clear theme to guide your shots. A focused approach will make your photo series feel more cohesive and impactful compared to a collection of unrelated images.
Researching Locations and Key Moments
Preparation is key to successful adventure photography. Knowing your destination inside and out helps you capture its essence and anticipate those unforgettable moments.
Understand the terrain, climate, and lighting conditions. A mountain hike presents different challenges compared to a desert trek or a coastal adventure, and each requires its own set of preparations. Knowing the environment ensures you’re ready to position yourself for the best shots.
"Good shots don’t just happen spur of the moment… The output equals the amount of work that goes into it. If I’m going anywhere, I plan my shots before I leave the house, even if I’m just going 15 minutes down the road." – Peter Baumgarten, Olympus Visionary
Pay attention to weather patterns. Beyond safety, weather can dramatically influence your photos. Storm clouds might create a moody backdrop, while clear skies could be ideal for capturing a sunrise. Researching seasonal changes can also help you time your visit for the most striking visuals.
Look for standout features like waterfalls, rock formations, or scenic viewpoints to enrich your story. These elements often become the focal points of your images, adding depth and interest. Seek out natural frames or leading lines in the landscape to enhance your compositions.
Add a human element to your story. Learning about local traditions, history, or conservation efforts can give your photos added meaning. Understanding how people interact with the landscape can inspire unique storytelling opportunities.
Create a flexible shot list. Map out potential sunrise or sunset locations, interesting foreground elements, and spots where your subjects can interact with the environment. Mark these on a physical map, along with notes about the best times and angles for each shot.
Photographing the Complete Journey
An adventure story doesn’t start when you reach your destination – it begins the moment you decide to go. Capturing the entire journey creates a richer narrative that draws viewers into the full experience.
Document the preparation phase. Show the process of packing gear, studying maps, or setting out early in the morning. These behind-the-scenes moments provide context and make your story more relatable.
The journey itself offers plenty of storytelling opportunities. Whether it’s winding mountain roads, hiking trails, or paddling across a lake, these transitional moments show the progression of your adventure. They connect everyday life to the extraordinary destination.
Focus on the small details. Sometimes, it’s the little things – muddy boots after a long hike, hands gripping trekking poles, or the glow of a campfire on tired faces – that carry the most emotional weight. These intimate moments add depth and relatability to your story.
"Adventure photography is so often about just seizing the right moment." – Robert Massey
Think about the emotional arc of your journey. The excitement of the beginning, the challenges along the way, and the satisfaction at the end all create natural story beats that keep viewers engaged.
Don’t overlook the return journey. Capturing the quiet moments of reflection, the tired but happy faces, or the unpacking of gear adds resolution to your visual narrative. These closing shots bring your story full circle.
While planning is essential, some of the best moments come unexpectedly. Stay open to spontaneous opportunities that might better capture the essence of your adventure than anything on your shot list. The goal is to tell an authentic story, blending both your planned and unplanned shots into a seamless narrative.
Photography Techniques for Better Storytelling
Once you’ve planned your shots, it’s time to bring your vision to life. These techniques can help you create images that don’t just document your journey but also pull viewers into the experience.
Using Composition to Tell Your Story
Good composition is at the heart of impactful adventure photography. Two tried-and-true techniques – the rule of thirds and leading lines – can transform your photos into compelling visual stories.
The rule of thirds involves dividing your frame into nine equal sections and placing key elements along the intersections. This approach creates balance and makes your images more dynamic. For instance, instead of centering a mountain peak, position it along the top third of your frame. Similarly, placing a hiker at one of the intersections naturally draws the viewer’s eye through the scene.
Leading lines, whether natural or man-made, guide the viewer’s gaze to your subject. Think of a winding trail leading to a distant summit or a flowing river pointing toward a waterfall. The trick is to ensure these lines direct attention to your subject, not away from it.
"Leading lines are a compositional technique where human-made or natural lines lead the viewer’s eyes through a photograph to the subject or the heart of the image…They can be very noticeable or they can be quite subtle." – Lukas Kosslow, Photographer
"Leading lines can be anything. They can be a road or a line of trees leading you somewhere. They can be people and repetitive objects, like railroad tracks." – Felipe Silva, Photographer
Before committing to a shot, take quick test photos with your phone from different angles. This helps you identify the strongest lines and refine your composition. Once you’ve nailed the framing, the next step is to work with light to enhance your story.
Using Light and Mood in Adventure Photos
Light is a powerful storytelling tool that adds mood and texture to your photos. The same scene can look completely different depending on the time of day or weather conditions. Understanding how to use natural light can elevate your images from simple snapshots to emotionally rich narratives.
Natural light is constantly changing, offering endless opportunities to shape your story. For example, golden hour – the soft light just after sunrise or before sunset – brings out textures and adds warmth, making it perfect for capturing rugged landscapes or the weathered faces of adventurers. On the other hand, post-sunset tones can evoke a sense of calm, ideal for reflecting on the end of a long day.
Take the Visual Wilderness team’s trip to Mauna Kea, Hawaii, as an example. As they climbed from sea level to the summit at nearly 14,000 feet, they captured volcanic craters under a setting sun. Within moments, the light shifted from warm golden hues to soft pastels, creating entirely different moods. One photographer used the golden light to highlight textures, while another focused on the gentle tones after sunset.
Don’t shy away from challenging weather – it can add drama to your shots. Stormy skies create striking contrasts, while fog or mist can transform a scene into something almost otherworldly. Even overcast days provide soft, diffused light, which is excellent for portraits. Experiment with tools like reflectors to bounce light or play with shadows for unique effects. Visit your locations at different times of day to see how the light interacts with the landscape, and adjust your camera settings accordingly.
With your composition and lighting set, the final step is adding people to bring an emotional depth to your photos.
Adding People to Your Photos
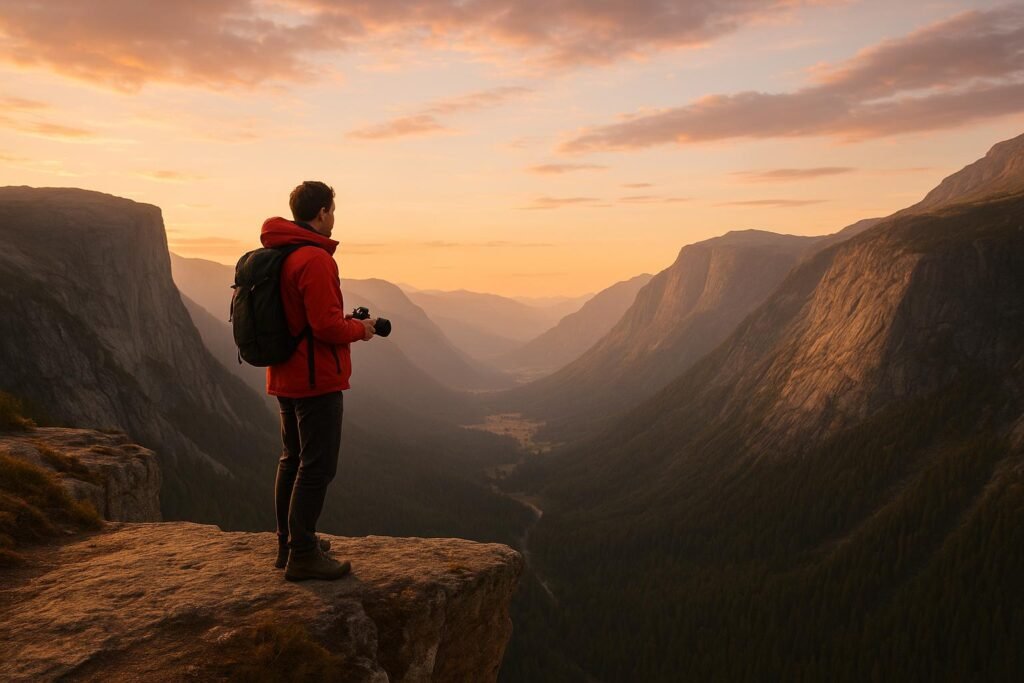
Including people in your adventure photos not only adds a human element but also gives viewers a sense of scale, making vast landscapes feel even more awe-inspiring. A lone figure on a mountain ridge or a group gathered around a campfire can turn a beautiful scene into a relatable story.
The key is to capture authentic moments rather than staged poses. Think of the exhaustion after a challenging climb, the joy of reaching a summit, or the quiet reflection at a scenic overlook. These moments invite your audience to step into the adventure with you.
Where you place people in your frame matters. A hiker silhouetted against a sunrise, a kayaker navigating rapids, or climbers scaling a rock face – all of these compositions guide the viewer’s eye and enrich the narrative. For the most emotional impact, focus on the eyes to capture genuine expressions.
The setting also plays a crucial role. A lone figure against an expansive mountain range tells a very different story than a group huddled in a tent during a storm. Each scenario requires thoughtful composition and timing to capture the essence of the moment.
sbb-itb-5a98267
Creating a Connected Adventure Photo Series
Bring your adventure to life by tying individual shots into a seamless story. A well-structured photo series keeps viewers engaged, taking them along for the journey from start to finish.
Building a Themed Photo Series
The backbone of any great adventure photo series is a clear and consistent theme. This theme acts as the glue that holds your story together, ensuring every image feels like part of a bigger picture.
Activity-based themes are a natural fit for adventure photography. For instance, a rock climbing series could follow the journey from gearing up at the base to the triumphant moment at the summit. Similarly, a backpacking series might highlight the evolving scenery – from trailhead forests to breathtaking mountain vistas. Each photo should not only fit the theme but also maintain a consistent style to create a smooth flow.
Location-based themes focus on showcasing the transformation of a single place throughout your adventure. Imagine documenting a mountain journey: begin with the dense forest at its base, move through the rugged, rocky ascent, and finish with the sweeping view from the peak. This approach captures both the physical and emotional evolution of the experience.
Mood-based themes dive into the emotions of the journey. Highlight moments like the peaceful solitude of a remote campsite, the bonds formed through shared challenges, or the joy of conquering obstacles. Remember, not every technically perfect shot belongs in the series – each image should contribute meaningfully to the story you’re telling.
Once your theme is set, you can explore different types of shots to add depth to your narrative.
Mixing Wide Shots and Close-ups
A balance of wide and close-up shots keeps your series dynamic and visually interesting. It’s like giving your audience a mix of sweeping vistas and intimate details, allowing them to experience the adventure from multiple perspectives.
Wide shots are perfect for setting the scene. They capture the grandeur of landscapes and the scale of the adventure, showing where the story unfolds. These shots answer the “where” and often become the dramatic highlights of the series.
Close-ups, on the other hand, bring out the finer details and emotions. They reveal the grit of weathered hands gripping a rope, the steam curling from a hot drink on a chilly morning, or the determination etched on a climber’s face. Alternating between wide shots and close-ups creates a natural rhythm, echoing how we experience the world around us. Wide shots give space to reflect, while close-ups draw viewers into the heart of the action.
Adding Captions and Text to Your Photos
Even the most striking photos can benefit from thoughtful captions. A well-written caption provides context that the image alone might not convey, deepening the viewer’s connection to your story.
Instead of generic descriptions like "View from the top", try something more vivid: "After 12 hours of climbing through dense fog, the summit finally appeared." Captions can also include technical details or location specifics to highlight the scale of the adventure.
Beyond facts, captions are a chance to share the human side of your journey. Describe the sound of the wind battering your tent at 3 AM or the rush of joy as the first rays of sunlight broke through the clouds. Mixing factual and personal captions creates a conversational tone, making your series feel more relatable and immersive.
Gear and Resources for Adventure Photography
When it comes to adventure photography, having the right gear can make all the difference. It’s not about owning the priciest equipment – it’s about choosing tools that are reliable, durable, and capable of capturing the essence of your outdoor experiences, even in tough conditions.
Essential Photography Gear
Your camera is the heart of your setup. Weather-sealed mirrorless models are a great choice for outdoor photography. For instance, the Sony A7IV delivers excellent image quality in a compact form, while the Sony A6600 is a solid option for those on a budget. If you’re after stunning detail in landscapes, the Sony A7RV is a fantastic pick.
Lenses are just as important. A versatile selection includes:
- Wide-angle zooms for expansive landscapes (e.g., Sony 16-35mm f/2.8 GM)
- Mid-range zooms for everyday shots (e.g., Sony 24-70mm f/2.8 GM II)
- Telephoto lenses for distant subjects (e.g., Sony 70-200mm f/4 G)
"Adventure photography requires that you have the right equipment rather than just a lot of expensive gear. It would help if you had tools that you can use to produce epic photos of an adventure." – Marc Bergreen, Photographer
A lightweight tripod is a must for long exposures, low-light conditions, and self-portraits. Models like the Manfrotto Element MII Series are durable, weather-resistant, and easy to carry on hikes.
Keeping your gear powered is crucial, especially on multi-day shoots. Pack extra batteries and a high-capacity power bank, like the Tether Tools ONsite 150W 25600mAh USB-C PD Battery Pack, to stay charged when you’re off the grid.
Backing up your photos is just as important as taking them. Portable SSDs are faster and more durable than traditional hard drives. Stick to the 3-2-1 backup strategy: three copies of your files, two on different types of media, and one stored offsite.
Once your main gear is sorted, don’t forget the accessories that protect and complement your equipment.
Accessories for Outdoor Adventures
Outdoor photography can be rough on your gear, so protective accessories are essential. Weather-sealed memory cards can handle moisture, extreme temperatures, and impacts better than standard ones. For extra protection, hard cases like the Nanuk 915 ($104.95) shield your gear from rain, river crossings, or unexpected storms.
A good camera backpack is a game-changer, offering both protection and easy access to your gear. Options like the Shimoda Action X30 and Explore V2 30L feature compartments designed specifically for cameras and other essentials.
"The trick to being able to hike efficiently and also take pictures is to have an accessible camera." – Brenda Bergreen, Colorado wedding photographer
Lens filters are another valuable tool. A circular polarizer can reduce glare and enhance colors, while neutral density filters are perfect for creating smooth water effects or dynamic skies. UV filters provide basic lens protection without affecting image quality.
Don’t overlook the small but important items. A headlamp and first aid kit are essential for safety. Keep your lenses clean with microfiber cloths, lens pens, and cleaning solutions, especially in dusty or wet environments. And if you’re shooting in cold weather, photography gloves will keep your hands warm without sacrificing control of your camera.
With your gear and accessories ready, it’s time to focus on refining your craft.
Learning and Inspiration from Adventurism.co
Adventurism.co is a treasure trove of tips and insights for adventure photographers. It’s not just about taking pictures – it’s about telling stories that connect emotionally with your audience. The platform offers guidance on planning your shoots, from capturing wide establishing shots to focusing on candid moments that reveal the human side of your journey.
Their gear recommendations prioritize practicality over cost, helping you choose equipment that simplifies your process while enhancing your work. Beyond the technical advice, Adventurism.co emphasizes responsible photography. They encourage an ethic of “taking only pictures and leaving only footprints,” ensuring the natural beauty you photograph remains untouched for others to enjoy.
Whether you’re into hiking, camping, kayaking, or fishing, Adventurism.co provides inspiration for a variety of outdoor adventures. By pairing the right gear with thoughtful planning and ethical practices, you’ll be equipped to create authentic, unforgettable photo stories.
Conclusion: Creating Lasting Memories Through Adventure Photography
Adventure photography is more than just snapping photos of where you’ve been – it’s about freezing emotions, experiences, and stories that make each journey unforgettable. By combining thoughtful planning, strong composition, skillful use of light, and perfect timing, you can turn outdoor moments into visual narratives that resonate deeply.
Every shot should reflect a purpose and evoke a feeling. These strategies work together to create a connection between your images and your audience. As Alan Ranger aptly puts it, "Storytelling in photography is a vocabulary that is uniquely yours to speak." Your perspective is what makes your work stand out, so let your personality shine through every frame. And don’t shy away from mistakes – they often lead to unexpected discoveries.
Think about the determination etched on a hiker’s face during a grueling ascent, the serene calm of a campsite at dawn, or the sheer joy of reaching a breathtaking summit. These raw, authentic moments are what draw viewers into your story, making them feel like they’re right there with you.
On your next adventure, take a moment to pause and truly observe your surroundings. Experiment with different angles, capture sweeping landscapes, and focus on the small, intimate details that tell a bigger story.
Through your lens, you have the power to inspire others to explore the outdoors and preserve memories that last a lifetime. Each trail, every sunrise, and all the moments in between are opportunities to create storytelling that truly matters.
FAQs
How can I use people in my adventure photos to tell better stories?
Including people in your adventure photos adds a layer of connection and makes your storytelling more engaging. Capture real moments – someone hiking a steep trail, pitching a tent, or soaking in the serenity by a lake. These interactions with nature create a sense of depth and context.
Candid shots are often the most impactful. Keep an eye out for natural expressions or unplanned actions that show the human bond with the adventure. By presenting the experience from a personal perspective, you can create a narrative that draws viewers in and makes your outdoor stories feel alive.
What are the best times and locations to capture dramatic lighting in adventure photography?
Capturing dramatic lighting in your adventure photos often comes down to timing. The golden hours – those magical moments shortly after sunrise or just before sunset – offer soft, warm light that adds depth and richness to your shots. If you’re after a cooler, more dreamlike vibe, try shooting during the blue hour, which happens just before sunrise or right after sunset. This light can give your photos an otherworldly touch.
Location matters just as much as timing. Think about how the sun interacts with the landscape. East-facing scenes glow beautifully in the morning light, while west-facing views come alive in the late afternoon. A little planning to align your location with the direction of the light can make the difference between a good photo and a breathtaking one.
How can I create a cohesive story with my adventure photos?
To tell a compelling story with your adventure photos, it’s a good idea to plan your narrative ahead of time. Think about the key moments you want to showcase – like the start of your journey, those unforgettable experiences along the way, and how it all wraps up.
When you’re taking photos, mix up your angles and perspectives to keep things interesting. Use wide shots to establish the setting, medium shots to add context, and close-ups to capture the little details and raw emotions. This variety will add depth and keep viewers engaged.
Once you have your shots, pay attention to how you arrange them. The sequence should feel natural, leading the viewer through your adventure step by step. Also, aim for consistency in lighting, colors, and tone across your photos – it helps everything feel connected and polished.