
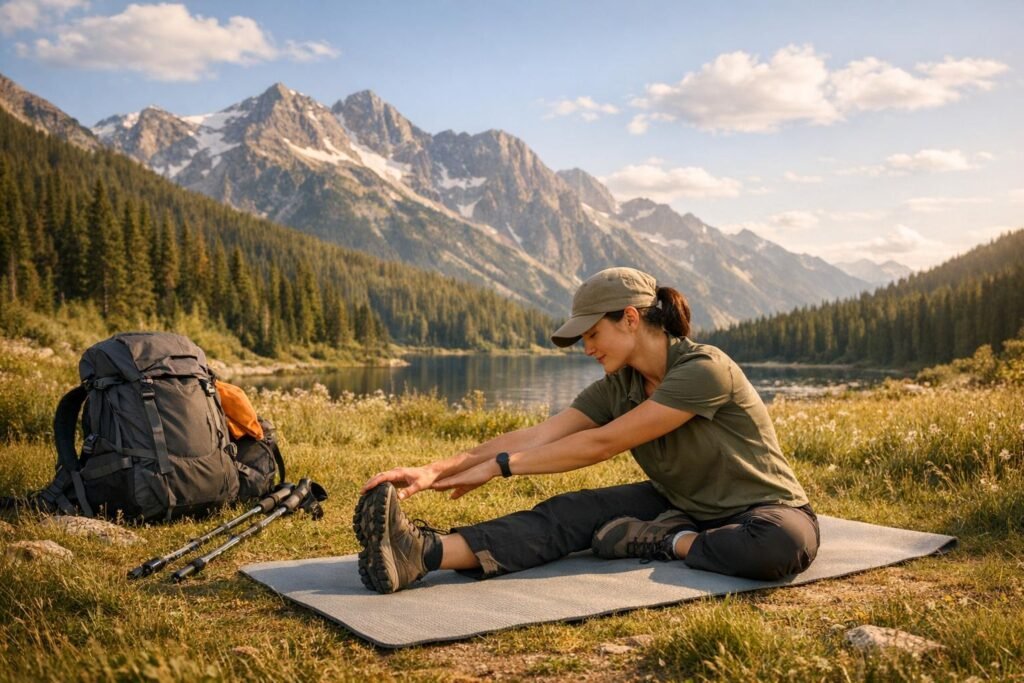
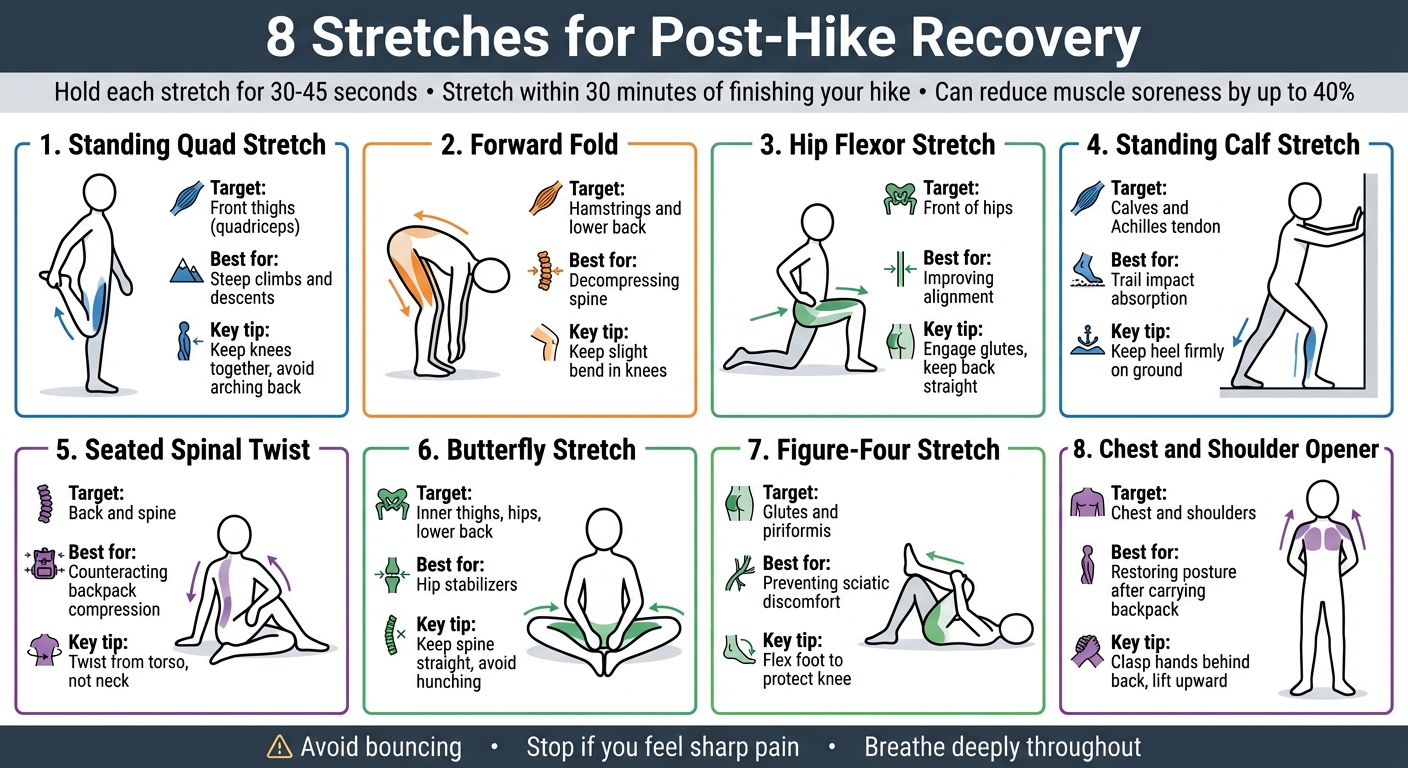
After a long hike, your muscles need care to recover faster and reduce soreness. Stretching within 30 minutes of finishing your hike can help ease tension, improve blood flow, and prevent stiffness. Here are eight stretches you can use to target key muscle groups:
- Standing Quad Stretch: Relieves tension in your thighs, essential after steep climbs and descents.
- Forward Fold: Loosens tight hamstrings and decompresses the lower back.
- Hip Flexor Stretch: Eases tightness in the hips and improves alignment.
- Standing Calf Stretch: Targets calves and Achilles, which absorb trail impact.
- Seated Spinal Twist: Relaxes the back and counteracts post-hike compression.
- Butterfly Stretch: Focuses on inner thighs, hips, and lower back.
- Figure-Four Stretch: Releases tension in glutes and prevents sciatic discomfort.
- Chest and Shoulder Opener: Restores posture after carrying a backpack.
Hold each stretch for 30–45 seconds, breathing deeply. Avoid bouncing and stop if you feel sharp pain. These simple stretches can cut muscle soreness by up to 40% and help you stay ready for your next adventure.
8 Essential Post-Hike Stretches for Muscle Recovery
Post-Hike Stretches to Prevent Soreness
1. Standing Quad Stretch
Your quadriceps – the muscles at the front of your thighs – do a lot of heavy lifting during a hike. They power you through steep climbs and keep you steady on the way down. Because of this, they’re often sore after a tough trek.
To stretch them out, stand tall and shift your weight onto one foot. Use something sturdy like a tree, car, or trekking pole for balance. Reach back with the hand on the same side and grab your opposite ankle. Slowly pull your heel toward your glutes until you feel a stretch along the front of your thigh. Make sure your knees stay close together and avoid letting them flare outward.
Keep your core engaged to maintain an upright posture and avoid arching your lower back. For a deeper stretch, gently push your hips forward. Hold the position for 30 to 45 seconds, repeating 2 to 4 times on each leg.
"Don’t bounce, as this can strain muscles." – Washington Trails Association
If grabbing your ankle feels uncomfortable, loop a towel or strap around your foot for assistance. And remember, if you feel sharp pain, ease off immediately. Stretching helps boost blood flow to tired muscles, delivering the oxygen and nutrients they need to recover quicker. Once you’ve loosened up your quads, move on to the next stretch to keep your lower body balanced.
2. Forward Fold for Hamstrings
After a long hike, your hamstrings might feel stiff and tight from all those uphill climbs and steep descents. That’s why giving them some extra care during recovery is so important. The Forward Fold stretch not only helps release tightness in your hamstrings but also decompresses your spine and eases tension in your lower back – perfect prep for your next outdoor adventure.
To get started, stand with your feet hip-width apart. Hinge forward at your hips, keeping your back straight – don’t let it round – and add a slight bend to your knees to protect your joints. Gently reach your hands toward your toes, shins, or the floor, depending on your flexibility. As you hold the position, gradually straighten your legs to deepen the stretch. Focus on deep, steady breaths; with every exhale, try to sink just a little lower.
"Since hiking can cause the hamstrings to tighten into what feel like iron ropes, it’s essential to stretch for flexibility and stability."
- Kate Pitts, Backcountry Ranger and Yoga Teacher
Hold this pose for 30 to 45 seconds, giving your muscles time to relax and lengthen. For a slight variation, try the Rag Doll version: grab your opposite elbows and let your head hang heavy, which can also help release tension in your neck and shoulders. If you’re feeling tightness in your outer hips, cross one foot over the other before folding – this tweak will stretch your IT band along with your hamstrings.
When you’re ready to come out of the stretch, bend your knees slightly and roll up slowly through your spine to avoid dizziness. For the best results, try doing this stretch within 30 minutes of finishing your hike while your muscles are still warm – it can reduce muscle soreness by up to 40%. Now, it’s time to move on to the next stretch to keep your recovery on track.
3. Hip Flexor Stretch
Your hip flexors put in a lot of work during hikes, especially when you’re tackling steep trails or navigating uneven ground. These muscles are responsible for lifting your legs with each step, and after hours of activity, they can become tight and stiff. When this happens, it might throw off your pelvic alignment, lead to lower back discomfort, or even weaken your core.
To try the half-kneeling hip flexor stretch, start by kneeling on one knee while placing the other foot flat on the ground in front of you, creating a 90-degree angle. Keep your back straight and activate your glutes to avoid arching your lower back. Gently shift your weight forward until you feel a stretch in the front of your hip. This movement not only helps your hips recover but also pairs well with the lower-body exercises mentioned earlier.
"If certain muscles are weak, including the core, glutes, or piriformis… it forces the hip flexors to take over some of the job of stabilizing the spine and pelvis, leading the already overworked hip flexors to stiffen."
- Kimberly Baptiste-Mbadiwe, Physical Therapist, HSS Orthopedic Physical Therapy Center
Hold this position for 30 to 45 seconds, taking deep breaths to help relax the muscles. For an added challenge, lift the arm on the side of your kneeling leg toward the ceiling and lean slightly in the opposite direction. Repeat the stretch 2 to 3 times on each leg. If kneeling feels uncomfortable, try lying on a bench with one leg hanging off the edge while pulling the opposite knee toward your chest.
Be mindful of your form – avoid arching your lower back or letting your stomach drop, as this can diminish the stretch’s effectiveness. Keeping your torso upright and engaging your glutes ensures proper alignment. Stretching while your muscles are still warm enhances circulation, helping to deliver the oxygen and nutrients your body needs for recovery.
4. Standing Calf Stretch
Your calves take on a lot during steep climbs and descents. They absorb most of the impact with every step, which is why tight calves are often the #1 reason hikers feel sore the next day. Stretching them properly within 30 minutes after your hike can make a big difference in how your legs feel the following morning.
To do a standing calf stretch, find something sturdy like a tree, your car, or a trailhead sign to use for support. Step one foot back, keeping that heel firmly on the ground and the leg straight. Lean into the stretch by bending your front knee until you feel a steady pull in your calf. This position focuses on the gastrocnemius, the larger muscle that gives your calf its rounded shape.
"The calves bear the brunt of the trail effort and can be especially painful when changing the length of your stride." – Lisa Slutsken, Educator and Thru-hiker
For a deeper stretch that targets the soleus muscle and the Achilles tendon, slightly bend your back knee while keeping the heel pressed into the ground. This adjustment shifts the stretch lower, closer to your heel. Hold each position for 30 to 45 seconds, repeating 2 to 4 times per leg. Remember to breathe deeply and avoid bouncing – sudden movements can strain or tear muscle fibers.
Keep your upper body upright and your hips squared forward throughout the stretch. If you feel sharp pain, ease off until it’s just a gentle pull. This simple routine helps your calves recover faster. Once you’ve finished, you’re ready to move on to the next stretch to keep easing that post-hike tension.
sbb-itb-5a98267
5. Seated Spinal Twist
Carrying a heavy backpack can compress your spine and tighten back muscles, leading to discomfort. The seated spinal twist helps counteract this "backpack posture" by promoting spinal rotation and guiding your body back to a neutral alignment. This stretch specifically targets the quadratus lumborum (QL) – a deep back muscle often responsible for lower back pain after intense hiking. Here’s how to perform this stretch effectively.
Begin by sitting on the ground with your legs extended straight in front of you. Bend one knee and place that foot flat on the floor, just outside the opposite knee. Take a deep breath and sit up tall, lengthening your spine before initiating the twist. Place one hand on the floor behind you for support, and wrap your opposite arm around the bent knee. As you twist, focus on engaging your core – let the movement come from your torso rather than straining your neck.
"Gentle twisting stretches can relieve muscle tension and ‘stretch common pain points in your low back.’ There’s a lot of muscles that support your lower spine that are stretched by doing this exercise." – Dr. Melissa Leber, Associate Professor of Orthopedics, Mount Sinai
Breathe deeply as you hold the pose. On each inhale, lengthen your spine; on each exhale, deepen the twist. Hold the position for 30 seconds on each side, ensuring your sitting bones stay firmly grounded. If tight hips make it difficult to cross your legs, keep the bottom leg extended straight and cross the other foot over it. This twist not only eases tension in your back and shoulders but also stretches your glutes and hips, which can stiffen from the repetitive movements of hiking.
6. Butterfly Stretch for Inner Thighs
Hiking, especially on uneven trails, puts your inner thighs and hips to work. Every step on rocky paths or steep inclines calls for stabilization, relying on smaller muscles like your adductors and hip stabilizers to keep you steady. The Butterfly Stretch is a simple yet effective way to target these areas, focusing on your hips, inner thighs, groin, and lower back all at once.
To try it, sit on the ground with the soles of your feet pressed together, pulling them toward your groin. Sit tall with your spine straight and your feet touching. Next, hinge forward from your hips and gently press your knees downward using your elbows. Be mindful of your posture – keep your back straight and avoid hunching your shoulders. If tight hips make this position challenging and your knees are raised, sit on a folded blanket to adjust your pelvis forward.
"The Butterfly Stretch focuses on stretching your hips, inner thighs, groin, and lower back making it a great hiking stretch!" – Nichole the Nomad
Hold the stretch for at least 30 seconds, breathing deeply as you go. On each inhale, lengthen your spine; on each exhale, relax deeper into the stretch. Doing this stretch right after your hike – while your muscles are still warm – can help ward off the stiffness that tends to set in a day or two later. Ready to keep easing that post-hike tension? Move on to the next stretch.
7. Figure-Four Stretch for Glutes
Your glutes and piriformis muscles do a lot of heavy lifting during a hike, helping you power uphill and control your descent. The Figure-Four Stretch is designed to target these deep muscles, along with other hip rotators that keep you steady on uneven terrain. When the piriformis tightens up, it can irritate the sciatic nerve, leading to discomfort in your hips or buttocks. This stretch helps keep those muscles loose and reduces the chance of that persistent ache.
"Keeping the piriformis mobile can reduce irritation or compression of the sciatic nerve." – Tom Biggart, Physical Therapist and Strength Coach
For the lying version (which provides the deepest stretch), start by lying on your back with both feet flat on the ground. Cross your right ankle over your left knee, making sure to flex your right foot to protect the knee joint. Reach through your legs and grab either the back of your left thigh or the front of your left shin. Gently pull your left knee toward your chest until you feel the stretch in your right glute. Hold this position for 30 to 45 seconds, breathing deeply, and then switch sides.
If lying down isn’t convenient, you can try a standing or seated variation. For the standing version, balance on one leg (use a trekking pole, tree, or vehicle for support if needed). Place the outside of your ankle on the opposite knee, then bend your supporting leg as if sitting into an invisible chair. For the seated version, sit on a tailgate or bench, cross one ankle over the opposite knee, keep your back straight, and hinge forward at your hips to deepen the stretch.
Take slow, deep breaths as you hold the stretch. By making stretching a regular part of your post-hike recovery routine, you can reduce muscle soreness by up to 40%.
8. Chest and Shoulder Opener
Carrying a heavy backpack and using trekking poles can leave your chest, shoulders, and upper back feeling tight, often encouraging a slouched posture. The Chest and Shoulder Opener is designed to help you counteract this by restoring a neutral, upright position.
Here’s how to ease that tension:
"As the shoulders round forward, the pec major shortens and tightens. Try this to stretch your chest muscles, which can also help improve your breathing." – Dan Pulsifer, Certified Fitness Trainer
Start by standing with your feet hip-width apart. Reach both hands behind your back, clasp your fingers together, and straighten your arms. Slowly lift your hands upward until you feel a stretch across your chest. Hold this position, taking deep breaths. Another option: press your palms against your glutes, pull your elbows toward each other, and tilt your head upward.
If you’re outdoors, a tree or trekking pole can come in handy. Press your palm and forearm against the tree trunk, then rotate your hips and opposite shoulder away from it to deepen the stretch. Alternatively, grab a trekking pole with a wide grip at chest height, push it overhead, and gently pull your shoulder blades back as you lower the pole behind your head. These variations not only stretch your chest but also prepare your upper body for recovery.
Conclusion
These eight stretches are a simple yet effective way to support your recovery after a hike. By sticking to regular recovery habits, you can ease muscle soreness and set yourself up for long-term hiking success. Aim to do your stretches within 30 minutes of finishing your hike, while your muscles are still warm – doing them right at the trailhead before heading home is even better.
Don’t wait too long to stretch – Delayed Onset Muscle Soreness (DOMS) typically peaks 24 to 48 hours after your hike. A quick 5–10 minute routine can improve your flexibility, lower the risk of injuries, and even enhance your overall performance on the trail.
Whether you’re heading out for a quick day hike or a multi-day trek, consistency is what makes the difference. Taking care of your muscles and tendons not only helps prevent chronic injuries but also ensures you maintain the mobility needed for tackling challenging trails. Use these recovery techniques to keep exploring the outdoors with confidence. For more tips on recovery, training, and hiking strategies, check out Adventurism.co – your go-to resource for staying strong and ready for every adventure.
FAQs
Why should you stretch within 30 minutes of finishing a hike?
Stretching within 30 minutes after a hike is important because your muscles are still warm, making the stretches more effective. It boosts blood circulation, eases muscle tightness, and helps reduce soreness. Plus, it can lower the risk of injuries and promote faster recovery, getting you ready for your next adventure.
How can I adjust stretches if I have tight hips or limited flexibility?
If your hips feel tight or your flexibility is limited, you can still make the most out of post-hike stretches with a few simple tweaks. Begin with a gentle warm-up to get your blood flowing – try slow leg swings or hip circles to loosen up before diving into stretches. When working on hip-focused movements, keep a slight bend in your knee and use a sturdy surface like a bench or yoga block for support. This helps ease strain while still effectively stretching your muscles.
For deeper stretches, adjust the pose to suit your comfort. Take a low lunge, for instance – rest your back knee on a cushion for extra support or use a strap to gently guide your front foot closer. Hold each stretch for 20–30 seconds and repeat 2–3 times on both sides. Remember to breathe deeply and steadily, and avoid forcing yourself into any sharp pain. The goal is to feel a gentle stretch, not discomfort. With these modifications, you’ll gradually improve your flexibility and help your body recover better after hiking.
What should I do if I feel sharp pain while stretching?
If you feel a sharp pain while stretching, stop right away and carefully return to a neutral position. Sharp pain could signal an injury or strain, so it’s crucial not to push through it. If the discomfort continues or gets worse, reach out to a doctor or a licensed healthcare provider for an evaluation. Pay attention to your body and make safety your top priority during recovery.