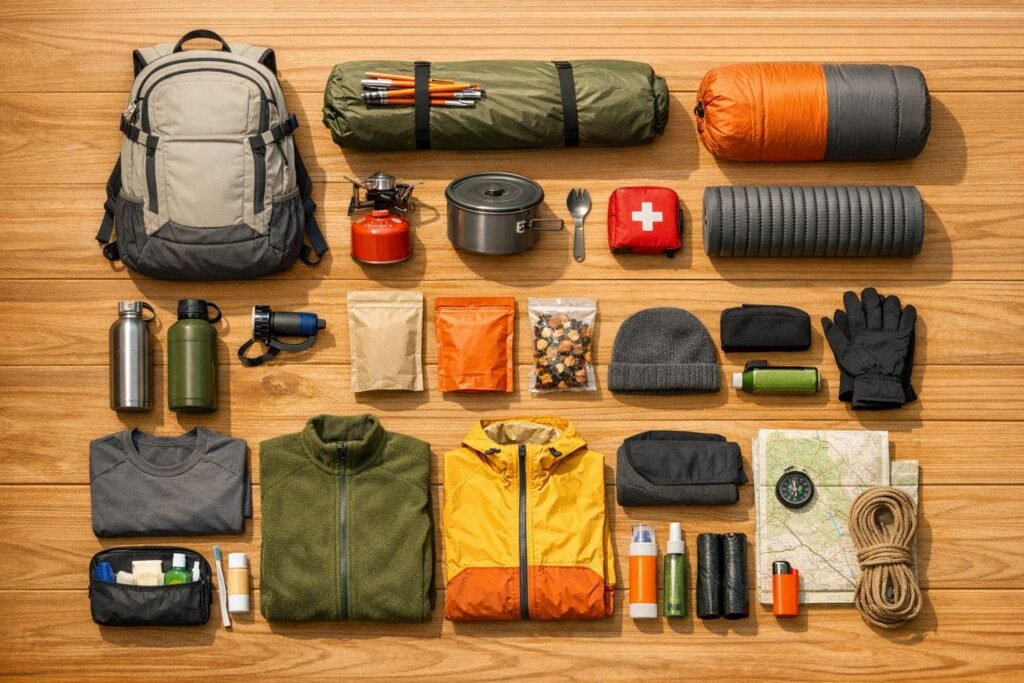
Packing for a camping trip can feel simple – until you’re in the wild and realize you forgot something important. Here’s how to avoid that frustration and ensure a smooth trip:
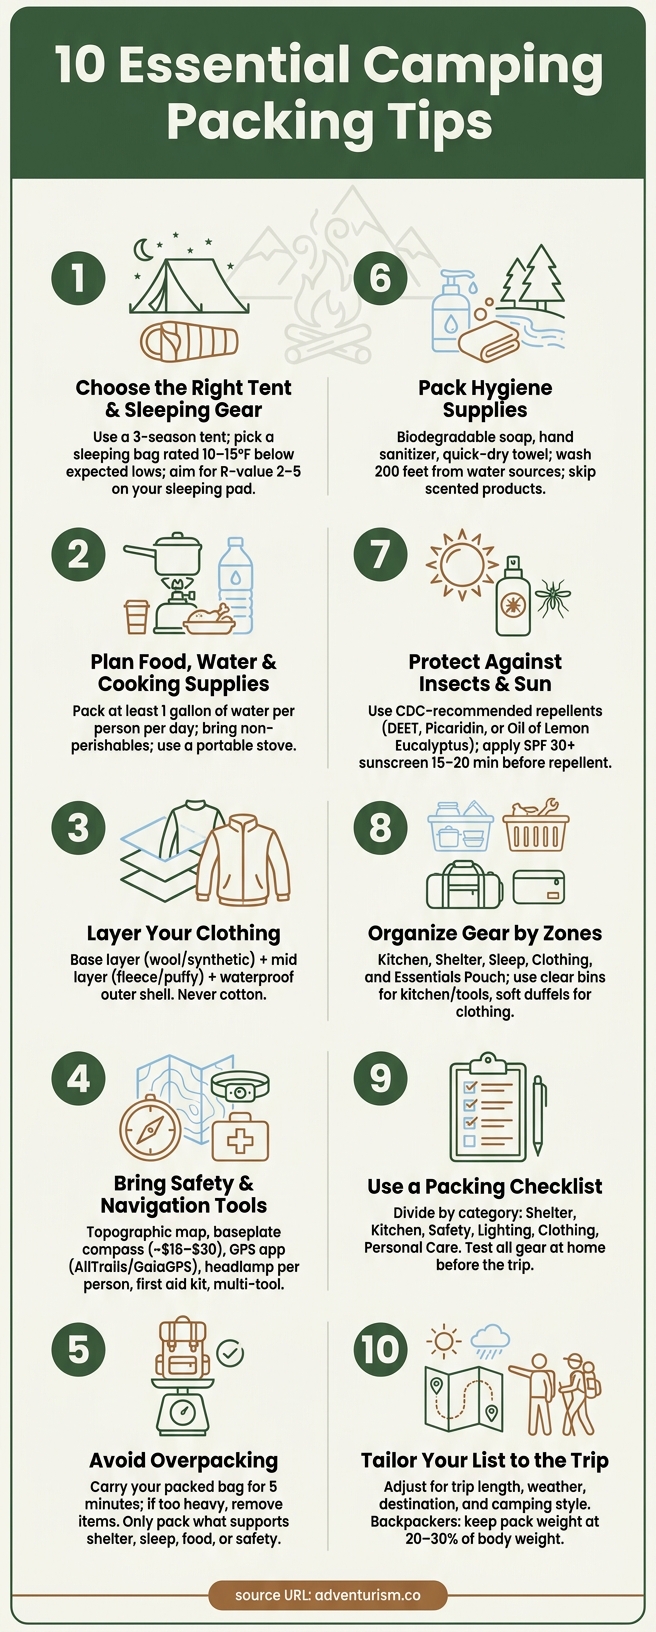
- Choose the right tent and sleeping gear: A 3-season tent, a sleeping bag rated for colder temperatures, and a high-quality sleeping pad are key for comfort.
- Plan food, water, and cooking supplies: Stick to non-perishable foods, bring at least 1 gallon of water per person per day, and pack a portable stove.
- Layer your clothing: Use a base layer, mid-layer, and waterproof outer shell for flexibility in changing weather.
- Bring safety tools: A map, compass, GPS app, headlamp, first aid kit, and multi-tool are must-haves.
- Avoid overpacking: Test your packed bag and only bring items you’ll use.
- Pack hygiene supplies: Include biodegradable soap, hand sanitizer, and quick-dry towels. Avoid scented products to deter wildlife.
- Protect against insects and sun: Use CDC-recommended repellents and broad-spectrum sunscreen with SPF 30 or higher.
- Organize gear by zones: Separate items into categories like kitchen, shelter, and safety for easy access.
- Use a checklist: Prevent forgotten items by reviewing a categorized packing list.
- Tailor your list to the trip: Adjust for trip length, weather, location, and camping style.
10 Essential Camping Packing Tips: What to Bring & Why
Camping 101: WHAT TO PACK | Easy Packing List For Car Camping
sbb-itb-5a98267
1. Pick the Right Tent and Sleeping Gear
Your tent and sleeping gear play a huge role in how comfortable your camping experience will be. The wrong choices can lead to a miserable night, so it’s worth starting with these essentials to ensure everything else falls into place.
For most campers, a 3-season tent is the go-to option. It’s designed to handle spring, summer, and fall weather, striking a balance between ventilation and protection from rain or wind. As John Ellings from Switchback Travel explains:
"A standard 3-season tent is sufficient for most non-winter adventures."
When selecting a tent, go one size larger than you think you need. While a 2-person tent technically fits two sleeping pads, it leaves little to no room for gear. If you’re camping as a pair, consider upgrading to a 3- or 4-person tent for added comfort. A well-chosen tent ensures you’ll have a solid place to rest, setting you up for success on your trip.
Pick a sleeping bag rated 10–15°F below the coldest temperature you expect. For example, if nighttime lows might hit 45°F, bring a 30°F bag. It’s better to unzip a warm bag than shiver in one that’s not insulated enough. For damp environments, synthetic fill is a safer option than down, as it retains warmth even when wet.
Don’t forget a high-quality sleeping pad. The ground can sap heat from your body quickly, even on mild nights. Sleeping pads come with an R-value rating – the higher the number, the better the insulation. For 3-season camping, an R-value between 2 and 5 is ideal. Before heading out, set up your tent at home to check for missing parts and practice pitching it.
2. Pack Food, Water, and Cooking Supplies
Packing efficiently begins with planning your meals and the supplies that go with them. Stick to non-perishable items like canned goods, trail mix, jerky, instant oatmeal, and freeze-dried meals – these are practical and help reduce the risk of attracting wildlife. If you decide to bring fresh fruits or vegetables, make sure they’re sealed and stored properly. A few basic seasonings can go a long way in keeping your meals flavorful without adding unnecessary weight. Be mindful of portion sizes to avoid running out or packing more than you’ll need.
Andy Taylor offers a simple guideline:
"If you’re going camping overnight, bring at least two days worth of food if you’re unsure what will be available in a given area."
Following this advice ensures you’re prepared without overloading yourself. Extra food can weigh you down and take up space that could be used for other essential gear.
Hydration is just as important as food. Plan for at least 1 gallon of water per person per day, and increase that amount if you’re dealing with hot weather, strenuous activities, or if you’re bringing pets along. For car camping, a 2.5- to 5-gallon jug with a spout is handy for cooking and cleaning. A great tip is to freeze water bottles before you leave – they’ll act as ice packs in your cooler and provide cold drinking water as they thaw. Always pack a backup like a water filter (such as a LifeStraw) or purification tablets, especially if you’ll be near natural water sources like lakes or streams.
When it comes to cooking, a portable stove and nesting cookware save both space and hassle. For solo trips, a single-burner butane stove works well, while a two-burner propane stove is better suited for group or family outings. Keep your utensils organized in a roll-up pouch, and store pre-chopped ingredients in leakproof bags for convenience. Use a hard-sided insulated cooler to keep food fresh and safe. At night, always store food, trash, and anything scented in your vehicle or a bear-proof container to avoid unwanted wildlife encounters.
With your food, water, and cooking supplies squared away, you’re ready to focus on organizing and balancing the rest of your gear.
3. Layer Your Clothing for Changing Weather
Weather at a campsite can change in the blink of an eye – what starts as a warm, sunny afternoon can easily turn into a cold, damp evening. That’s why packing clothes you can layer is so important. It gives you the flexibility to adapt without needing to bring a heavy, overstuffed bag.
A good layering system has three parts: a base layer, a mid layer, and an outer shell. Start with a base layer made of synthetic or wool fabrics – not cotton. Cotton holds onto moisture, keeping it close to your skin, which can leave you feeling cold and uncomfortable. Wool or synthetic materials, on the other hand, wick away sweat and dry quickly, keeping you warm and dry.
For the mid layer, choose something that traps heat but still allows for airflow. A fleece, wool sweater, or lightweight puffy vest works well. Then, for your outer shell, pack a waterproof jacket and pants to handle sudden rain or wind.
Don’t forget the small but essential items. Wool or synthetic socks, a warm hat, and gloves can make all the difference in keeping your hands, feet, and head warm in chilly or wet weather.
Finally, always change into dry clothes before bed. Sleeping in damp clothing will strip away your body heat, leaving you cold even in a high-quality sleeping bag. Staying dry is key to staying warm.
4. Bring Safety and Navigation Tools
Once you’ve packed your gear for comfort and cooking, it’s time to think about safety and navigation. A wrong turn on a trail or a small injury far from help can turn a fun trip into a serious situation. The right tools can help you stay on track and deal with issues before they become bigger problems.
Think of navigation as a system. Start with a topographic map and a baseplate compass (priced around $16–$30). These tools work without batteries or cell service, making them reliable in the backcountry. Complement these with a GPS app like AllTrails or GaiaGPS on your smartphone. Just make sure to download offline maps before your trip – cell service is often spotty at campgrounds and trailheads. As soon as you arrive, mark your campsite or trailhead on your GPS app for an easy reference point.
"I hate to say it, but given all the tools available today, getting lost should be almost impossible." – Christian Schauf, Founder and CEO, Uncharted Supply Company
Lighting is another must-have for safety, especially after sunset. Opt for a headlamp instead of a handheld flashlight – it keeps your hands free and saves your phone’s battery. Be sure to pack one headlamp per person, along with spare batteries. Cold weather can drain batteries faster than expected, so backups are essential.
Don’t forget a first aid kit stocked with basics like bandages, antiseptics, tweezers, and pain relievers. Add a whistle to your kit – three short blasts is the universal signal for distress. A multi-tool and a small roll of duct tape can also be lifesavers when it comes to quick gear repairs. These small additions can make a big difference when you’re out in the wild.
5. Limit Comfort Items to Avoid Overpacking
When it comes to comfort items, it’s easy to go overboard. A few unnecessary extras – like additional lanterns or speakers – can quickly turn your vehicle into a cluttered storage space. The key is to be honest with yourself: only pack what you’ll actually use. This approach keeps your gear manageable and ensures you focus on the essentials.
Here’s a quick test: carry your packed bag for five minutes. If it feels too heavy to handle, it’s time to reevaluate. Long-term traveler and author Shannon O’Donnell offers straightforward advice:
"Leave behind anything that serves only as a convenience. Bringing things like large lamps and heaters defeat the purpose of going camping."
Some commonly overpacked items include extra clothing, bulky kitchen gadgets, heavy decor, large speakers, and delicate dishes. Instead, stick to items that genuinely improve your experience without adding unnecessary weight – like a comfortable camp chair, a proper pillow, or a shared lantern. For car campers, opting for a tent that’s slightly larger than needed (e.g., a 4-person tent for 2 people) can provide extra space without the hassle of packing extra furniture.
When in doubt, follow this simple rule: does this item support shelter, sleep, food, or safety? If it doesn’t serve one of these core needs – or basic hygiene – it’s probably just extra clutter.
6. Pack Toiletries and Hygiene Supplies
Once your gear and safety tools are sorted, it’s time to focus on personal hygiene – an essential part of staying healthy and comfortable during your trip.
Maintaining hygiene in the wilderness isn’t just about feeling fresh. As Sea to Summit highlights:
"While it’s another thing to end up with a nasty stomach bug in the middle of nowhere because of inadequate trail hygiene."
Your toiletry kit should include the basics: biodegradable soap, a toothbrush, toothpaste, toilet paper, hand sanitizer, and a lightweight, quick-dry towel. Soap leaves are a smart choice over liquid soap – they’re lighter, won’t leak, and help keep your gear clean. A popular option is the Sea to Summit Wilderness Wash (priced between $6.95 and $10.95), a concentrated solution versatile enough for multiple cleaning tasks.
When using soap, always wash at least 200 feet (around 70 adult steps) away from any water source to minimize your impact on the environment, even if the soap is biodegradable. Similarly, when brushing your teeth, avoid spitting toothpaste in one spot to prevent contamination.
If water is scarce, biodegradable wipes can act as a quick "trail shower", especially for freshening up high-sweat areas. For instance, the Sea to Summit Wilderness Wipes (also priced $6.95–$10.95) are highly rated, with an impressive 4.9/5 stars from 82 reviews.
Skip scented deodorants altogether – strong fragrances can attract wildlife.
To keep your hygiene supplies organized and easily accessible, consider a hanging toiletry bag like the Eagle Creek Pack-It Reveal Hanging Toiletry Kit. You can clip it to a tree branch, keeping everything off wet or dirty surfaces while avoiding the hassle of digging through your pack.
7. Protect Yourself from Insects and Sun
Bugs and sunburn can turn an enjoyable trip into a miserable experience, but with the right precautions, they’re easy to avoid.
For insect protection, pick repellents with ingredients recommended by the CDC and registered with the EPA, such as DEET, Picaridin, or Oil of Lemon Eucalyptus. As Adventure Medical Kits explains:
"Not all repellents offer equal protection either – look for bug sprays that use active ingredients that are CDC‐recommended for repelling disease-carrying insects and are registered with the EPA."
DEET provides long-lasting coverage, though it can feel a bit heavy on the skin. For a lighter alternative, Picaridin is odorless, non-greasy, and more suitable for sensitive skin. Prefer something plant-based? Oil of Lemon Eucalyptus is effective but may require more frequent reapplication. Be thorough – apply repellent to all exposed skin and clothing, and remember to reapply every two hours or after swimming or sweating heavily.
When it comes to sun protection, choose a broad-spectrum sunscreen with at least SPF 30. For longer hikes or higher altitudes, go for SPF 50 or higher. Apply sunscreen first, giving it 15–20 minutes to absorb before adding insect repellent on top. Don’t overlook your lips – use a dedicated SPF lip balm, as regular sunscreen often doesn’t get applied there. If you’re near water, opt for biodegradable or eco-friendly sunscreen to avoid harming aquatic life.
Clothing can also be a great defense. A wide-brimmed hat and light-colored, long-sleeve shirts protect your face, neck, and arms from the sun. Pair these with polarized sunglasses to shield your eyes from harmful UV rays. Keeping your gear well-organized ensures you can easily access these essentials when you need them most.
8. Use Packing Zones to Stay Organized
When your gear is a mess, it’s not just frustrating – it can waste precious time. Digging through a jumbled duffel to find something essential can throw off your entire setup. The key? Organize your gear by function to make everything easier to find and use.
One smart approach comes from HYDAWAY:
"The real solution is to build a system of modular, grab-and-go kits. Think one bin for cooking, another for sleeping gear, one for first aid, and so on."
Here’s a breakdown of the main zones to keep in mind:
- Kitchen Zone: Pack items like your stove, fuel, cookware, utensils, and a spice kit here.
- Shelter Zone: Include your tent, poles, stakes, and footprint.
- Sleep Zone: Gather your sleeping bag, pad, and pillow together.
- Clothing Zone: Use color-coded packing cubes to separate and organize clothing.
- Essentials Pouch: Keep first aid supplies, fire starters, and navigation tools in one easy-to-access spot.
For the kitchen and tool zones, clear, hard-sided bins work well since you can quickly see what’s inside. On the other hand, soft duffel bags are ideal for clothing and bedding because they’re flexible and save space. A popular choice among campers is the Iris 62.8 Quart Watertight Plastic Bin, which stands out for its weather-resistant lid and durability.
Finally, think about how you pack. A "first-in, last-out" strategy can make a big difference: pack the items you’ll need right away – like your tent, lighting, or mallet – at the top so they’re easy to grab when you arrive.
9. Use a Checklist to Catch Forgotten Items
Even seasoned campers can forget critical gear. A checklist takes the guesswork out of packing and ensures you don’t show up at your campsite missing essentials like waterproof matches, a multi-tool, or spare batteries.
The best checklists are divided into categories – Shelter, Kitchen, Safety, Lighting, Clothing, and Personal Care. This method makes it easy to review each section and confirm you’ve covered everything. As Tim Gillespie, Regional Manager at Under30Experiences, puts it:
"Checklists are an important tool in organization. This camping list we provided is quite comprehensive. We are not saying that you need everything listed, but let this help in ensuring you don’t forget anything important on your next camping trip."
Incorporate your checklist into a pre-trip gear test to avoid surprises once you’re out in the wilderness.
Pay close attention to small but essential items – lighters, toilet paper, trash bags, and extra batteries – that may seem insignificant but become crucial when needed. Adding a “small essentials” section to your checklist and reviewing it last can help ensure nothing slips through the cracks.
A smart practice is to test your gear at home before heading out. Pitch your tent in the backyard, fire up your camp stove, and double-check that every piece is functional and accounted for. While your checklist ensures you bring everything, a quick trial run confirms it’s all ready to go. With everything checked off, you’ll be ready to organize your gear in the next step.
10. Adjust Your Packing List to the Trip
Packing for a camping trip isn’t a one-size-fits-all process. As Under30Experiences explains:
"Your exact camping list will vary depending on where you will be camping, the expected weather conditions, the length of your camping trip, and the activities you have planned."
To make sure you’re prepared, consider key factors like trip length, location, and your camping style.
Start with the trip duration. A short weekend getaway might only require a couple of outfits and a cooler stocked with food. On the other hand, for longer trips, you’ll need to pack additional clothing layers, extra food supplies, and a dependable power source – like spare batteries or a solar-powered charger.
Next, think about your destination. Where you’re camping determines what gear is essential. Heading to the mountains? Pack thermal layers, gloves, and a waterproof jacket. If your trip takes you to the desert, focus on sun protection: UV-rated sunglasses, sun-protective clothing, and at least 2 liters of water per person are must-haves. For forested areas, you’ll want bug repellent and a reliable water filtration system that can remove 99.9% of bacteria.
Your camping style also plays a big role. Car campers have the luxury of bringing heavier, comfort-focused items like a two-burner stove or a cot. Backpackers, however, need to keep their gear light, aiming for a pack weight that’s 20–30% of their body weight.
Lastly, check the amenities at your campsite. If the site offers conveniences like shared bathrooms or running water, you can leave items like a portable toilet or extra water jugs at home. Tailoring your packing list in this way ensures you’re equipped without overloading your bags.
Comparison Table
Knowing what to pack is one thing, but figuring out how to store it can be the difference between a smooth setup and a frustrating mess at the campsite. The table below complements the packing zones discussed earlier, offering practical advice on storing your gear for an efficient camping experience.
| Packing Category | Item Examples | Recommended Storage | Key Tip |
|---|---|---|---|
| Sleep System | Tent, sleeping bag, pad, stakes | Large duffel or ventilated bin | Always pack your tent completely dry to avoid mildew. |
| Camp Kitchen | Stove, cookware, utensils, dry food | Clear, lidded plastic bins | Transparent bins let you locate items without rummaging. |
| Cold Food & Drinks | Perishables, beverages | Hard-sided cooler | Pre-chill your cooler and use block ice for longer-lasting cold. |
| Clothing | Layers, rain gear, socks | Color-coded packing cubes | Keep wet or dirty clothes in a separate bag to protect clean items. |
| Safety & Essentials | First-aid kit, headlamps, multi-tool | Brightly colored waterproof pouch | Use a consistent color for safety gear to locate it quickly in emergencies. |
| Toiletries | Soap, toothbrush, toilet paper | Small hanging toiletry kit | Store toilet paper in a zip-top bag to keep it dry. |
| Comfort Items | Camp chairs, hammock, blanket | Collapsible or waterproof bags | Waterproof bags protect blankets; collapsible designs save space. |
| Trip-Specific Extras | Journal, books, small electronics | Ziplock bags or padded gear pouches | Remove batteries from electronics to avoid corrosion during storage. |
A few extra tips can make a big difference in how smoothly your trip goes. For instance, always load heavy items like coolers first into your vehicle. Place them at the bottom to create a stable base for lighter gear to stack on top. This prevents shifting during transit and makes unloading much easier.
Also, think about what you’ll need as soon as you arrive at the campsite. Items like your tent, rain jacket, and headlamp should be packed last so they’re the first things you can grab. Adopting these habits will not only simplify your setup but also make your camping trip far more enjoyable.
Conclusion
A successful camping trip starts with thoughtful preparation. The key lies in packing smartly and prioritizing essentials.
"Smart packing is not about carrying everything, but selecting the right equipment that serves multiple purposes and minimizes weight." – Hazli Collection
By organizing your gear, planning meals ahead, and using a comprehensive checklist, you’ll set yourself up for an enjoyable outdoor experience.
For more tips on camping, hiking, backpacking, and other adventures, visit Adventurism.co.
FAQs
What’s the difference between packing for car camping and backpacking?
When it comes to gear, the main difference lies in how much you can bring and what kind. With car camping, your vehicle does the heavy lifting, so you can pack bulkier, heavier items that add extra comfort and convenience. On the other hand, backpacking demands lightweight, compact gear that you can carry on your back. It’s all about sticking to the essentials to keep your load manageable. Most backpackers aim for their pack to weigh about 20% of their body weight, ensuring they can move freely on the trail.
How do I choose the right sleeping bag temperature rating?
To select the best sleeping bag temperature rating, think about the coldest nighttime temperatures you’re likely to encounter on your trip. Choose a bag rated for that temperature or a bit lower to stay cozy. For instance, if nighttime lows are around 40°F, a sleeping bag rated for 30°F or 40°F should do the trick. Don’t forget to consider your own comfort level – if you usually feel cold or warm while sleeping, adjust your choice accordingly to ensure a restful night.
What’s the easiest way to organize gear so I can find things fast?
The simplest way to keep your gear in order is by sorting it into categories before you start packing. For example, group together items like cooking supplies, sleeping gear, and tools into their own sections. This approach not only saves time but also cuts down on stress at the campsite, helping you quickly locate whatever you need.