
Fishing gear maintenance is simpler than you think – and it saves you money. Regular cleaning and care can extend the life of your rods, reels, and tackle by over a decade, compared to replacing neglected gear annually. Here’s what you need to know:
- Rinse and Clean After Every Trip: Freshwater rods need occasional cleaning, but saltwater gear requires a rinse after each use to prevent corrosion.
- Inspect for Damage: Check rod guides with a cotton swab and replace any damaged parts. Look for chips, cracks, or rust on reels, lines, and hooks.
- Use Proper Tools: Basic supplies like mild dish soap, a toothbrush, microfiber cloths, and reel oil are all you need for maintenance.
- Store Correctly: Always dry gear thoroughly, loosen reel drags, and store rods and reels in cool, dry places to prevent warping or rust.
- Seasonal Maintenance: Deep clean reels, replace worn lines, and sharpen hooks during the off-season to keep everything in top shape.
Taking a few minutes to care for your fishing gear ensures it performs when you need it most. Keep reading for detailed steps on cleaning rods, maintaining reels, and organizing tackle.
How To Clean & Maintain Your Fishing Gear
sbb-itb-5a98267
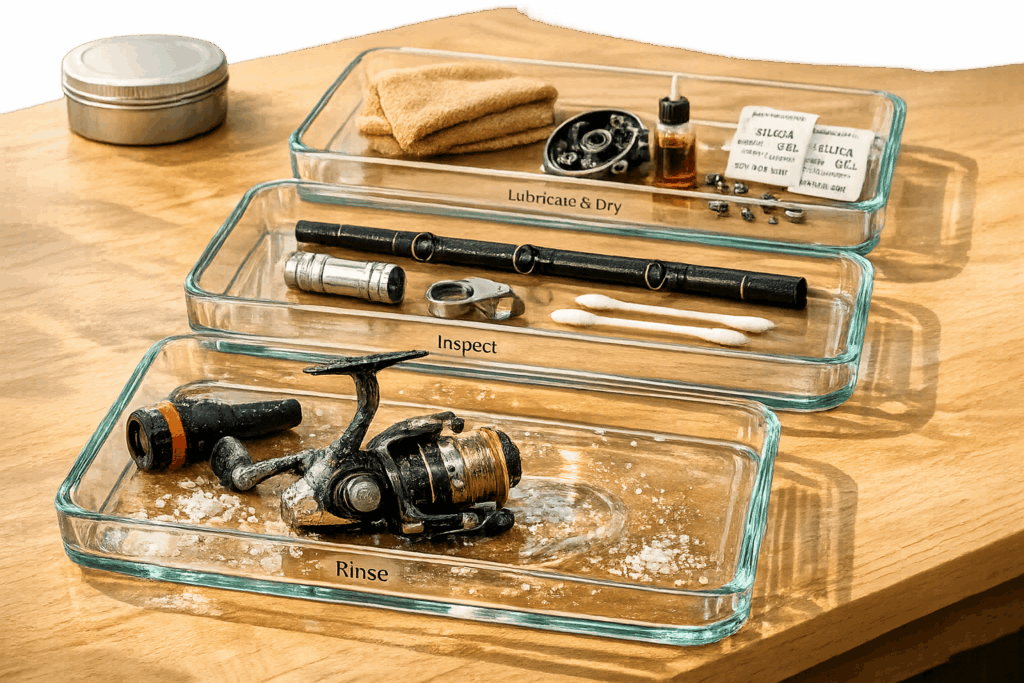
Cleaning and Caring for Fishing Rods
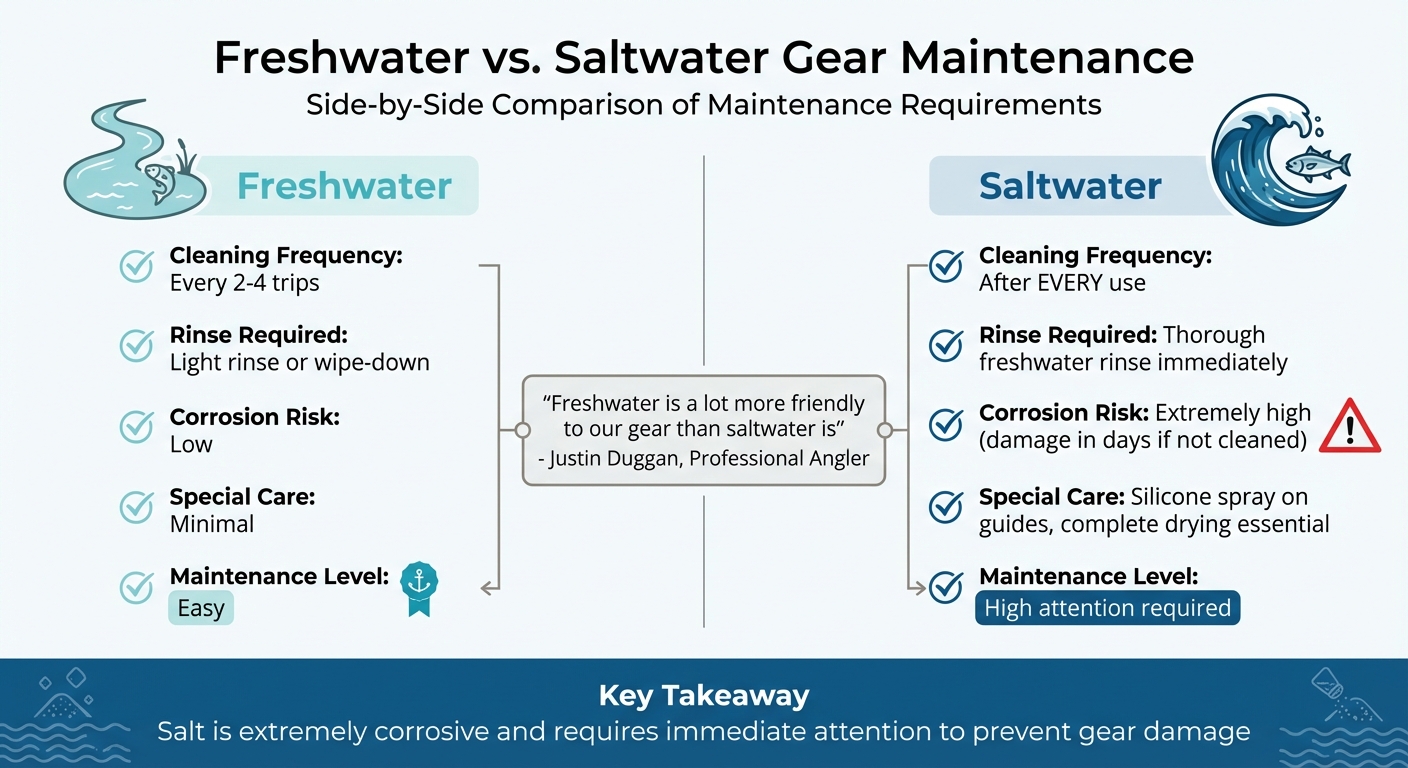
Freshwater vs Saltwater Fishing Gear Maintenance Requirements
How to Clean Your Rod
Start by rinsing your rod gently with freshwater. Avoid high-pressure sprays, as they can push dirt and debris into the reel seat and guides. Pay extra attention to the rod guides since grit in these areas can damage your fishing line. Use a soft-bristled toothbrush to carefully clean around each guide and remove trapped particles.
For the handle, mix a small amount of mild dish soap with water. Use this solution to scrub the cork, EVA, or foam grips. Cork handles, being more porous, may require a toothbrush to lift out stubborn dirt, while EVA foam is easier to wipe clean. Once cleaned, dry the entire rod thoroughly, especially around the reel seat and guides, to prevent corrosion or adhesive issues.
Perform a cotton swab test on your guides by running a Q-tip through each guide ring. If the cotton snags, it’s a sign of a chipped or cracked guide insert, which should be replaced to avoid damaging your line. For multi-piece rods, apply a small amount of ferrule wax to the male ends of the joints to prevent sticking and wear.
Now, let’s look at how freshwater and saltwater conditions affect your cleaning routine.
Freshwater vs. Saltwater Rod Care
Freshwater rods are relatively easy to maintain. A simple wipe-down or light rinse after every two to four trips is usually enough to remove dirt and grime. However, saltwater rods require much more attention. Salt is extremely corrosive and can damage guides, reel seats, and internal parts in just a few days if not cleaned properly. Professional angler Justin Duggan highlights the difference:
"If you’re a freshwater angler, things are a lot easier for you because freshwater is a lot more friendly to our gear than saltwater is".
After using a rod in saltwater, rinse it gently with freshwater, avoiding high-pressure water to keep salt from being forced into sensitive areas. Once rinsed, wipe down the metal guides with a rag lightly coated in food-grade silicone spray to create a protective layer. Always ensure the rod is completely dry before storing it, as moisture trapped during storage can lead to corrosion.
Protecting Your Rod from Damage
Before cleaning or storing your rod, remove any lures or hooks to prevent accidental scratches. Store your rods vertically in a rack or horizontally on a flat surface. Avoid leaning them against walls for long periods, as this can cause warping or micro-cracks in the blank. Use rod sleeves or cases during transport to protect the blank from bumps and scratches.
Inspect your rod regularly for micro-cracks in the blank and for grooves or chips in the guides that could harm your fishing line. To maintain cork handles, apply a cork protectant once a year. For extra protection, especially on saltwater rods, consider applying rod wax to the guides after cleaning to help guard against corrosion.
Maintaining Fishing Reels
Just like taking care of your fishing rod, keeping your reel in good shape is key to ensuring it lasts and performs well.
Taking Apart and Cleaning Your Reel
Before you start, snap a few photos during disassembly to remember where all the springs and gears go. Secure the fishing line to the spool with masking tape to avoid tangles while you work.
To begin, carefully remove the side plates using a small screwdriver, keeping track of every screw. If your reel has been exposed to sand, don’t turn the handle before cleaning – this could grind grit into the components. Instead, use compressed air to blow away particles. When applying degreaser, put it on a cloth or cotton swab rather than spraying it directly. This helps protect the internal seals. A toothbrush and cotton swabs are perfect for clearing old grease out of gear teeth and other tight spaces.
Avoid rinsing your reel with a high-pressure hose, as it can push salt, sand, and dirt deeper into the gears and bearings. As Gus Hertz from Boat Outfitters points out:
"You are better off not rinsing your reel at all than subjecting it to a hard spray."
Similarly, don’t dunk your reel in water unless it’s a sealed model, as trapped water can speed up corrosion. For freshwater reels, do a deep clean every 10 to 15 trips. Saltwater reels, however, need a rinse after every outing and a deep clean every 5 to 7 trips.
Once your reel is clean and debris-free, it’s ready for lubrication and reassembly.
Lubricating and Putting Your Reel Back Together
After cleaning, make sure all parts are completely dry before moving on to lubrication. Stick to reel-specific oils and greases – general products like WD-40 aren’t suitable because they can strip away essential lubricants. Use reel oil on high-speed components like ball bearings and line rollers, applying just one drop per bearing. For gears, spread a thin layer of grease on the teeth using a toothpick. Brian Gordon from West Marine advises:
"A little bit of grease or oil goes a long way. Excess grease and oil attract dirt and debris."
For spinning reels, add a drop of oil to the line roller and bail hinges. On baitcasting reels, clean and grease the worm gear in the level wind system, as it’s constantly in motion during use. Also, oil the handle knob where it meets the arm and the connection point between the handle arm and reel body. During reassembly, applying a small dab of grease to screw threads can help prevent them from seizing due to salt exposure.
| Component | Lubricant Type | How to Apply |
|---|---|---|
| Ball Bearings | Reel Oil | 1 drop per bearing |
| Main Gears | Reel Grease | Light coating on gear teeth |
| Line Roller | Reel Oil | 1 drop |
| Bail Hinges | Reel Oil | 1 drop at each pivot point |
| Worm Gear | Reel Grease | Light coating for level wind |
Preventing Reel Corrosion
Before rinsing your reel, tighten the drag fully to create a seal that keeps water and salt out of the drag washers. Use a gentle freshwater mist to rinse, then dry the reel thoroughly with a soft cloth. Pay extra attention to the line roller on spinning reels, as it’s prone to salt buildup and needs frequent cleaning and oiling.
Once the reel is dry, apply a light protective coating of a corrosion inhibitor like Aluma Guard, Reel Magic, or a silicone spray to all external metal parts. Don’t forget to loosen the drag completely before storing the reel long-term. This reduces pressure on the drag washers and helps them last longer. As Cast and Spear explains:
"Loosening the drag can help alleviate the pressure off the drag washers. This is the way to help them last longer."
Store your reels in a cool, dry place away from direct sunlight. To combat humidity, consider adding silica gel packs to your reel cases or tackle bags. This extra step can go a long way in keeping your gear in top condition.
Organizing and Storing Fishing Lines and Tackle
Keeping your fishing gear organized isn’t just about convenience – it’s about protecting your investment and ensuring everything is ready to go when you hit the water. A tidy tackle box and properly stored lines mean less hassle and more time fishing, while also protecting your equipment from unnecessary wear and tear.
Cleaning and Checking Your Fishing Line
After a saltwater outing, it’s essential to clean your fishing line properly. Remove about 20–30 yards of line and run it through a damp cloth with mild soapy water. Follow this by rinsing it with fresh water to eliminate salt crystals that can weaken the line over time. As you clean, inspect the first few yards of line for any nicks, frays, or rough patches[7, 9]. If you spot damage, trim that section immediately.
Once cleaned, let the line air-dry completely before storing it in a cool, dark place. This prevents heat and UV rays from breaking down the material, whether it’s monofilament, fluorocarbon, or braided line[4, 7, 9]. Loosen the drag on your reels before storing them to avoid unnecessary strain on the drag gears and to prevent the line from embedding into itself[4, 7]. To keep leader lines from tangling, try slipping a neoprene koozie or an old sock over the spool.
With a clean, well-maintained line, organizing the rest of your tackle becomes much simpler.
How to Organize Your Tackle Box
Start by grouping your tackle based on the species you’re targeting or your fishing style[32, 9]. Use labeled trays or dividers to sort weights by size and hooks by type[32, 31]. Outdoor writer and freshwater guide Debbie Hanson emphasizes the benefits of this approach:
"By keeping your fishing tackle tidy, you will spend more time actually catching fish and less time rummaging through your tackle box searching for the right lure or having to untangle a mess."
For treble hooks on lures, secure them with plastic twist ties, and use safety pins to keep hooks of the same size together. After each trip, rinse lures and terminal tackle with freshwater to prevent rust, which can quickly spread to other gear[32, 7]. Open the lids of your tackle box to let moisture escape, and consider adding silica gel packs or anti-rust tabs to control humidity[7, 8]. A damp lure or jig can develop rust fast, and once it starts, it’s hard to stop.
Once your tackle box is in order, you can focus on storing delicate soft plastics and lures the right way.
Storing Soft Plastics and Lures
Soft plastics are best stored in their original packaging or in separate sealed bags. Jim Lagacy, Aquatic Education Coordinator at MassWildlife, offers this advice:
"Always keep soft plastics in their original packaging, as these can melt or chemically bind to other plastic materials within your box."
Mixing different brands or types of soft plastics can lead to a sticky, melted mess that can even damage your tackle box. After using jigs, spinnerbaits, or spoons, remove any soft plastic trailers. The chemicals in the plastic can melt onto metal hooks or lure skirts over time. For hard lures, rinse them thoroughly with fresh water and let them air-dry completely before putting them away. Use a hook file or sharpening stone to touch up dull hooks, and replace any that are rusted or bent[7, 9]. Store your tackle box in a dark, climate-controlled area to protect your gear from UV damage and preserve the coatings on your lures and the integrity of your fishing lines[8, 9].
Seasonal Maintenance and Long-Term Storage
Taking care of your fishing gear during the off-season is crucial, whether you’re prepping for winter or taking an extended break. A little effort now can save you from costly repairs or replacements later. Start by inspecting your equipment for damage and making necessary replacements. Then, focus on proper storage to keep everything in top shape.
Pre-Season Gear Inspection
Before heading back to the water after some downtime, give your gear a detailed once-over. For rods, use a cotton swab or ball to check the guides – if it snags, there’s likely a chip that could damage your line. Inspect reel seats, guides, and your fishing line for any signs of wear. Replace compromised parts immediately. For reels, test the bail spring and anti-reverse mechanism, and listen for grinding sounds, which could mean worn gears or bearings.
Fishing lines need special attention. Monofilament lines weaken with sun exposure and should be replaced every year, while braided lines can last up to two years if maintained properly. If you use waders, turn them inside out and wipe them down with isopropyl alcohol to spot leaks. As Joe Balog from IGFA advises:
"The off-season presents the perfect time to go through gear, take inventory, and replace stock before spring."
Don’t forget to sharpen dull hooks, swap out rusted split rings, and organize your tackle by type. This way, you’ll be ready to hit the water without any last-minute scrambling.
How to Store Your Fishing Gear
Once your gear is clean and inspected, focus on storing it in an environment that protects against moisture and temperature swings. A dry closet inside your home works best – avoid damp basements, garages, or sheds, as these can lead to rust and damage.
Separate rods and reels before storing. Loosen reel drags to relieve internal pressure and apply a thin layer of lubricant or corrosion inhibitor to all metal parts. For rod joints, use ferrule wax or paraffin to prevent sticking and seal out moisture. Store rods vertically in a rack or horizontally on a flat surface, but never lean them against a wall for long periods, as this can cause warping. Keep reels in individual protective cases or breathable bags to avoid dust buildup. If you store rods in tubes, leave the caps off to allow for airflow. As Orvis News points out:
"Incorrect storage can shorten that life span or ruin the aesthetics of a fine rod or reel."
For tackle boxes, toss in a few silica gel packs to keep humidity levels in check.
Preventing Rust on Metal Components
Proper storage is your best defense against rust, especially for metal parts. Salt, sand, and moisture are the main culprits, so after rinsing reels, tighten the drag to keep water out of the internal stack. Once dry, loosen the drag completely before storing. Use reel oil on bearings and line rollers, and apply grease to internal gears to create a moisture barrier.
If you find surface rust on tools like pliers or clippers, gently sand the area with steel wool and apply a protective oil to stop it from spreading. Check hooks, split rings, and other metal components for rust before putting them away – rust can quickly transfer to other gear in your tackle box. For saltwater fishing, consider soaking your line in fresh water, drying it thoroughly, or even removing it entirely before storage. A little maintenance now can save you money and hassle down the road.
Conclusion
Taking care of your fishing gear doesn’t have to be complicated, but it does require consistency. Following the steps outlined above can make all the difference in keeping your equipment reliable and ready for action.
Main Maintenance Steps to Remember
A few simple habits can extend the life of your gear. Start by rinsing everything with fresh water after each trip, especially when fishing in saltwater, to avoid salt and grit buildup. Thoroughly dry your gear with a microfiber cloth to prevent corrosion. Loosen the drag on your reels before storing them, and check your rod guides with a cotton swab – if it snags, it’s a sign of damage that could harm your line. Apply reel-specific oil to bearings and rollers every 3–5 outings, and don’t forget to replace monofilament or fluorocarbon lines at least once per season. With these practices, your rods and reels could serve you well for over a decade.
Making Maintenance Part of Your Routine
Routine care can mean the difference between gear that lasts for years and gear that fails when you need it most. As Capt. Ricky Wheeler of Marlin Magazine puts it:
"A reel that is not properly maintained will eventually fail on you – it’s just a matter of when".
Make maintenance part of your routine: rinse and dry your gear after every outing, inspect rod guides regularly, and schedule a deep clean during the off-season. Jim Lagacy, Angler Education Coordinator at MassWildlife, emphasizes the payoff of these efforts:
"Taking a little time to care for my gear can really pay off once spring rolls around".
FAQs
What’s the fastest post-trip routine to prevent corrosion?
The fastest way to keep corrosion at bay after a fishing trip is to rinse your gear with freshwater. Pay special attention to reels, guides, and any moving parts. After rinsing, dry everything carefully with a soft cloth to remove any moisture. Finally, apply a lubricant to the moving parts to shield them from rust and corrosion. This quick routine can go a long way in extending the life of your fishing equipment.
How can I tell if my reel needs a deep clean or professional service?
Your reel might need a thorough cleaning or professional servicing if you notice signs of saltwater corrosion, a decline in smooth operation, or if regular maintenance has been neglected. Even the sturdiest reels benefit from occasional deep cleaning or expert care to keep them performing at their best.
What’s the best way to store rods, reels, and tackle in humid areas?
To keep your rods, reels, and tackle in great shape when storing them in humid areas, use airtight containers with gaskets to block out moisture. For extra protection, include desiccants to absorb any humidity and help prevent rust or corrosion. This simple setup will keep your gear ready to perform, even in damp conditions.