
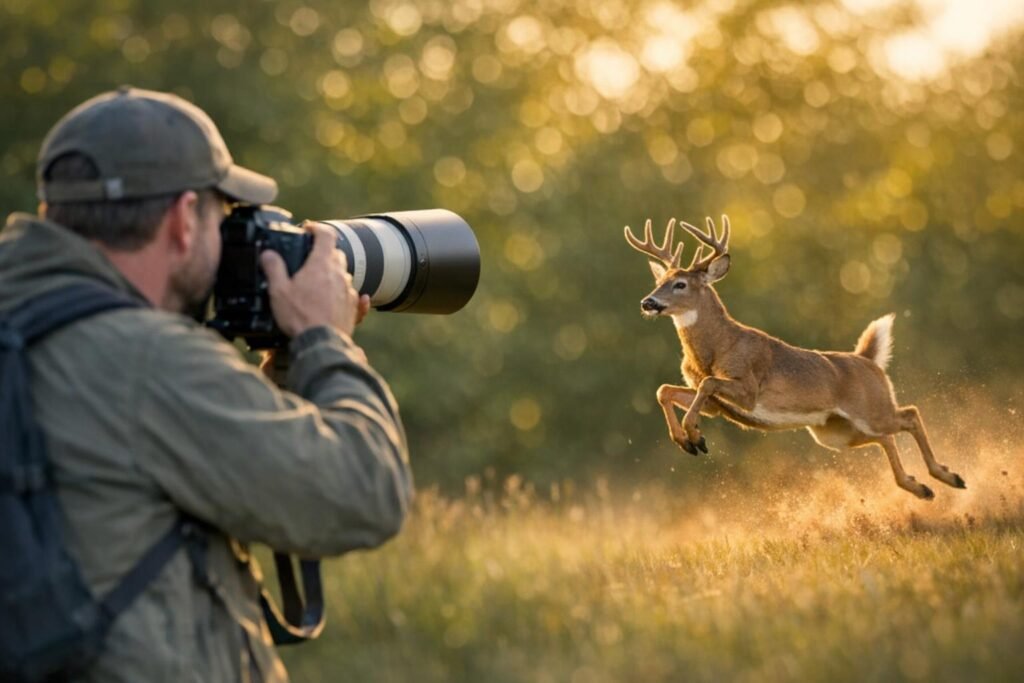
Wildlife photography demands quick decisions and precise settings. The key to success lies in mastering three camera settings: shutter speed, aperture, and ISO. Here’s what you need to know:
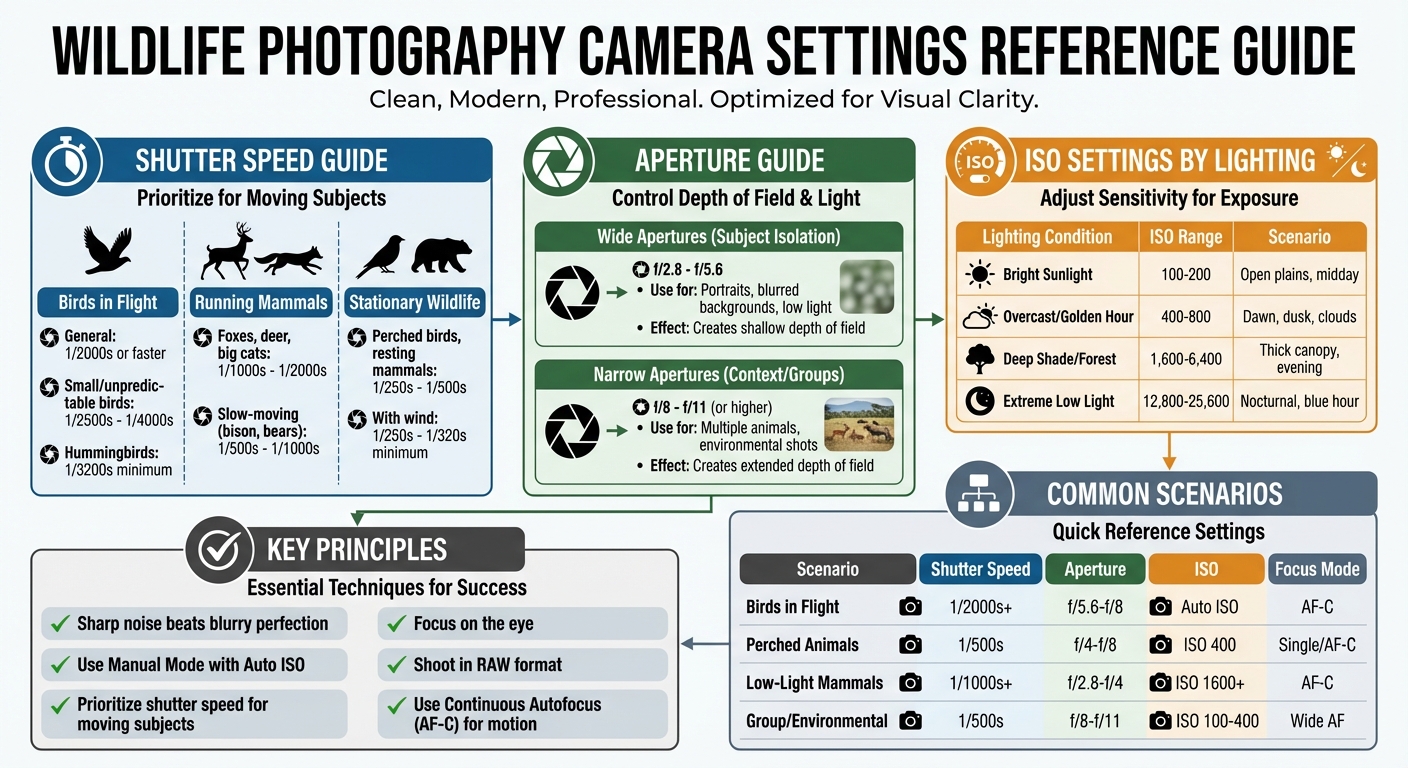
- Shutter Speed: Use faster speeds (e.g., 1/2000s or higher) for moving subjects like birds, and slower speeds (e.g., 1/250s to 1/500s) for stationary animals.
- Aperture: Wide apertures (f/2.8–f/5.6) isolate subjects with blurred backgrounds, while narrower apertures (f/8–f/11) are better for group or detailed shots.
- ISO: Adjust ISO to balance light and noise. Use low ISO (100–200) in bright conditions and higher ISO (1600–6400 or more) in low light.
For moving wildlife, Manual Mode with Auto ISO is highly effective – you set the shutter speed and aperture, and the camera adjusts ISO for proper exposure. Always prioritize sharpness over noise, as a grainy image is preferable to a blurry one.
Additional tips:
- Use Continuous Autofocus (AF-C) for tracking motion.
- Shoot in RAW format for better post-processing flexibility.
- Apply exposure compensation to correct lighting challenges, such as backlit subjects.
Start practicing with local wildlife to refine your skills and build confidence. These techniques will help you handle diverse scenarios, from fast-flying birds to low-light mammal shots.
Wildlife Photography Camera Settings Quick Reference Guide
Best Exposure Settings in Camera for Wildlife Photography
Shutter Speed: Freezing Motion
Shutter speed plays a key role in capturing motion without unwanted blur. The right speed depends on how fast your subject is moving and its size within the frame. For example, subjects shot with longer telephoto lenses (like 500mm or 600mm) demand faster shutter speeds because even slight movements become more pronounced. A handy tip: follow the reciprocal rule – set your shutter speed to match your lens’s focal length, or even double it for added sharpness.
"Sharp noise beats blurry perfection every single time. If your lion’s eye is tack sharp but the ISO is 6400? That’s a keeper. If your lion’s ear is soft because you shot at 1/100 instead of 1/250? That’s a lost shot." – Paolo Sartori, Wildlife Photographer
Modern cameras handle high ISO impressively well, so don’t hesitate to boost ISO to maintain a fast shutter speed. A sharp image with some noise is always better than a blur-free but soft photo. Below, we’ll break down the best settings for both moving and stationary wildlife.
Settings for Moving Subjects
Capturing fast-moving wildlife requires quick shutter speeds. For birds in flight, aim for 1/2000s or faster. Smaller, unpredictable birds may need 1/2500s to 1/4000s, while hummingbirds typically demand at least 1/3200s to freeze their rapid wingbeats.
When it comes to running mammals – like foxes, deer, or big cats in action – choose speeds between 1/1000s and 1/2000s. This range will preserve details in their fur and freeze their swift movements. For slower-moving animals, such as bison or bears strolling along, 1/500s to 1/1000s is usually sufficient.
Keep in mind that wing tips often move faster than the body. Even if the head appears sharp at 1/1000s, the wings might still blur. Always review your shots and adjust your settings as necessary.
Settings for Stationary Wildlife
For subjects that are mostly still – like a perched bird or a resting mammal – you can use slower shutter speeds to allow more light into the frame and reduce ISO. In these cases, 1/250s to 1/500s often works well to maintain sharpness while enhancing image quality.
However, environmental factors matter. If there’s wind rustling leaves around your subject, increase your speed to at least 1/250s to 1/320s to keep the background sharp. Even stationary animals can make slight movements – a blink, a head turn, or a tail flick – so avoid going too slow.
For shutter speeds below 1/250s, especially in low-light situations, use a tripod to prevent camera shake. Remember, image stabilization can help counteract your movement, but it won’t freeze the motion of your subject.
Aperture: Controlling Depth of Field
Aperture plays a key role in determining depth of field – what appears sharp versus what becomes blurred in your photos. Wide apertures (f/2.8–f/4) create a shallow depth of field, while narrow apertures (f/11–f/16) increase the area in focus.
"Aperture offers the greatest creative control over wildlife imagery." – Matt Meisenheimer, Photographer
Wildlife photographers often rely on telephoto lenses, which naturally produce a shallower depth of field compared to wide-angle lenses. This makes your aperture settings even more critical. For instance, using a 500 mm lens at 16 ft (5 m) with an f/5.6 aperture results in a very shallow focus zone, emphasizing the importance of adjusting aperture based on your subject’s distance. Many photographers find that settings between f/5.6 and f/8 strike a sweet spot, balancing subject sharpness with background separation. Let’s dive into how wide and narrow apertures can shape your composition.
Wide Apertures for Isolating Subjects
Wide apertures (f/2.8 to f/5.6) are perfect for isolating your subject, creating beautifully blurred backgrounds that eliminate distractions. These settings are especially handy for capturing striking animal portraits or shooting in low-light conditions, as opening up the aperture allows more light into the lens without needing to crank up the ISO.
"Wildlife photography at its core is, in many ways, portrait photography. This means that we are constantly looking to isolate our subjects from their backgrounds, creating images with tack sharp focus points and buttery smooth bokeh." – Arthur Lefo, Wildlife and Conservation Photographer
For example, at a distance of 43 ft (13 m) with a 500 mm lens set to f/5.6, the depth of field might only be about 8.7 in (22 cm). This can be too narrow to capture details like both eyes and the snout of your subject. Stopping down to f/7.1 or f/8 can help ensure better coverage of your subject’s face. Remember to always focus on the eye – it’s the focal point that draws viewers into the image.
While wide apertures are fantastic for isolating a single subject, narrower apertures are better suited for shots that include more context or multiple subjects.
Narrow Apertures for Group or Landscape Shots
If your goal is to photograph multiple animals or place your subject within its environment, narrow apertures (f/8 to f/11 or higher) are your go-to. These settings expand the depth of field, ensuring that more of the scene stays in focus. For small groups, f/9 to f/13 works well, while f/16 or higher is ideal for subjects at varying distances. For instance, at 500 mm and 66 ft (20 m), using f/8 gives a depth of field of about 2.6 ft (0.8 m), but switching to f/16 nearly doubles it to 5 ft (1.5 m).
"Sometimes, sacrificing having more in focus on a wildlife in landscape shot by widening your aperture is necessary in order to deliver a crisper and less noisy image by shooting with a lower ISO." – Arthur Lefo, Wildlife Photographer
However, narrower apertures often require adjustments to other settings. You might need to raise the ISO or slow the shutter speed to compensate for the reduced light, which can introduce noise or motion blur. During bright daylight, this isn’t usually an issue. But as light fades, you’ll need to weigh the importance of maintaining a deep depth of field against keeping the ISO low for a cleaner image.
ISO: Balancing Light and Noise
ISO controls your camera sensor’s sensitivity to light, allowing you to adapt to various lighting conditions while keeping your shutter speed and aperture settings consistent. When paired with fast shutter speeds and carefully chosen apertures, the right ISO setting ensures you capture sharp, usable images. In wildlife photography, a sharp but grainy photo often outshines a blur-free yet soft image.
"Sharp noise beats blurry perfection every single time. Especially in wildlife." – Paolo Sartori, Wildlife Photographer
For most entry-level and mid-range crop-sensor cameras, you can achieve clean images up to ISO 3,200 or 6,400. High-end full-frame cameras, on the other hand, can handle ISO levels between 12,800 and 20,000 while maintaining professional detail. To avoid excessive noise, it’s a good idea to set an Auto ISO maximum based on your camera’s capabilities. This way, you can focus on framing and composition without worrying about unusable noise levels.
Using Manual Mode with Auto ISO is a popular and highly effective setup for wildlife photography. You control the shutter speed and aperture, while the camera automatically adjusts ISO to achieve proper exposure. Exposure compensation can fine-tune brightness, which is especially helpful when capturing dark subjects against bright backgrounds. This approach is ideal for handling the fast-paced movement and low-light challenges common in wildlife photography. Let’s look at how to adjust ISO for different lighting scenarios.
ISO Settings for Good Lighting
On sunny days, stick to a low ISO range of 100 to 200 for the cleanest, sharpest images. This ensures minimal noise and maximum detail. When conditions shift – like during overcast skies or the golden hours of dawn and dusk – you’ll need to increase ISO to the 400 to 800 range. This adjustment helps maintain the fast shutter speeds required to freeze motion. If your camera’s ISO reaches its base value (commonly 64 or 100) in very bright conditions, you can increase the shutter speed to avoid overexposure.
ISO Settings for Low-Light Conditions
In dimly lit environments, such as dense forests, late evenings, or the blue hour, start with an ISO around 1,600 and adjust up to 6,400 as needed. For extremely low-light scenarios – like photographing nocturnal animals or capturing action at dusk – modern full-frame cameras can handle ISO settings between 12,800 and 25,600 while still delivering usable results. Always prioritize shutter speed over lower ISO values. A grainy photo taken at a high ISO can often be improved during editing, but a blurry image is much harder to salvage. To get the best results, set an appropriate Auto ISO maximum (e.g., 6,400 for crop sensors or 12,800 to 25,600 for full-frame cameras) and shoot in RAW format. RAW files retain more data, making noise reduction in post-processing far more effective.
Here’s a quick summary of recommended ISO ranges for common wildlife lighting conditions:
| Lighting Condition | Recommended ISO Range | Typical Scenario |
|---|---|---|
| Bright Sunlight | 100 – 200 | Open plains, midday sun |
| Overcast / Golden Hour | 400 – 800 | Dawn, dusk, or cloudy skies |
| Deep Shade / Forest | 1,600 – 6,400 | Thick canopy, late evening |
| Extreme Low Light | 12,800 – 25,600 | Nocturnal animals, blue hour action |
sbb-itb-5a98267
Other Camera Settings to Consider
In addition to shutter speed, aperture, and ISO, there are other settings that can significantly influence the quality of your images. These options allow for even greater control and refinement when working with the exposure triangle.
Autofocus Settings
For photographing fast-moving wildlife, Continuous Autofocus (AF-C or AI Servo) is indispensable. This mode continuously adjusts focus as your subject moves, ensuring sharp images even in dynamic situations .
"Continuous focus is for moving subjects. Single focus is for static subjects." – Charlie’s Wildlife Photography
To improve your ability to track subjects, consider reassigning the focus function to a dedicated back button (commonly labeled AF-ON). This technique gives you more control, allowing you to hold the button for continuous focus or release it to lock focus. It essentially combines the strengths of both continuous and single autofocus modes .
When it comes to focus area selection, single-point AF is ideal for precision, such as focusing on an animal’s eye. For subjects that move unpredictably, switching to zone or wide-area AF can help maintain focus more effectively . Many modern mirrorless cameras also feature animal eye autofocus, which automatically detects and tracks the eyes of animals. However, this feature may not function as well in low-contrast scenes or if the animal’s eye is partially obscured.
Fine-tuning your focus settings is just one part of the equation. Adjusting exposure settings can further elevate your images, especially in challenging lighting conditions.
Exposure Compensation and RAW Format
Two powerful tools for refining your wildlife photography are exposure compensation and shooting in RAW.
Exposure compensation helps correct metering errors in tricky lighting scenarios. For example, in high-contrast scenes – such as a dark animal set against a bright sky or a white bird framed by dark foliage – adding +1.0 to +2.0 stops of compensation can help brighten backlit subjects. Conversely, using negative compensation (around -1/3 to -2/3 stops) can preserve highlight details in bright or unevenly lit environments, like dappled forest light .
Shooting in RAW format is another must for achieving professional-quality results. RAW files retain the maximum amount of image data, offering far greater flexibility during post-processing .
"If you want to get your photos to a professional level and get the most out of what your camera is capable of, you want to be shooting in RAW." – Alastair Marsh, Wildlife Photographer
When shooting in RAW, you can confidently leave your white balance set to auto, knowing you can adjust the color temperature later during editing. Together, these tools round out your arsenal for capturing sharp, well-exposed images of wildlife in any environment.
Settings for Common Wildlife Scenarios
Now that you’ve got the basics down, let’s dive into how to fine-tune your camera settings for typical wildlife photography situations. The goal? To balance sharpness, exposure, and depth of field for the best results.
Birds in Flight
Capturing birds in motion requires fast shutter speeds. Aim for 1/2,000s as a starting point, but for smaller, quicker species, bump it up to 1/3,200s–1/4,000s. Keep your aperture between f/5.6 and f/8 to ensure sharp detail across the bird’s wings and body. Wider apertures can leave parts of the bird out of focus, so avoid going too wide here. Use Manual Mode with Auto ISO, allowing your camera to adjust exposure while you control shutter speed and aperture.
"With birds in flight, I’m almost always at 1/2500-1/3200s"
Set your autofocus to Continuous Autofocus and use a dynamic or zone focus area to track the bird effectively. If your subject is backlit against a bright sky, apply positive exposure compensation (+1.0 to +2.0 stops) to prevent underexposure. For perched or less active birds, you can dial back these settings for a more balanced approach.
Perched or Stationary Animals
When photographing stationary wildlife, you don’t need as fast a shutter speed. 1/500s is usually enough for handheld shots with a telephoto lens, helping to freeze minor movements. Adjust your aperture between f/4 and f/8, depending on whether you want a blurred background or more environmental detail. In good lighting, set your ISO to around 400 to retain clarity without introducing noise.
Low-Light Mammal Photography
Shooting in low light – whether at dawn, dusk, or under dense foliage – requires specific adjustments. Use your widest aperture (like f/2.8 or f/4) to let in as much light as possible. For moving mammals, stick to a shutter speed of 1/1,000s or faster. If your subject is stationary and your camera is stabilized, you can drop to 1/100s–1/250s. To compensate for the lack of light, increase your ISO to 1,600 or higher. Modern cameras handle higher ISO settings better than ever, and any noise can be reduced during post-processing.
"A noisy image is better than a blurred one." – Will Nicholls, Professional Wildlife Photographer
For better results, use burst mode to capture multiple frames. Avoid using teleconverters in low light, as they reduce the amount of light reaching your sensor. Also, steer clear of underexposing with the intention of brightening shadows later – this can lead to unwanted noise. If you’re photographing multiple subjects or including their surroundings, you’ll need to tweak your settings further.
Group Scenes or Environmental Shots
When photographing a group of animals or incorporating their habitat, a narrower aperture (like f/8 to f/11) is key to keeping both your subjects and the background in focus. A shutter speed of 1/500s works well to freeze slow-moving groups and reduce blur when shooting handheld with a telephoto lens. In well-lit conditions, an ISO between 100 and 400 will help maintain fine detail.
For exposure, switch to matrix/evaluative metering to achieve a balanced result. Use a wide or whole-area autofocus mode to track multiple subjects effectively. If the scene has even lighting, applying a small exposure compensation (+1/3 to +2/3 stops) can help retain shadow details, making post-processing easier.
Conclusion
Wildlife photography thrives on a solid understanding of the Exposure Triangle – shutter speed, aperture, and ISO. These three settings work together to help you adapt to the unpredictable conditions nature throws your way. Aperture gives you the power to control depth of field, whether you want to isolate your subject with a beautifully blurred background or capture it in the context of its environment. ISO, on the other hand, acts as your safety net, letting you maintain the shutter speeds and apertures you need, even when the light begins to fade.
Here’s a critical tip: sharpness trumps perfection. A sharp image with some noise is far more valuable than a noise-free shot that ends up soft or blurry. Using Manual Mode with Auto ISO strikes a great balance – it gives you creative control over your settings while letting the camera handle quick exposure adjustments in dynamic situations.
Once your settings are dialed in, it’s time to put theory into practice. Start small – photograph backyard birds or squirrels in your neighborhood to build confidence before chasing after rarer wildlife encounters. Experiment with your camera at different ISO levels to understand its limits and how it performs in various lighting conditions. Practice adjusting your settings until it becomes second nature, so you can make changes without ever taking your eye off the viewfinder. Over time, this muscle memory will free you up to focus on what truly matters – composition and observing the unique behaviors of your subjects.
FAQs
What camera mode is best for photographing wildlife in motion?
The Shutter Priority mode (marked as Tv or S on most cameras) is a go-to setting for photographing wildlife in motion. This mode allows you to control the shutter speed, which is key to freezing fast action – whether it’s a bird soaring through the sky or a deer sprinting through the forest. Meanwhile, the camera takes care of adjusting the aperture to achieve the right exposure.
To get the best shots, opt for a fast shutter speed – typically 1/1000 of a second or quicker. Combine this with a suitable ISO setting to handle changing light conditions while keeping your images sharp and detailed.
How should I adjust ISO for different lighting conditions in wildlife photography?
To fine-tune ISO settings for wildlife photography, start by evaluating the lighting conditions. On a sunny day, stick to a low ISO, such as 100–200, for the sharpest and cleanest shots. If the light dims, like on overcast days or in shaded areas, bump the ISO up to 800–1600 to maintain good exposure and a fast shutter speed. When shooting during dawn or dusk, you may need to push ISO to 3200–6400. In extremely low-light environments, such as dense forests or nighttime scenes, modern cameras can often handle ISO settings of 12,800 or even higher.
For situations where lighting fluctuates quickly, using Manual mode paired with Auto ISO can be a lifesaver. Simply set your preferred shutter speed and aperture, and let the camera handle ISO adjustments. To keep noise under control, set a maximum ISO limit in your camera’s settings and consider applying noise reduction during editing. The goal is to keep ISO as low as possible while ensuring your images are sharp and properly exposed.
What are the best aperture settings for photographing wildlife groups versus individual animals?
When photographing groups, select a narrower aperture (higher f-stop, such as f/8 or f/11). This ensures a greater depth of field, keeping everyone in the shot sharp and in focus. For individual wildlife portraits, go with a wider aperture (lower f-stop, like f/2.8 or f/4). This creates a shallow depth of field, blurring the background and drawing attention to your subject. Always adjust your settings based on the available light and the artistic look you’re aiming for.