
When you’re far from medical help, knowing how to handle burns can save lives and prevent long-term damage. Burns in the wilderness are often caused by cooking accidents, campfires, or prolonged UV exposure. Without access to hospitals, you’re left to manage pain, infection risks, and fluid loss with limited supplies. Here’s what you need to know:
- Burn Types: First-degree (red, no blisters), second-degree (blisters, moist), and third-degree (charred or waxy, painless center).
- First Aid Steps: Stop the burn, cool with clean water (not ice), clean gently, and cover with sterile or clean, non-stick dressings.
- Pain Relief: Alternate Ibuprofen and Acetaminophen, staying within daily limits (1,200 mg and 4,000 mg respectively).
- Evacuation Triggers: Burns on the face, hands, feet, genitals, or over 10% of the body; airway involvement; or signs of infection.
- Prevention: Use stable cooking setups, keep pot handles turned inward, and apply sunscreen to avoid sunburns.
Preparation is key. Carry a well-stocked first aid kit and know how to act quickly. These steps can make a critical difference when you’re far from professional help.
Wilderness First-Aid: Treating Burns 2024 Guide
How to Prevent Burns in the Wilderness
Burns in the wilderness often happen during routine activities when fatigue sets in and caution slips. In fact, two-thirds of backcountry burns are caused by spilled boiling water, and burns make up 9% of all skin and soft tissue injuries on NOLS expeditions. A few simple adjustments to your camp routine can go a long way in preventing these injuries. By recognizing common sources of burns, you’ll be better equipped to take preventive measures.
Common Sources of Burns Outdoors
When you’re outdoors, campfires, stoves, and lanterns are the usual culprits for thermal burns. Flames, hot cookware, and glowing embers can all pose risks. Scald burns are another concern – spilled hot liquids like coffee, cocoa, or boiling water can cause serious harm, especially if the heat gets trapped by your clothing. Even natural hot springs, if over 72°F (22°C), can lead to burns if you stay submerged too long.
Environmental hazards like wildfires and chemical burns from stove fuel add to the risks. Plus, prolonged UV exposure can result in sunburns and even long-term skin damage. Snow blindness, a painful burn to the eyes caused by UV rays reflecting off snow or water, can strike even on overcast days.
Safety Practices to Avoid Burns
A few thoughtful habits can significantly reduce your chances of getting burned. For example, squatting near your stove instead of sitting allows you to move away quickly if something tips or flares up. Dr. Christopher Tedeschi recommends placing mugs on the ground before pouring hot liquids to avoid spills.
Here are additional tips to keep in mind:
- Always set mugs, thermoses, and bowls on stable surfaces before pouring.
- Walk around lit stoves and fires instead of reaching over them.
- Turn pot handles inward to prevent accidental tipping.
- Use thick gloves or potholders when handling hot cookware.
- Maintain a 3-foot safety zone around heat sources, especially if kids are present.
- Stay clear of alcohol or drugs when near open flames.
For sun safety, apply high-SPF sunscreen regularly and wear wrap-around sunglasses to protect your eyes from UV glare. These precautions not only lower your risk of burns but also help you stay focused on enjoying your wilderness experience.
Types of Burns and How to Identify Them
When you’re in a remote area, knowing how to classify a burn can make all the difference. It helps you decide whether to treat the injury on-site or arrange for immediate evacuation. Burns are categorized by how deeply they affect the skin, and each type requires a unique approach to care.
First-Degree Burns
First-degree burns are the least severe, affecting only the epidermis, which is the skin’s outer layer. These burns cause redness, tenderness, and slight swelling – similar to a mild sunburn. To confirm, use the blanching test: press lightly on the red area with your finger. If the skin turns white and then quickly returns to red, it’s likely a first-degree burn. There are no blisters, and the skin remains dry. These burns usually heal on their own within 3 to 6 days and don’t require specialized treatment.
Second-Degree Burns
Second-degree burns go deeper, reaching the dermis, the layer beneath the epidermis. A clear sign of these burns is the presence of fluid-filled blisters, which may form immediately or within 24 hours. The skin often appears moist and mottled pink or red. These burns are extremely painful because the nerve endings are still intact. The blanching test typically works here too, although deeper second-degree burns may blanch less or not at all. Recovery time can range from 7 to 25 days, depending on the severity.
Third-Degree Burns
Third-degree burns are the most severe, destroying all layers of the skin and potentially affecting underlying fat, muscle, or even bone. These burns have a distinctive appearance: the skin may look charred black, waxy white, or pearl gray and feels leathery. Surprisingly, the center of these burns might be painless because the nerve endings are destroyed.
Dr. Elizabeth Hewett Brumberg from the Red Cross Scientific Advisory Council emphasizes:
"A burn that needs to go to the emergency department includes any burn that involves the face, the hands, the genitals, or any burn that’s larger than your palm."
The blanching test doesn’t work for third-degree burns, as the damaged skin won’t turn white under pressure. Another indicator is the hair pull test: if hair in the burned area can be pulled out easily and without pain, it means the follicles and nerves are destroyed. These burns require immediate evacuation and advanced medical treatment, such as skin grafts, as they cannot heal on their own.
Immediate Actions for All Burns
Regardless of the burn type, remove any jewelry, watches, or tight clothing from the affected area as soon as possible. Swelling can occur rapidly and may cut off circulation within minutes. With over 400,000 Americans visiting emergency rooms for burn injuries each year, understanding these identification techniques is crucial, especially when professional help isn’t immediately available. Recognizing the type of burn ensures you can take the right steps to provide effective first aid.
First Aid Steps for Wilderness Burns
Wilderness Burn First Aid: 4-Step Emergency Response Guide
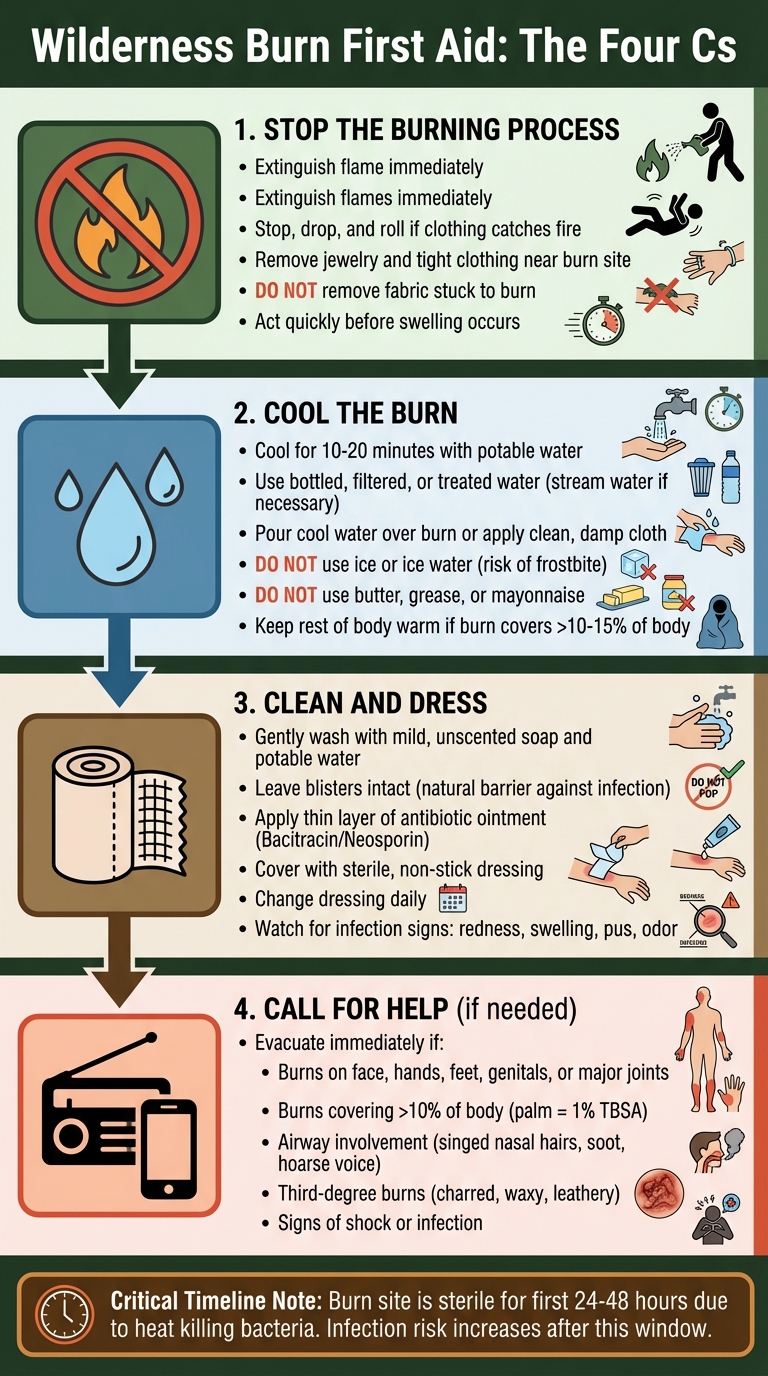
When you’re far from medical help, taking immediate action after a burn can make a big difference. Quick steps can minimize tissue damage and lower the risk of infection. Annette Matherly from the Utah Burn Center recommends following the "Four Cs": cool, clean, cover, and call for help.
Stop the Burning Process
Start by stopping the source of the burn. If flames are involved, extinguish them immediately. If your clothing catches fire, remember to stop, drop, and roll, or smother the flames with something like a jacket or sleeping bag. Remove jewelry or tight clothing near the burn site to prevent complications from swelling. However, if fabric is stuck to the burn, do not attempt to pull it off – it could cause more harm. Act quickly, as swelling can make removing items like rings or bracelets more difficult.
Once the burning has stopped, the next step is to cool the area.
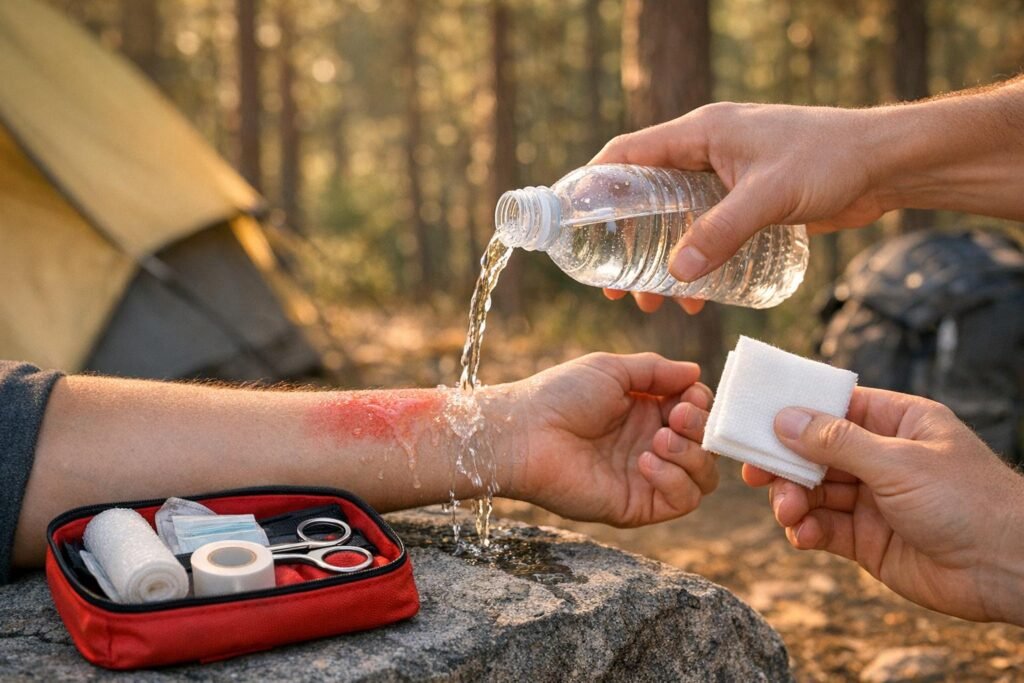
Cool the Burn
Cooling the burn is crucial to prevent deeper heat damage and ease the pain. Ideally, you should cool the area for 10 to 20 minutes using potable water, such as bottled, filtered, or treated water. If you’re in the wilderness and don’t have access to potable water, using stream water is acceptable. As Matherly puts it:
"If that’s all you have, then you use stream water. You’ve got to take out that burn. And is it optimal? No… but you’ve got to do these things."
Pour cool water over the burn or press a clean, damp cloth against it if running water isn’t available. Avoid using ice or ice water, as these can restrict blood flow and may lead to frostbite. Also, steer clear of home remedies like butter, grease, or mayonnaise, as they can trap heat in the wound. For burns covering more than 10–15% of your body, take precautions against hypothermia by keeping the rest of your body warm with blankets.
Clean and Dress the Wound
Once the burn is cooled, the next step is cleaning and dressing it. Gently wash the area with mild, unscented soap and potable water. If blisters have formed, leave them intact – they act as a natural barrier against infection. After cleaning, apply a thin layer of antibiotic ointment, such as Bacitracin or Neosporin, and cover the burn with a sterile, non-stick dressing. If you don’t have sterile gauze, improvise with a clean t-shirt or loosely wrap the area with plastic wrap to shield it from dirt and debris.
Change the dressing daily and keep an eye out for signs of infection, such as redness, swelling, pus, or an unusual odor. While the burn site is generally sterile for the first 24 to 48 hours due to the heat killing bacteria, the risk of infection increases after this window. Keeping the wound clean and properly covered is essential if medical care isn’t immediately available.
sbb-itb-5a98267
Advanced Burn Care Techniques
When dealing with severe burns, advanced care techniques go beyond basic first aid, helping you make critical decisions about treatment and evacuation. These methods are essential in ensuring the best possible outcomes in emergency situations.
How to Assess Burn Severity and Size
Understanding the severity and size of a burn is key to determining the next steps. The Rule of Nines is a widely used method for estimating the total body surface area (TBSA) affected by burns in adults. Here’s the breakdown: each arm accounts for 9%, the head for 9%, each leg for 18%, the front or back of the torso for 18%, and the genital area for 1% of TBSA. For smaller or irregular burns, the Palm Method is handy – the patient’s palm, including fingers, represents about 1% of their TBSA.
Burns covering more than 15% TBSA often require intravenous fluids in a hospital setting, while burns exceeding 20%–30% TBSA can lead to systemic shock. Rapid evacuation is critical for partial-thickness or full-thickness burns affecting over 10% of the body. Circumferential burns are especially dangerous, as swelling can block circulation. Be alert for airway burns – symptoms like singed nasal hairs, soot in saliva, or a hoarse voice signal an immediate need for evacuation. These assessments guide your response and prioritize care.
Managing Pain and Preventing Infection
Once you’ve assessed the burn, managing pain and infection becomes the priority. Alternate doses of Acetaminophen and Ibuprofen every two hours to control pain, ensuring you stay within daily limits: 4,000 mg for Acetaminophen and 1,200 mg for Ibuprofen. This staggered approach helps maintain consistent relief, especially when medical help is far away.
Burns often lead to significant fluid loss, making hydration essential. Provide plenty of water with electrolytes to prevent dehydration. Keep an eye on dressings, and watch for infection signs like redness, swelling, pus, or foul odors. If a dressing sticks to the wound, soak it with clean water before removing it to reduce pain. For burns covering more than 2%–3% TBSA, use dry, sterile dressings to reduce the risk of hypothermia.
Improvised Dressings and Natural Options
In situations where medical supplies are scarce, improvisation becomes necessary. Honey can act as an effective antibacterial treatment for burns if triple-antibiotic ointment isn’t available. For superficial burns, such as sunburns, aloe-based gels or creams can provide relief, but they’re not suitable for deep thermal burns. If nothing else is available, clean, moist cloths or towels can protect the burn from dirt and debris.
Use clean water for cooling, cleaning, and hydration. If stranded in the wilderness for several days, a diet rich in carbohydrates and Vitamin C can aid tissue repair and healing. These simple measures can make a significant difference when resources are limited.
When to Evacuate and Get Medical Help
After addressing immediate burn care, it’s crucial to know when professional medical help is necessary. Acting quickly can prevent serious complications like shock, infection, or respiratory failure.
Warning Signs of Severe Burns
The most urgent concern is airway compromise. Signs like soot around the mouth or nose, singed nasal hairs, a hoarse voice, noisy breathing, or persistent coughing demand immediate evacuation. According to Tod Schimelpfenig of NOLS Wilderness Medicine, burns that cover more than 10% of the body also require evacuation.
To estimate the size of a burn, use the patient’s palm – it represents about 1% of the total body surface area. Burns that are full-thickness (appearing charred, leathery, or waxy white) always need professional care. Additionally, burns on sensitive areas such as the face, hands, feet, armpits, groin, or major joints should be treated as emergencies due to the risk of functional loss or airway issues. Circumferential burns, which encircle a limb, chest, or neck, are especially dangerous because swelling can cut off circulation or restrict breathing.
Be alert for systemic symptoms like a rapid heart rate, clammy skin, confusion, shivering, or vomiting – these can signal shock. If pain becomes unmanageable or signs of infection appear (fever, spreading redness, or pus), seek medical help immediately. Partial-thickness burns larger than 3 inches across also typically require emergency care.
Once you identify severe symptoms, focus on stabilizing the patient and planning for evacuation.
How to Evacuate from Remote Areas
Start by stabilizing the patient. Stop the burn source, ensure the airway is clear, and address any signs of shock. Lay the patient flat, elevate their legs slightly (no more than 12 inches), and keep them warm, as severe burns can disrupt the body’s ability to regulate temperature. Remove any jewelry or tight items to prevent complications from swelling.
In remote areas without cell service, use a Personal Locator Beacon or satellite messenger to request help. When contacting Search and Rescue, provide as much detail as possible, including the cause of the burn, whether there was an explosion, any additional injuries, the patient’s medical history, and a timeline of events. During transport, cover burns loosely with sterile or clean, dry dressings to reduce the risk of infection. Keep the patient hydrated with water and electrolytes, but avoid potassium-heavy drinks like certain juices.
These steps ensure your initial care transitions smoothly to professional medical treatment when it’s needed most.
Conclusion
Why Preparation Matters
Wilderness burns may be rare, but they require you to be fully prepared. Out in the backcountry, there’s no access to standard hospital treatments – your first aid kit and knowledge are your lifelines.
A solid first aid kit stocked with essentials like non-stick dressings, Bacitracin, and electrolyte solutions is crucial for treating burns in remote areas. But having the right gear is just part of the equation. Knowing how to handle a burn can make the difference between a manageable situation and a life-threatening emergency. As Mandi, RN, points out, severe burns can lead to fatal outcomes, cause lasting damage, and demand urgent medical attention.
Being prepared doesn’t just reduce risks – it connects your immediate response to long-term safety while enjoying outdoor adventures.
Stay Safe While Enjoying the Outdoors
Alongside preparation, staying alert and practicing safe habits are key to avoiding burns in the wild. Respect your environment by carrying the right gear and taking simple precautions. For example, squat instead of sitting while cooking, set your stove on stable ground, and stay extra attentive during activities that involve fire or hot surfaces. These straightforward steps can go a long way in preventing burns. And if an accident does occur, proper cooling, pain relief, and timely evacuation can stop minor injuries from turning serious.
Ultimately, your safety is in your hands. Equip yourself with the knowledge and tools needed to handle burns and other emergencies before heading out. With the right preparation, you can embrace the outdoors with confidence and respond effectively if challenges arise.
FAQs
What are the best ways to prevent burns while camping in the wilderness?
Preventing burns while camping starts with practicing smart fire safety. Always build campfires in designated fire pits or in cleared areas that are at least 3 feet away from tents, gear, and vegetation. Before starting a fire, clear away anything flammable, like leaves and sticks, and stick to using dry, seasoned wood – steer clear of accelerants like gasoline or lighter fluid. Keep a bucket of water or sand nearby, and when it’s time to put the fire out, make sure it’s fully extinguished by dousing it with water, stirring the ashes, and dousing again. Avoid lighting fires on windy days, and always keep an eye on children and pets near the fire.
Cooking while camping can also be a source of burns if precautions aren’t taken. Set up stoves on stable, flat surfaces, and use a windscreen to keep the flame steady. Keep pot handles turned inward to prevent accidental spills, and let boiling liquids cool slightly before moving them. Always use both hands to carry hot items, and store hot cookware on a heat-proof surface away from where people walk. For added protection, lightweight, heat-resistant gloves can be a helpful addition to your gear.
Lastly, make sure you’re prepared for minor mishaps by packing a basic first-aid kit. Include items like sterile gauze and non-adhesive dressings specifically for treating burns. With a little preparation and attention to safety, you can enjoy your camping trip without worrying about injuries.
What are the signs that a burn needs emergency evacuation in the wilderness?
Certain burns demand immediate evacuation because they can’t be handled safely in a wilderness setting. Here’s what to watch for:
- Size and depth: Burns affecting 10% or more of the body, or those that are deep partial-thickness or full-thickness (third-degree), need prompt medical care.
- Critical areas: Burns on the face, hands, feet, joints, genitals, or any that encircle a limb (circumferential burns) pose serious risks, such as restricted blood flow, and require evacuation.
- Severe symptoms: Signs like intense, unmanageable pain, symptoms of shock (pale, clammy skin or a weak pulse), or rapidly worsening swelling suggest systemic issues.
- Other complications: Burns accompanied by traumatic injuries, pre-existing health conditions, or inhalation injuries (e.g., coughing, hoarseness, or soot in the mouth) need immediate professional attention.
If you notice any of these warning signs, focus on getting the person to a medical facility without delay.
How can I manage burn pain effectively when far from medical help?
To handle burn pain in the wilderness, the first step is to cool the burn. Use clean, cool water or a damp compress for 10–20 minutes, but steer clear of ice-cold water – it can cause further tissue damage. Once the area is cooled, elevate and immobilize it. For example, you can create a temporary sling to minimize swelling and irritation.
For pain relief, consider taking ibuprofen or naproxen (400–600 mg) along with acetaminophen (500–1,000 mg), if it’s safe for you. If NSAIDs aren’t an option, acetaminophen alone can still provide relief. Staying hydrated is equally important, as it helps your body recover and better manage pain. If you don’t have access to proper wound dressings, you can use clean, natural alternatives like aloe vera gel, honey, or even a boiled potato peel to keep the burn moist and protected.
By focusing on cooling, elevation, pain management, hydration, and clean coverings, you can effectively manage burn pain until professional medical care is available.