
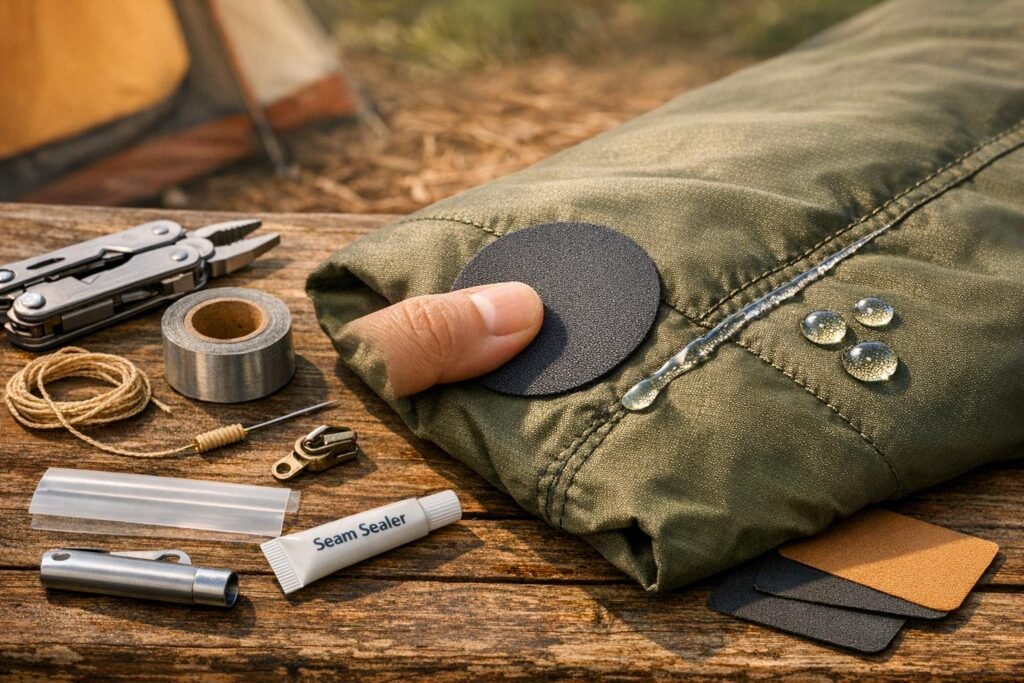
An outdoor gear repair kit is your safety net for unexpected equipment failures during adventures. It includes tools like multi-tools, adhesives, and fasteners to fix common issues such as torn fabric, broken zippers, or damaged tent poles. A well-prepared kit saves money, reduces waste, and ensures you can continue your trip with minimal disruption.
Key Takeaways:
- Core Tools: Multi-tools (e.g., Leatherman Micra), duct tape, adhesives (like Tenacious Tape), and fasteners (zip ties, paracord).
- Material-Specific Supplies: Nylon patches for jackets, silicone-based adhesives for SilNylon tents, and Aquaseal for inflatable gear.
- Field Repair Tips: Clean surfaces before repairs, use rounded patches, and test your skills at home.
- Organization Tips: Use waterproof bags for storage, keep tools lightweight, and distribute items among group members.
Preparation and practice are essential. A reliable kit can turn gear mishaps into minor inconveniences, keeping your adventures on track.
Gear fix it kit| A necessity in all of your hard use gear
sbb-itb-5a98267
Core Tools for Outdoor Gear Repair Kits
When you’re out in the wild, the difference between a minor inconvenience and a trip-ending disaster often comes down to having the right tools. A well-prepared repair kit should include essentials from three key categories: cutting tools, adhesives, and fasteners. These items are lightweight yet versatile, ready to handle a variety of emergencies.
Multi-Tools and Cutting Implements
A compact multi-tool is a must-have for any repair kit. Options like the Leatherman Micra (about $30) or the Leatherman Juice S2 (around $65, weighing 4.4 oz) are excellent choices, offering scissors, pliers, and knife blades. Scissors are particularly important since their precision is hard to replicate in the field. Pliers can help with everything from pulling thick needles through heavy webbing to adjusting stove or backpack hardware.
"A multitool with scissors – which are hard to improvise in the field – simplifies repairs like trimming fabric patches."
– Kristin Hostetter, Gear Editor, Backpacker Magazine
The knife is handy for cutting cordage and preparing fabric edges, while an awl can punch holes in damaged boots or create openings for stitching. Make sure the screwdrivers on your multi-tool match the screws on your gear.
Adhesives and Tapes
Duct tape is the classic go-to for quick fixes, but Tenacious Tape (starting at $3) offers a more durable solution for technical gear. Unlike duct tape, it bonds permanently to materials like nylon, plastic, and rubber without leaving a sticky residue – and it can even withstand machine washing. For sealing tent seams or repairing sleeping pads, Seam Grip (about $7) is a flexible, waterproof adhesive that’s earned accolades, including Backpacker Magazine’s Editor’s Choice 25-Year Hall of Fame award.
"There is no substitute for Aquaseal if you are going to patch something that inflates."
– Saylor Flett, Outdoor Recreation Instructor, Feather River College
To save space, wrap 2–3 feet of duct tape around a water bottle or trekking pole. Always clean surfaces with isopropyl alcohol before applying adhesives, and round off the corners of patches to prevent peeling.
Fasteners and Binding Tools
Fasteners like zip ties are incredibly versatile, capable of standing in for broken straps, shoelaces, or guylines. Safety pins are great for quick clothing fixes or adjusting gear, while a few feet of paracord can replace guy-lines or serve as makeshift straps. Don’t forget to pack replacement buckles for hip belts and sternum straps.
For tent repairs, a tent pole splint (about $6) is an aluminum sleeve that can stabilize a broken pole when secured with duct tape. When sewing is necessary, heavy-duty needles paired with dental floss or fishing line provide strong, durable repairs. A complete repair kit with these tools typically weighs between 1.6 and 3.5 oz, leaving plenty of room in your pack.
With these essentials, you’ll be ready to handle a wide range of repairs in the field, ensuring your adventure continues uninterrupted.
Repair Supplies for Different Materials
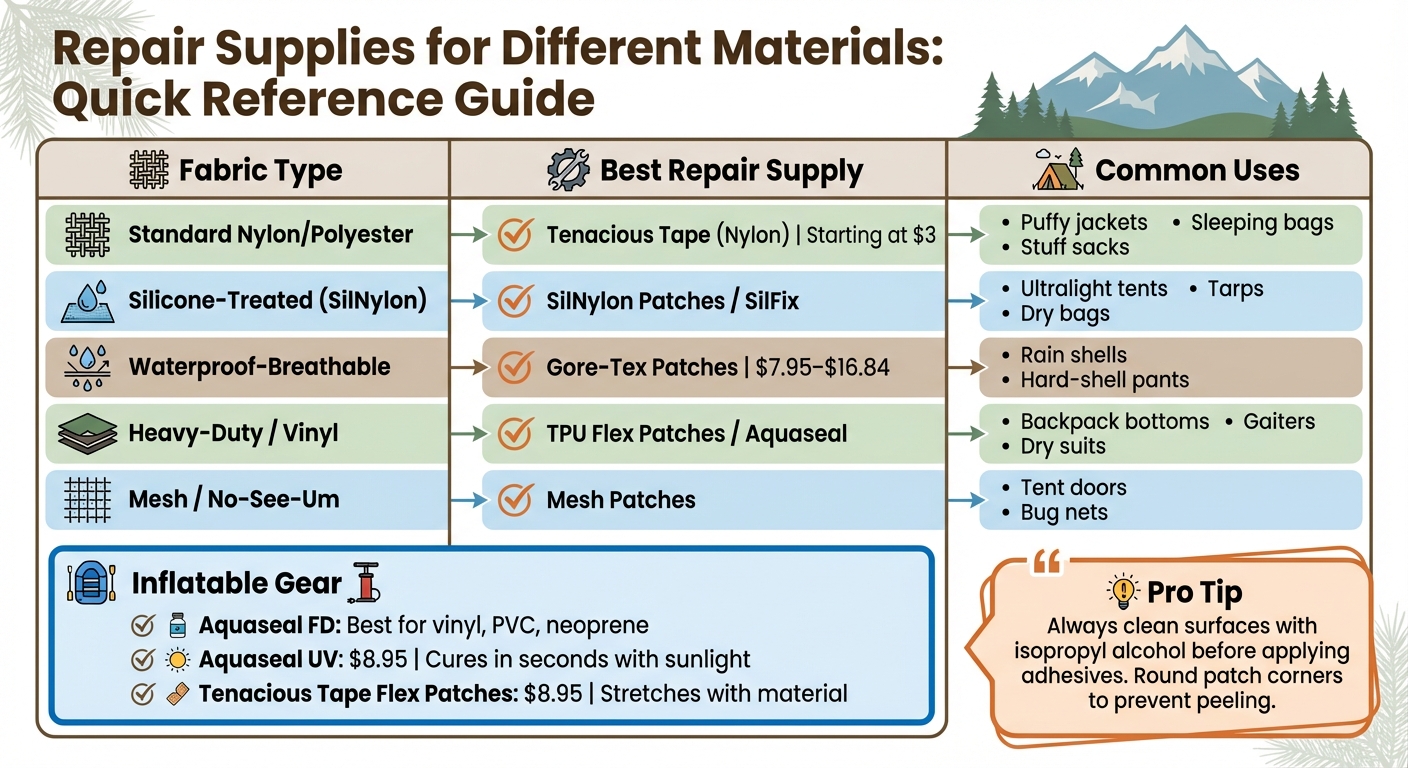
Outdoor Gear Repair Supplies by Fabric Type Guide
Once you’ve got your core tools ready, the next step is to match your repair supplies to the materials of your gear. Outdoor equipment can vary widely – nylon tents, silicone-coated tarps, and inflatable pads all require specific fixes. Using the right supplies for each material is crucial for a repair that lasts.
Textile and Fabric Repairs
For nylon and polyester fabrics found in jackets, sleeping bags, and stuff sacks, Tenacious Tape patches are a reliable choice. These pressure-sensitive patches come in nylon, ripstop, and clear vinyl options, forming a permanent bond with technical fabrics without leaving residue. For waterproof-breathable materials, Gore-Tex patches ($7.95–$16.84) not only seal tears but also maintain the fabric’s performance.
"Tenacious Tape is a gear repair tape that comes in a plethora of different textures, colors, shapes, and sizes. It’s designed to restore technical fabrics."
– Ali Becker, Adventure Writer
If adhesive patches alone don’t do the trick, urethane adhesives like Seam Grip FD or Aquaseal ($4.00–$12.95) provide a flexible, durable bond after an 8–12-hour curing period. For high-stress areas like backpack straps, reinforce the repair by applying a patch on the inside as backing, then seal the exterior with urethane adhesive for added durability. When working with heavy-duty fabrics or webbing, a Speedy Stitcher sewing awl (≈$15.00) and heavy-duty thread are ideal for creating strong, long-lasting repairs.
| Fabric Type | Best Repair Supply | Common Uses |
|---|---|---|
| Standard Nylon/Polyester | Tenacious Tape (Nylon) | Puffy jackets, sleeping bags, stuff sacks |
| Silicone-Treated (SilNylon) | SilNylon Patches / SilFix | Ultralight tents, tarps, dry bags |
| Waterproof-Breathable | Gore-Tex Patches | Rain shells, hard-shell pants |
| Heavy-Duty / Vinyl | TPU Flex Patches / Aquaseal | Backpack bottoms, gaiters, dry suits |
| Mesh / No-See-Um | Mesh Patches | Tent doors, bug nets |
Waterproof and Sealed Gear
When it comes to waterproof gear, maintaining the integrity of sealed seams and membranes is critical. Seam Grip + WP sealant (starting at $9.95) is great for resealing tent seams and fixing pinholes, forming a permanent, flexible waterproof bond. Before applying any adhesive, clean the area with isopropyl alcohol – but be cautious with tent flies, as alcohol can damage certain coatings.
For silicone-coated fabrics, standard adhesives won’t work. Instead, use silicone-based products like Sil-Net or Sil-Poxy, which are specifically formulated for these surfaces. A pro tip: warm the adhesive slightly with your fingers when applying patches in wet conditions to improve bonding. Cutting patches with rounded corners also helps prevent peeling over time.
Inflatable Gear Fixes
Inflatable items like sleeping pads, air mattresses, and rafts require adhesives that can flex under pressure. Aquaseal FD is a top choice, offering excellent durability on materials like vinyl, PVC, and neoprene.
For quick repairs in the field, Aquaseal UV ($8.95) cures in seconds when exposed to sunlight, making it perfect for sunny-day emergencies. Another great option is Tenacious Tape Flex Patches ($8.95), which stretch with the material and resist punctures better than standard patches. To locate pinhole leaks, inflate the item and brush it with soapy water – bubbles will reveal the leak. For larger tears (over 1 inch), use masking tape on the inside as a temporary bridge, then apply a urethane adhesive on the exterior, overlapping the edges by 1/4" to 1/2" for a secure seal.
Field Repair Techniques and Best Practices
Having the right tools is only part of the equation – knowing how to use them properly is what ensures a repair holds up in the field. Being prepared and using careful techniques are just as important as having a well-stocked repair kit. A rushed repair might save time initially, but it often doesn’t last.
Fixing Tears and Punctures
The first step in repairing tears or punctures is to clean the damaged area thoroughly with rubbing alcohol. This removes dirt, oils, and sunscreen, which can interfere with adhesion. For fabric tears, gently push any exposed insulation back into place and trim loose threads. Cut a patch that overlaps the tear by at least 1/4 inch on all sides, and round the corners to prevent peeling.
For inflatable sleeping pads, finding the leak is the trickiest part. Inflate the pad and brush soapy water over the surface – bubbles will reveal even the tiniest pinholes. Once located, deflate the pad, clean the area with alcohol, and lightly roughen smooth surfaces with fine sandpaper. This step helps the adhesive stick better before applying the patch.
"Knowing how to sew and use a Speedy Stitcher has saved me a great deal of duct tape use." – Steve Robitshek, Instructor, NOLS
For waterproof gear like rain jackets, large rips should be sewn first, followed by a thin layer of seam sealer (such as Seam Grip) applied to both sides to restore the waterproof barrier. For tent seams, applying sealant to the inside seams works best – aim for a thickness about the same as spreading butter on toast (approximately 1 millimeter). A useful tip: rolling a hot water bottle over the patch helps the adhesive bond more effectively.
Now, let’s look at how to restore functionality to zippers and buckles.
Repairing Zippers and Buckles
Zipper issues often arise when the slider becomes loose or bent, preventing it from meshing the teeth properly. Start by checking for any fabric caught in the zipper and gently free it. Then, move the slider to the bottom of the track and use pliers from your multi-tool to gently crimp the slider back into shape. Work in small increments to avoid breaking the metal.
"If the slider feels loose, gently squeeze the slider plates together with pliers… to restore its grip on the teeth." – Greyson Reed, Camp Associate, REI
If the slider still doesn’t work, try "coloring in" the teeth with a graphite pencil or applying a small dab of lip balm as a lubricant. If the pull tab breaks off, a paper clip or small loop of cord can serve as a temporary replacement. For tent zippers, always "clip then zip" – fasten the buckle at the base of the door before zipping to reduce strain on the slider.
When buckles on backpacks or boots break, a ski strap can act as a temporary high-tension fix until a proper repair can be made. For fraying straps, trim the loose fibers and carefully melt the edges with a lighter to stop further unraveling.
Maintaining Waterproofing
Keeping gear waterproof is just as important as repairing it. Waterproofing depends on three components: the waterproof membrane, a Durable Water Repellent (DWR) coating, and sealed seams. If your gear starts to "wet out" – where water soaks in instead of beading up – it’s time for maintenance.
Start by cleaning the gear. Dirt, oils, and smoke clog fabric pores and degrade the DWR coating, and applying waterproofing to dirty gear is pointless. Use a technical cleaner like Nikwax Tech Wash instead of household detergents, which leave residues that attract water.
"You wouldn’t wax a dirty car, so do not try to waterproof a dirty piece of gear." – Heidi Dale Allen, Vice President of Marketing, Nikwax
To reactivate the DWR coating, tumble dry the clean, dry jacket on medium heat for 20 minutes. Sometimes, heat alone is enough to revive the factory coating. If that doesn’t work, apply a new DWR coating. Wash-in treatments work best for 3-layer shells, while spray-on products are ideal for 2-layer garments or targeted areas like shoulders.
For tent seams, identify the fabric type first – silicone-treated fabrics require different sealers than polyurethane-coated ones. Apply the sealant to the inside of the seam, and allow 6 to 24 hours for curing before packing the tent. Technical shells should be washed every 10–20 wears, and DWR coatings typically need reapplication every 6–12 months, depending on how often the gear is used.
Organizing and Packing Your Repair Kit
Once you’ve gathered your essential tools and honed your repair skills, the next step is keeping your kit organized. A well-arranged repair kit ensures you can handle emergencies quickly – even in less-than-ideal conditions like pouring rain.
Storage and Accessibility
A simple, waterproof zip-top bag is a great choice for keeping your repair supplies organized and visible. As Kristin Hostetter, Gear Editor at Backpacker Magazine, advises:
"Store everything in a freezer-weight zip-top bag. It’s lightweight, waterproof, cheap, and see-through, so you can get to your supplies quickly."
For extended trips, consider upgrading to a weather-resistant container with compartments, like the Patagonia Black Hole Cube 3L ($29+), which features internal mesh pockets for added organization.
Packing your kit smartly can make a big difference. For example, wrap 15–20 feet of dental floss or heavy thread around a business card to keep it neat, and secure your needles to prevent tangling. Toss in a few alcohol wipes for cleaning surfaces before repairs and desiccant packs (like those from dehydrated meal bags) to keep your metal tools dry. To make repairs even easier, include printed instructions in a mesh pocket for quick reference. Staying organized not only saves time but also helps maintain balance in your pack.
Weight Management Tips
Once your kit is neatly arranged, focus on managing its weight. Tailor your supplies to your specific gear – there’s no need to carry a tent pole splint if you’re using a trekking-pole-supported shelter. Look for ways to downsize: use small items like SOL Duct Tape cylinders ($4) instead of full rolls and opt for travel-sized tubes of sealant.
If you’re traveling with a group, distribute common repair items like a stove repair kit or a roll of cordage among the team to lighten individual loads. For long-distance hikes, a "bounce box" can be a lifesaver. Mail heavier or less frequently used repair items to resupply points along your route, so they’re there when you need them.
Finally, choose compact tools that pack a punch. For instance, the Leatherman Micra ($30) is a great option – it includes scissors and pliers without the bulk of a full-sized multitool. As Kristin Hostetter points out:
"A multitool with scissors – which are hard to improvise in the field – simplifies repairs like trimming fabric patches."
Conclusion
Having a well-prepared repair kit can turn potential gear failures into manageable hiccups, ensuring your adventures stay safe and enjoyable. The essentials don’t have to cost much – items like Tenacious Tape (starting at $3), Seam Grip WP (around $7), and a few replacement buckles (from $5) can save you hundreds in replacement costs and help reduce waste by extending the life of your gear.
Preparation makes all the difference. As Claire Jencks from MSR wisely notes:
"Knowing how to perform basic maintenance on your gear will not only lengthen its lifespan, but will also bring you confidence in the field".
Before heading out, take the time to practice simple fixes like patching old fabric and testing essential equipment like your stove and water filter. A repair that’s quick and easy at home can feel overwhelming in challenging conditions like heavy rain or strong winds.
When assembling your kit, focus on versatility without adding unnecessary weight. Multi-use items – such as zip-ties, paracord, and a compact multi-tool – offer creative solutions for a variety of problems while keeping your pack light and organized.
Field repairs aren’t about making things perfect; they’re about getting you back home safely. Whether it’s patching a jacket or stabilizing a broken tent pole, having the right tools and know-how can turn a potential disaster into a minor inconvenience.
Take some time this weekend to gather your supplies, practice key techniques, and store everything in a clear, waterproof bag. A little preparation now means you’ll spend less time worrying on the trail and more time enjoying the adventure.
FAQs
What’s the smallest repair kit I can carry?
A lightweight sewing and repair kit is the most compact solution you can carry for on-the-go fixes. It typically includes essentials like needles, thread, patches, and small tools such as scissors or a multitool. These kits are designed to be easy to carry and practical for handling quick repairs in the field.
How do I choose the right patch or adhesive for my gear material?
To pick the right patch or adhesive, it’s all about matching it to your gear’s material. For adhesives, go with ones that work well on fabrics like nylon, polyester, rubber, or GORE-TEX. When it comes to patches, choose materials similar to your gear for better durability. Options like Aquaseal FD or Seam Grip® are excellent choices for outdoor repairs. Prioritizing compatibility ensures your fixes stay secure and last longer.
When should I sew a repair instead of using tape?
When handling large tears, areas under significant stress, or when a sturdy, lasting solution is required, sewing is the way to go. This method is especially effective for items like tents, jackets, or backpacks that endure frequent strain. On the other hand, tape is better suited for small holes, surface-level damage, or temporary fixes. It’s particularly useful for waterproof materials, where sewing could weaken the fabric’s resistance to water. Tape serves as a quick, short-term solution until you can make a more permanent repair.