
When temperatures drop, fire becomes a survival tool – not just for warmth, but for cooking, melting snow, and boosting morale. Starting a fire in freezing conditions is challenging due to cold tools, wet kindling, and reduced dexterity. This guide simplifies the process, covering essential tools, preparation, and techniques to ensure success in extreme cold.
Key Takeaways:
- Use the P.A.C.E. system for fire-starting tools: Primary (e.g., BIC lighter), Alternate (ferrocerium rod), Contingency (stormproof matches), and Emergency (magnesium block or flares).
- Always carry fire-starting gear on your person to keep it warm and accessible.
- Gather standing deadwood, dry bark, or inner tree bark for tinder. Avoid fuel lying on snow.
- Build an elevated fire platform to prevent heat loss into snow or ice.
- Fire structures like the teepee (for quick ignition) or log cabin (for long-lasting heat) work best in freezing conditions.
- Use accelerants like petroleum jelly-soaked cotton balls or magnesium shavings for wet tinder.
Pro Tips:
- Ferrocerium rods generate sparks at 5,400°F, making them reliable even in wet conditions.
- Dry kindling and tinder during the day to prepare for nighttime fires.
- Use rock reflectors to retain heat and shield flames from wind.
With the right tools, preparation, and techniques, you can start and maintain a fire even in the harshest winter conditions. Your survival depends on practice and readiness.
Quick Fire Starting | Alaskan Extreme Cold
sbb-itb-5a98267
Preparing Before You Enter Extreme Cold
Success in extreme conditions often hinges on how well you pack and organize your gear. When it comes to fire-starting, redundancy is key. Relying on just one ignition method is risky – distribute multiple tools across your body instead of keeping everything in a single pack that could get lost or separated.
Building a Cold-Weather Fire-Starting Kit
A solid fire-starting kit follows the P.A.C.E. system: Primary, Alternate, Contingency, Emergency.
- Primary: Start with a BIC lighter. Remove the child safety feature and place a rubber washer under the gas button to prevent fuel leaks.
- Alternate: Add a ferrocerium rod, which generates sparks at 5,000°F and works even in wet, freezing conditions.
- Contingency: Include stormproof matches. These burn for 10–20 seconds and can stay lit even after brief submersion.
- Emergency: Pack a road flare or magnesium block. These burn at an intense 5,400°F – enough to ignite damp wood.
For tinder and accelerants, cotton balls soaked in petroleum jelly are a reliable choice, burning for 4–7 minutes – long enough to dry out damp kindling. You can also use commercial options like Tinder Quik or Blackbeard Fire Plugs. Hexamine or trioxane heat tabs are another great addition, as they produce a steady, wind-resistant flame. To protect your supplies, store everything in waterproof containers with O-ring seals.
Cold weather can make even simple tasks challenging, so choose tools with large grips that are easy to handle while wearing thick gloves. Fine motor skills deteriorate quickly in freezing temperatures. Once your kit is ready, make sure to carry backups on your person to prepare for unexpected failures.
Creating Emergency Backup Plans
Always keep at least three ignition tools on your body – not just in your pack. Store lighters and ferrocerium rods inside your jacket, close to your body heat. This keeps them 20–30°F above freezing, ensuring that butane in lighters vaporizes properly. Regularly check that each tool is in working condition, as extreme cold can cause unpredictable malfunctions.
While conditions are still manageable, build a "day cache" of dry kindling and fuel. Store it under natural cover to use when temperatures plummet or fatigue sets in.
Before heading out, scout your route for potential fire points. Look for natural windbreaks like rock faces or dense vegetation, as well as accessible fuel sources. Focus on standing dead wood, which stays drier than fallen logs, and check the lower branches of conifer trees like spruce or hemlock for sheltered, dead twigs. Always gather double the amount of tinder and kindling you think you’ll need – better to have too much than too little when conditions turn harsh.
Fire-Starting Tools That Work in Extreme Cold
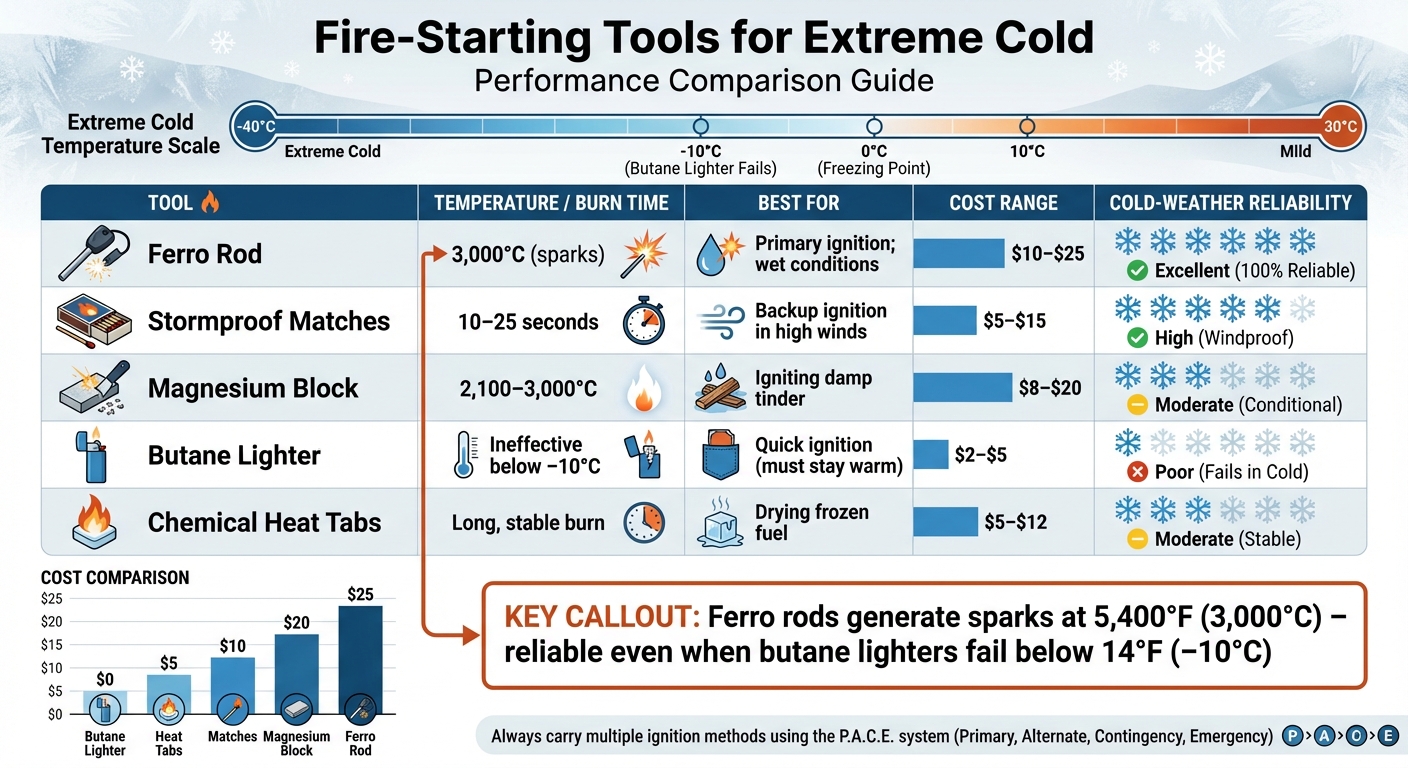
Fire-Starting Tools for Extreme Cold: Temperature Ratings and Cost Comparison
When you’re braving freezing temperatures, having the right tools for fire-starting isn’t just convenient – it can be lifesaving. In extreme cold, your gear must work reliably, even in challenging conditions. The right tools can mean the difference between staying warm or enduring a dangerously cold night.
Ferrocerium Rods and Stormproof Matches
Ferrocerium rods are a go-to option for fire-starting in subzero temperatures. They don’t rely on pressurized gases, which can fail in the cold, and they’re resistant to chemical breakdown. These rods generate sparks at an incredible temperature of about 3,000°C (5,400°F), enough to ignite even damp tinder. Plus, a good ferro rod can last through thousands of strikes, making it a dependable long-term tool.
"A ferro rod fire starter outperforms matches in wind and rain and doesn’t care if your lighter sulks in high altitude or cold."
- The Bear Essentials
When choosing a ferro rod, look for one with a diameter of at least 3/8-inch and a handle that’s easy to grip, even with gloves or when your hands are numb. Pair it with a tungsten-carbide striker for better performance than basic steel. If your fingers are stiff from the cold, try using a "pullback" technique – keep the striker steady while pulling the rod back to protect your tinder nest.
Stormproof matches are another essential, especially when fine motor skills are impaired. These matches can burn for 10–25 seconds and withstand winds up to 60 mph – even after being submerged in water. A popular choice is the UCO Titan Stormproof Matches, which boast a 20-second burn time and can ignite damp materials.
For times when natural tinder isn’t an option, accelerants can be a game-changer.
Accelerants for Fast Ignition
When you’re dealing with wet or frozen tinder, accelerants can make starting a fire much easier. One simple and effective option is petroleum jelly-soaked cotton balls. They burn for 5–7 minutes, providing enough time to dry out and ignite stubborn kindling. They’re also waterproof, inexpensive, and catch sparks with ease.
Another powerful option is magnesium. Magnesium blocks burn at temperatures between 2,100°C and 3,000°C (3,800°F to 5,400°F), generating the intense heat needed to ignite damp wood. To use, shave a small pile of magnesium onto your tinder and strike your ferro rod to create a high-heat flash. Magnesium starter kits are affordable, typically ranging from $8 to $20. For particularly tough conditions, you can try the "landmine" technique – shave ferrocerium curls onto your tinder before striking, creating a concentrated burst of heat.
Backup Tools: Lighters and Chemical Heat Tabs
Backup tools can be just as important as your primary fire-starting gear, especially in severe conditions.
Butane lighters are convenient, but they have a major drawback in extreme cold: their fuel stops vaporizing between –5°C and –10°C (23°F to 14°F), rendering them ineffective. If you decide to carry one, keep it in an inner pocket close to your body to ensure the fuel stays warm enough to work.
Chemical heat tabs, made from materials like hexamine or trioxane, are a more reliable backup. They ignite easily with a spark and provide stable, wind-resistant heat in any temperature. These tabs are especially useful for drying out frozen wood before you build a proper fire. Just make sure to store them in waterproof containers so they’re ready to go when you need them.
| Tool | Temperature/Burn Time | Best For | Cost Range |
|---|---|---|---|
| Ferro Rod | 3,000°C (sparks) | Primary ignition; wet conditions | $10–$25 |
| Stormproof Matches | 10–25 seconds | Backup ignition in high winds | $5–$15 |
| Magnesium Block | 2,100–3,000°C | Igniting damp tinder | $8–$20 |
| Butane Lighter | Ineffective below –10°C | Quick ignition (must stay warm) | $2–$5 |
| Chemical Heat Tabs | Long, stable burn | Drying frozen fuel | $5–$12 |
Finding Dry Tinder and Kindling in Snow and Ice
When snow blankets the ground, firewood lying on the forest floor is usually waterlogged. The better option? Look for standing dead branches. These branches, still attached to trees or caught in lower limbs, are often naturally sheltered and remain air-dried.
"The trick is… find standing deadwood. The last place to source your wood is off the ground. Any log lying on a forest floor is soaking up moisture from the ground."
- Stelios Lazos, Founder, BushLife
Deadwood with wet bark can still be useful. Strip away the outer bark with a knife to expose the dry wood underneath. This also works for branches – splitting them open often reveals a dry core, even if the exterior is damp or frozen.
Collecting and Storing Tinder During the Day
Daylight hours are the best time to gather tinder and kindling, when your hands are warmer and more nimble. Create a "day cache" by storing dry materials in a safe, protected spot for use when the temperature drops.
If some of your tinder, like birch bark or dry grasses, feels slightly damp, you can dry it out by tucking it into an inner pocket. Your body heat will gradually remove the moisture, turning it into a reliable fire-starter. When searching for dry materials, check natural shelters. Evergreen trees, like spruce and hemlock, often have dense, low-hanging branches that shield dead needles and twigs from snow. These lower branches, sometimes called "squaw wood", snap off easily and are often completely dry. Birch bark is another excellent choice – it contains natural oils that make it water-resistant and easy to ignite, even when wet.
Making Feather Sticks and Using Inner Bark
Once you’ve collected dry wood, it’s time to prepare it for quick ignition. Feather sticks are a great tool in wet conditions. By carving thin curls into a dry stick, you expose more surface area, making it easier to catch fire. The trick is to carve the curls so that the "necks" are thin enough to ignite easily. Prepare several feather sticks – four to six is a good starting point – to ensure your fire lights quickly.
The inner bark of certain trees also makes excellent tinder. Cedar, cottonwood, aspen, and willow are great options. Strip away the rough outer bark to find the dry, fibrous layer beneath, then shred it into a loose bundle. This fine material catches sparks easily and burns hot enough to ignite your feather sticks. To check if wood is dry enough to use, try the "snap test." Dry wood snaps cleanly with a sharp crack, while wet or green wood bends or tears instead.
Building an Elevated Fire Platform
Never light a fire directly on snow or ice – it will melt and extinguish your flames. Instead, build an elevated platform. A simple "log raft", made by laying green logs side by side, works well. Alternatively, you can use a base of flat rocks.
For particularly deep snow or wet conditions, consider a double platform. Start with a layer of thumb-thick sticks, then add a second layer at a right angle on top. This setup keeps your tinder off the wet ground, provides a stable base, and improves airflow, helping your fire burn more efficiently. Elevating your fire also prevents heat loss and keeps it burning longer in freezing temperatures.
Before lighting your fire, gather three times as much fuel as you think you’ll need. In extreme cold, wood burns faster than expected, and scrambling for more fuel in the dark with freezing fingers is a situation you want to avoid. Once your fire is going, use its warmth to dry additional tinder bundles and store them in waterproof containers for future use.
Fire Lay Structures That Work in Freezing Temperatures
Choosing the right fire lay structure can make all the difference when you’re battling freezing temperatures. The way you arrange your wood isn’t just about starting a fire – it’s about keeping it efficient, long-lasting, and suited to your needs. Some structures light up quickly, while others are designed to burn steadily or even keep you warm through the night with minimal effort.
Lean-To and Log Cabin Fire Lays
The lean-to fire lay is perfect when you’re dealing with wind or light snow. Start by placing a thick log on the ground to act as a windbreak. Your tinder bundle goes at the base of this log. Then, lean small twigs against it to create a canopy that shields your tinder from the elements. If the wind is particularly strong, you can drive a longer piece of kindling into the ground at a 30-degree angle (facing into the wind) and lean smaller sticks against it for added stability.
On the other hand, the log cabin lay is a great choice for steady, long-lasting heat. Begin by setting up a small teepee in the center for easy ignition. Around this, place two large fuel logs parallel to each other. Then, stack two more logs on top of these at a right angle, creating a square frame – like Lincoln Logs. Keep layering smaller logs as you build upward. This design encourages airflow and creates a chimney effect, ensuring the fire burns efficiently from the inside out. It’s ideal for cooking or maintaining warmth over several hours without constant attention.
Both styles offer excellent protection for your flame and ensure a balance of quick ignition and sustained heat.
Teepee Fire for Fast Ignition
If someone is showing signs of hypothermia or you need immediate warmth, the teepee fire lay is your best bet. Arrange your tinder in the center and lean kindling around it in a cone shape, leaving a gap on the windward side to encourage airflow. This vertical design pulls air upward, creating a tall, intense flame that generates heat quickly.
For ignition, a ferrocerium rod is a reliable choice, producing sparks at around 3,000°C. This method works even when temperatures drop below 14°F, where butane lighters often fail.
Keep in mind, though, that teepees burn through fuel fast. Use this layout to warm up quickly or to establish a bed of coals, then transition to a log cabin or pyramid structure for longer-lasting heat.
Using Rock Reflectors to Retain Heat
A rock reflector can make a big difference in conserving heat. Placing a rock wall behind your fire can boost the temperature by up to 27°F within about 20 inches. Natural rock faces, large boulders, or hill bases work well for this purpose. If none are available, you can stack flat rocks to create your own reflector.
"A simple rock reflector can raise local temperature by up to 15 °C within half a meter of the fire, saving both fuel and focus."
Position your fire between the reflector and your shelter. This setup bounces radiant heat back toward you, rather than letting it escape into the cold air. Another bonus? Placing your next batch of firewood near the reflector helps it dry and pre-warm, making it easier to ignite later. Just avoid using rocks from riverbeds or damp areas – trapped moisture can cause them to crack or even explode when heated.
Using these natural features alongside your fire lay structures ensures you get the most out of your fire in freezing conditions.
How to Ignite a Fire in Freezing Weather
Once you’ve set up your fire lay and collected the necessary materials, the real challenge begins: sparking that first flame. In freezing conditions, traditional fire-starting methods might fail due to the cold or reduced dexterity. Here are some alternative techniques to rely on when standard methods fall short.
Battery and Gum Wrapper Method
This ingenious emergency method uses the electrical resistance of a foil-backed gum wrapper (or even a hot cocoa wrapper) to create fire. Start by cutting the wrapper into an hourglass shape, ensuring the center strip is exactly 3/32 of an inch wide for optimal heating. You’ll need a AA, AAA, or 9V battery to make it work.
"The thickness of the wrapper is important (3/32’s is exact), too thick and it smokes but does not catch fire, and too thin it burns up immediately and would not start tinder."
- Kevin Babione, BPL Member
To ignite, press the foil side of the wrapper against both battery terminals at the same time. The narrow center strip generates heat through resistance and ignites the paper backing almost instantly. Be prepared with your tinder bundle nearby since the flame is brief but intense enough to light dry tinder. Use gloves or copper pennies to handle the wrapper, as it heats up quickly.
Chainsaw Spark Plug Ignition
If you have a chainsaw on hand, its ignition system can double as a fire starter in emergencies. First, remove the bar and chain for safety. Then, prepare a small amount of a 50/50 gasoline and bar oil mixture on your tinder, placed in a safe, contained area like a log or rock depression.
Detach the spark plug from the engine and unplug the wire from the spark plug. Insert a chainsaw tool (or "scrench") or a piece of wire into the plug wire boot, leaving a gap of about 1/8 inch from the fuel-soaked tinder. Pull the starter cord to create a spark, which will ignite the fuel. Use a stick to hold the tool in place to avoid accidental shocks while pulling the cord. Once the tinder catches, you’ll have a flame to build upon.
Ice Lens to Focus Sunlight
This method is as challenging as it is fascinating. It requires extremely clear ice, bright sunlight, and steady air conditions. Natural lake ice often has too many air bubbles or cracks to work effectively. For better results, boil water to remove gases, then freeze it slowly in an insulated container at home.
Once you have clear ice, carve it into a convex lens about 2 inches thick and 6 inches in diameter. Smooth the surface carefully, then position it to focus sunlight onto your tinder. For best results, use ultra-dry, dark-colored tinder like char cloth or fine wood shavings, as they absorb heat more efficiently. This technique demands patience and precision but can yield a flame under perfect conditions.
| Method | Difficulty (1-5) | Key Requirement |
|---|---|---|
| AA Battery & Wrapper | 2 | Hourglass-shaped foil wrapper |
| Chainsaw Spark Plug | 3 | 1/8 inch gap between tool and fuel |
| Ice Lens | 5 | Clear ice and direct sunlight |
These techniques expand your toolkit for starting a fire in extreme conditions, adding to the methods and tools already discussed. While some require more precision and patience than others, they can be lifesaving when conventional fire-starting methods fail.
Fixing Common Fire-Starting Problems in Extreme Cold
Mastering fire-starting in freezing temperatures goes beyond choosing the right tools and preparing fuel properly. Common issues like heat loss to the ground, wet fuel, and poor airflow can make maintaining a fire a real challenge. For instance, building a fire directly on snow causes it to melt through, sinking and losing heat to the frozen ground. Similarly, wood that’s at or below freezing (32°F) wastes energy drying out before it can ignite. On top of that, compact fuel piles can choke the fire by restricting airflow.
Why You Shouldn’t Rely Too Much on Accelerants
Accelerants might seem like a quick fix, but they only provide a temporary boost. Once they burn off, the fire will die if the wood hasn’t reached the right ignition temperature. Overusing accelerants can create a flashy but short-lived flame if you skip the basics, like proper fuel layering and building a solid coal base.
"When attempting to burn wet wood, over half the heat is utilized in drying the wood before it can burn."
- Scott Finazzo
Instead of leaning heavily on accelerants, use them sparingly as a jumpstart. Focus on starting small: begin with matchstick-sized twigs, then move to pencil-thick sticks, and gradually add larger pieces of wood once the fire gains strength.
Controlling Wind and Oxygen Flow
Wind can be tricky – it’s helpful in moderation but destructive when too strong. Position your fire near natural windbreaks like rock faces or fallen trees to shield it from gusts. If you’re in an open space, create windbreaks using snow blocks or angled branches.
A rock reflector is another useful tool. It can block wind while reflecting radiant heat back toward you, increasing the local temperature by up to 15°C (59°F) within just half a meter of the fire.
"A simple rock reflector can raise local temperature by up to 15 °C within half a meter of the fire, saving both fuel and focus."
- UF PRO
At the same time, make sure not to block airflow. Use fire structures like the log cabin or lean-to to maintain open air channels. Always start the fire on the windward side so the breeze helps feed the flames. Adjust your setup as needed to keep the fire burning steadily, especially if you’re planning to keep it going overnight.
Maintaining a Fire Through the Night
Keeping a fire alive through the night takes planning. Start by gathering and storing your fuel during the day to ensure it stays dry. Hardwoods like oak, maple, or beech are ideal for overnight fires because they produce steady, long-lasting coals compared to the quick-burning nature of softwoods.
One effective method for overnight burning is the upside-down fire lay. This approach involves stacking the largest logs at the base, layering progressively smaller pieces on top, and placing tinder at the very top. The fire burns downward, igniting each layer in turn and sustaining itself for up to four hours without needing to be refueled. To make things even easier, place extra logs near the fire so they pre-dry in the radiant heat. For a longer-lasting coal bed, arrange logs in a criss-cross pattern within the embers. This setup helps retain heat longer than active flames.
Conclusion
This guide has walked through the key elements of starting a fire in extreme cold. When temperatures plummet, success depends on having the right tools, being well-prepared, and practicing consistently. The techniques discussed tackle the specific challenges of freezing conditions – like damp fuel, limited dexterity, and the impact of wind.
As Paul Kirtley wisely puts it:
"Under pressure, your performance always drops to the level of your training."
- Paul Kirtley
Using the P.A.C.E. system (Primary, Alternate, Contingency, Emergency) can help you avoid relying on a single solution. This framework supports everything from choosing ignition tools to building a reliable fire structure. Always carry multiple ignition options – ferrocerium rods that generate sparks around 3,000°C, stormproof matches, and backup lighters – and pair them with a proper fuel setup, starting with fine tinder and working up to larger logs.
Survival is as much about mindset as it is about gear – 90% mental, as the saying goes. The real difference lies in preparation and practice. Hone your skills now: store dry fuel, perfect your fire-building techniques, and practice under tough conditions. When the cold sets in and your hands lose their grip, preparation and muscle memory will be your strongest allies.
FAQs
What’s the best fire starter when my lighter won’t work in the cold?
When your lighter stops working in freezing temperatures, a ferrocerium rod (ferro rod) can save the day. This tool produces sparks strong enough to ignite tinder, even in wet or icy conditions. For extra dependability, pair it with waterproof tinder options like Pyro Putty, WetFire, or Fatwood. Another smart backup? Petroleum jelly-coated cotton balls – they’re easy to carry and work well for starting fires in tough weather.
How do I find dry tinder when everything is covered in snow?
When you’re in snowy conditions, locating dry tinder can feel like a challenge, but it’s not impossible. Start by checking under trees or beneath logs covered in snow – these spots often shield materials from moisture. Another trick is to split wet wood; the inside core is usually dry and can be used to start a fire.
To improve your chances, gather more tinder than you think you’ll need. Pair it with dependable fire starters like stormproof matches or ferrocerium rods. These tools are designed to work even in tough, wet environments, giving you an edge when conditions are less than ideal.
How can I keep a fire burning overnight without constant refueling?
To keep a fire going all night, choose large, slow-burning logs and arrange them in a way that helps retain heat. Structures like a tipi or log cabin design work well for a self-sustaining fire. Adding a layer of ash over the fire and using dry, seasoned wood can slow down the burning process. This setup creates a stable bed of embers that holds heat for hours, cutting down on the need to constantly add more fuel.