
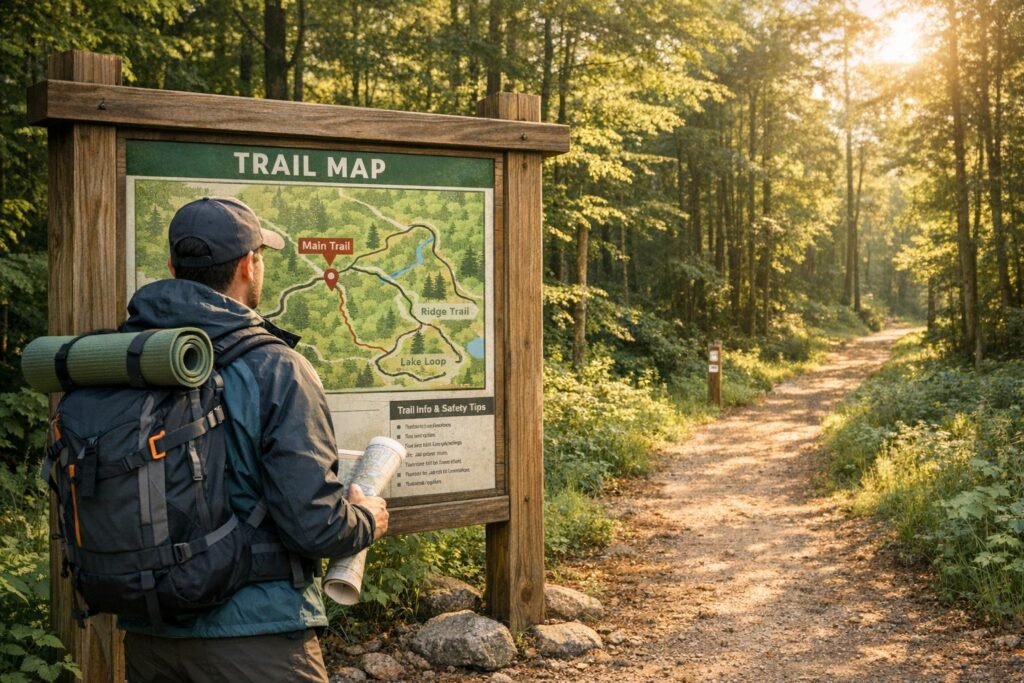
Planning an outdoor trip can seem overwhelming, but breaking it into clear steps makes it easier. A good itinerary ensures safety, organization, and fun. Here’s how to get started:
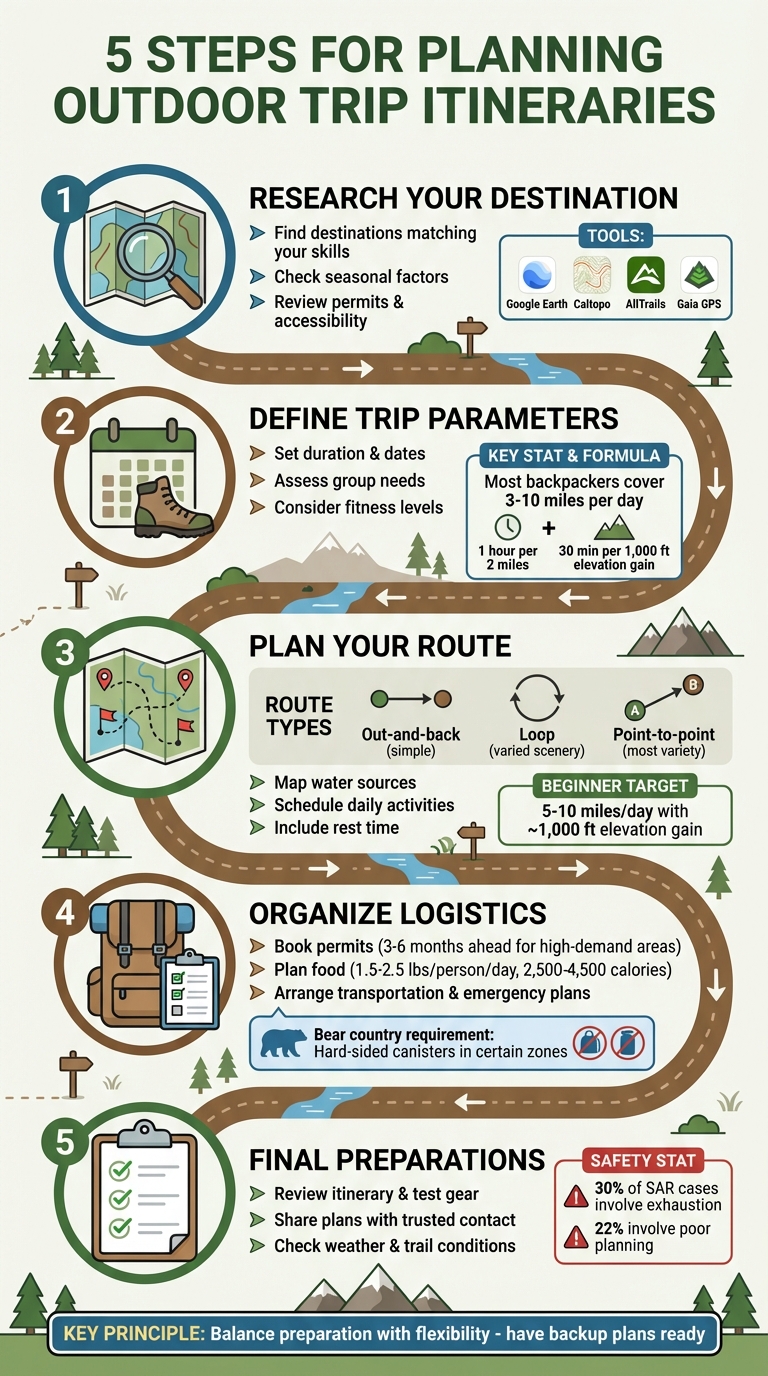
- Research Your Destination: Pick a location that matches your fitness and skills. Use tools like Google Earth, Caltopo, and AllTrails to map routes and check seasonal conditions.
- Set Trip Parameters: Decide trip length, dates, and group needs. Base your plans on the slowest member’s pace and consider weather, daylight hours, and terrain.
- Plan Your Route: Choose between out-and-back, loop, or point-to-point trails. Mark water sources, campsites, and backup options.
- Organize Logistics: Secure permits, plan meals, pack gear, and arrange transportation. Share your trip details with someone for safety.
- Final Checks: Test gear, review your plan, and check weather and trail conditions before heading out.
Preparation is key to a safe and enjoyable adventure. By following these steps, you’ll minimize risks and maximize your time outdoors.
5-Step Outdoor Trip Planning Process: From Research to Trail
Step 1: Research Your Destination
Find Potential Destinations
Start by assessing your physical fitness, navigation skills, and outdoor experience to pick a destination that matches your abilities. As outdoor expert Andrew Skurka points out, overestimating your skills can lead to overpacking and unnecessary stress.
To narrow down your options, consider the "Five W’s":
- Where: The general region you want to explore.
- When: The season and specific dates for your trip.
- Who: Whether you’re going solo or with a group.
- Why: Your goals, like photography, fishing, or simply hiking.
- What: Whether your focus is more on hiking or camping.
Once you’ve outlined these, use tools like Google Earth for 3D views of the terrain, Caltopo for elevation details, and apps like Gaia GPS or AllTrails to map routes. For your first few trips, stick to familiar and nearby areas to keep things manageable and less overwhelming.
After choosing a destination, ensure the timing and conditions are right for your plans.
Check Seasonal and Regional Factors
The time of year can significantly impact trail conditions, weather, and the gear you’ll need. Be aware of potential hazards like avalanches, flooding, or shorter daylight hours, and adjust your plans accordingly.
Use Google Earth’s "Historical Imagery" feature to examine satellite photos from past years and seasons. This can help you estimate snowmelt, vegetation density, or other seasonal factors. Also, check sunrise and sunset times, particularly in autumn, to avoid navigating in the dark when trails become harder to follow. Research average temperatures, precipitation levels, and record highs and lows for your chosen dates to get a clear picture of what to expect.
Once you’ve confirmed seasonal suitability, focus on the practical logistics of your trip.
Review Accessibility and Logistics
Before heading out, double-check permits, parking options, shuttle services, and resource availability. Look into essentials like potable water sources, bear-resistant storage requirements, and cell coverage by consulting local agencies or government websites. High-demand areas may require permits through lotteries, so be mindful of deadlines.
Contact local ranger stations or visit official sites like NPS.gov or the Forest Service for up-to-date information on alerts, trail conditions, and any seasonal wildlife concerns. Additionally, familiarize yourself with local regulations, such as group size limits, fire restrictions, and pet policies. Remember to follow Leave No Trace principles, including proper waste disposal protocols.
Step 2: Define Your Trip Parameters
Set Trip Duration and Dates
How long you plan to hike and the dates you choose are key factors in shaping your trip. Most backpackers typically cover 3 to 10 miles a day, depending on their fitness level and how challenging the terrain is.
To estimate hiking time, use this simple rule of thumb: 1 hour for every 2 miles of flat ground, plus 30 minutes for every 1,000 feet of elevation gain. If you’re planning a weekend trip, aim for destinations closer to home. That way, you can spend more time on the trail instead of stuck in the car.
Daylight hours are another crucial detail. In autumn, shorter days increase the chances of hiking after dark, which makes trails harder to navigate. And don’t forget about snow – high-elevation trails can stay snow-covered well into early summer, no matter what the calendar says. Always check point-specific forecasts at weather.gov to get accurate conditions for your route, as mountain weather can be far harsher than what’s happening in the valleys.
Once you’ve nailed down your dates and distances, fine-tune your plans to match the abilities of everyone in your group.
Assess Group Needs and Preferences
When planning your itinerary, it’s essential to base your daily mileage on the pace of the slowest hiker in your group. Pushing beyond their limits can lead to exhaustion and safety risks.
"If you’re with others you’ll need to accommodate the pace of the slowest member of your group." – REI
Larger groups come with their own challenges. Campsite space may be limited, and permits might have stricter requirements. Be upfront about group expectations – some may prefer covering more miles to reach breathtaking views, while others might enjoy a slower pace with plenty of breaks. Sharing gear like stoves, water filters, tents, and bear canisters can lighten individual loads, making the trip more manageable for everyone .
Clear communication and planning around group dynamics will help ensure a smoother experience for all.
Consider Fitness Levels and Safety
Take an honest look at everyone’s fitness and experience levels. Compare your planned route to what each person has successfully tackled before. For beginners, plan shorter and less demanding days. If someone is new to backpacking, consider organizing one or two overnight trips first to build confidence and establish a baseline fitness level.
Outdoor skills and health histories also play a role, especially at higher altitudes where risks can increase. A "shakeout" trip is a great way to prepare – have participants hike with fully loaded packs, practice setting up shelters, and cook meals. This can help identify any fitness gaps or gear issues before the main trip .
Finally, establish a "turn-around" rule from the outset. If exhaustion or safety concerns arise, prioritize turning back rather than pushing on to reach a destination. Always have a backup plan with shorter trails or less strenuous activities in case weather or energy levels take a turn . These precautions will guide not only your daily goals but also your contingency plans, ensuring a safer and more enjoyable adventure.
Step 3: Plan Your Route and Daily Schedule
Map Your Route
Choosing the right route is all about balancing your goals with practical needs. Out-and-back routes are straightforward – you hike to a certain point and return the same way – but they don’t offer much variety in scenery. Loop trails, on the other hand, provide fresh views throughout and conveniently bring you back to your starting point, though they can be harder to match with specific distances. If you’re looking for the most variety, point-to-point routes are ideal, but they require more coordination, like arranging a shuttle or leaving bikes at the endpoint.
Use topographic maps to pinpoint reliable water sources and flat spots for camping. Tools like Google Earth can help you visualize the terrain in 3D and plan your route with its "Add Path" feature. For detailed elevation profiles and total vertical gain, platforms like Caltopo.com or Gaia GPS are excellent options.
"I strongly prefer having a track rather than a collection of waypoints because it makes navigation much simpler and the process of creating the track makes me more familiar with the landscape." – Review editor Luc Mehl
Refer back to Step 2 for estimating travel times. If you’re hiking in winter or using snowshoes, adjust your pace to about 1 mile per hour. To stay informed about trail conditions, check recent trip reports on AllTrails or contact local ranger stations for updates on obstacles like downed trees or washed-out bridges.
Once your route is planned, shift your focus to creating a flexible daily schedule.
Schedule Activities and Attractions
Instead of rigidly planning every stop, aim for a flexible mileage range each day and identify multiple campsite options within that range. This approach gives you wiggle room for delays caused by weather, fatigue, or simply wanting to spend more time at a scenic spot. Most backpackers cover 3 to 10 miles daily, with beginners sticking closer to 5 to 10 miles and around 1,000 feet of vertical gain.
"Overall, I don’t think it’s realistic to plan out your itinerary exactly, because all it takes is coming up a few miles short on the first day and the whole plan is wasted." – Andrew Skurka
For days with steep climbs, use your topographic map to identify major uphill sections and plan to stop earlier to avoid overexertion. Mark backup campsites in case your pace varies from what you expected. On point-to-point hikes, it’s also smart to identify bail-out points, like intersecting roads or airstrips, where you can exit the trail early if needed. Always aim to finish hiking before sunset, as navigating trails becomes much harder and riskier in the dark.
After setting your daily distances and backup plans, make sure to include time for rest and recovery.
Include Rest and Recovery Time
For extended trips, consider setting up a base camp. This means hiking to a central spot where you can stay for a few nights, using it as a home base for lighter day hikes or summit attempts without hauling your full pack. It’s a great way to balance adventure with recovery while reducing daily strain.
Check daylight hours to avoid hiking after dark. If unexpected challenges like bad weather or fatigue arise, have backup activities ready – such as easier, lower-elevation trails or even indoor options. According to the National Park Service, 30% of search and rescue cases in 2013 involved hikers who were too exhausted to continue, and 22% were due to poor planning or underestimating the effort required. Building in rest time and staying flexible can help ensure you’re not part of those statistics.
How I Plan My Backpacking Trips | Choosing Trails, Creating Itineraries + Trip Planning Resources
sbb-itb-5a98267
Step 4: Organize Trip Logistics and Resources
Getting your logistics in order is just as important as planning your route. It’s the backbone of a smooth adventure, ensuring everything runs safely from start to finish.
Book Accommodations and Permits
For high-demand destinations, aim to secure permits 3–6 months in advance. Rules vary depending on whether you’re venturing onto federal or state lands. Some require permits for any overnight stay, while others only for specific zones or activities. Most national park reservations can be managed through Recreation.gov, but iconic spots like Yosemite’s Half Dome, Zion’s Narrows, and areas in Grand Teton and Yellowstone operate strict lottery systems to manage visitor numbers.
"Places in high demand (like Half Dome in Yosemite National Park, the Narrows in Zion, and Grand Teton and Yellowstone national parks), utilize strict permitting systems to prevent overuse and overcrowding of lands and trails." – Adventure Treks Staff
Always double-check permit requirements on official websites. For example, Rocky Mountain National Park mandates hard-sided bear canisters (like the BV500) for overnight stays in certain backcountry zones. Some regions require WAG bags for packing out human waste, enforce fire bans, or limit group sizes. If your first-choice permit is unavailable, have a backup plan ready so your trip doesn’t fall through.
Once you’ve locked in your permits and accommodations, shift your focus to organizing food and gear.
Plan Food, Water, and Supplies
When it comes to food, pack 1.5–2.5 pounds of dry goods per person, per day, aiming for 2,500–4,500 calories. Choose calorie-dense foods to save weight – think tortillas instead of bagels and dried fruit instead of fresh oranges. To avoid getting bored with your meals, mix up flavors and textures. Pre-measure and repackage your meals to save space and reduce waste on the trail.
Mark reliable water sources like rivers, springs, or lakes on your topographic map, and always carry a dependable purification system – whether it’s a filter, UV purifier, or chemical treatment. Check with local rangers for updates on water availability, as seasonal sources can dry up unexpectedly. If you’re traveling in bear country, store all food, trash, and scented items in bear-proof containers or lockers. Lastly, test your stove, tent, and other gear at home to make sure everything is in working order before you hit the trail.
Arrange Transportation and Emergency Plans
For point-to-point hikes, figure out how you’ll handle transportation. Options include shuttling two cars, hiring a local shuttle service, or even leaving a bicycle at the endpoint. Create a detailed trip plan that outlines your route, key landmarks, estimated timeline, and emergency contact information. Share this plan with someone you trust who isn’t part of the trip. Give them a specific deadline to call for help if you don’t check in, and leave an extra copy of your plan in your car at the trailhead as a backup.
Make sure every person in your group carries a whistle – it’s far more effective than shouting if someone gets separated. In areas without cell service, consider bringing a satellite communication device like a Garmin InReach or SPOT. After your trip, notify your emergency contact promptly to avoid unnecessary panic. If weather conditions shift or injuries occur, adjust your plans as needed – safety should always come first. Once these logistics are squared away, you’ll be ready for the final pre-trip checks.
Step 5: Complete Final Preparations and Pre-Trip Checks
With your route mapped out and logistics in place, it’s time to wrap up the final details to ensure a smooth and safe departure.
In the days leading up to your trip, go through a printed checklist to double-check your gear, food, and overall plan. This small step can save you from big headaches later.
Review Your Itinerary and Gear
Test the essentials before you go. Set up your tent, fire up your stove, and make sure your headlamps have fresh batteries. Don’t forget to charge your electronics and pack a backup power bank. Load up your backpack and take it for a quick test to ensure it feels comfortable. Perishables can wait until the last minute to stay fresh.
Share Your Plans with Someone You Trust
Let someone know exactly where you’re going and when you’ll be back. Share your itinerary, including trailheads, campsites, and emergency contacts. It’s also a good idea to leave a backup copy with them and keep them updated if anything changes.
"Leave a copy of your trip plan with a trusted friend or relative who can call search and rescue if you don’t come home or contact them by a certain time." – Philip Werner, Founder, SectionHiker
Check Weather and Trail Conditions
Look at the five-day weather forecast, especially for higher elevations, and note sunrise and sunset times. Check in with local rangers or browse recent trip reports for updates on trail conditions. If the weather takes a turn for the worse, don’t hesitate to switch to your backup plan. Better safe than sorry!
Conclusion
Planning an outdoor adventure doesn’t have to feel overwhelming. By breaking it down into clear steps – researching your destination, setting trip goals, mapping your route, organizing logistics, and performing final checks – you can set yourself up for a safer and more enjoyable journey.
Preparing thoroughly not only boosts your safety but also equips you to handle unexpected situations on the trail. As professional backpacker Andrew Skurka wisely said:
"By solving foreseeable problems beforehand, I was more able to respond fully to the true unknowns".
This proactive mindset ties all the planning phases together, helping you stay calm and focused when surprises come your way. It’s about finding that balance between preparation and adaptability.
Flexibility is equally crucial. Weather shifts, trail closures, or group dynamics can quickly alter plans. Having backup options ensures your trip stays on track, even when things don’t go as expected. A solid itinerary isn’t just about reaching a destination – it’s about giving yourself the confidence and organization to fully embrace the experience.
These steps create a dependable framework for any outdoor adventure. Start with the essentials, test your gear, and always share your plans with someone you trust. The more prepared you are, the less you’ll worry about logistics, leaving you free to enjoy the moment.
So grab your map, pack your bag, and step into the wild – your adventure is waiting!
FAQs
What are the best tools for planning and mapping an outdoor trip in the U.S.?
Planning an outdoor trip becomes much smoother when you have the right tools to guide you. Start with a reliable trip-planning app that lets you build detailed itineraries, mark waypoints, and visualize your route on an interactive map. Many of these apps also let you store notes, reservations, and other trip details in one convenient spot.
For navigation, consider downloading topographic maps from trusted sources like the USGS or using digital mapping apps equipped with GPS features. These tools offer real-time tracking and offline access, which are especially handy in remote areas where cell service might be nonexistent. Don’t forget to check historical weather patterns and forecasts to prepare for shifts in temperature (°F), precipitation, and other seasonal factors that could impact your trip.
To round out your preparation, browse recent trip reports or outdoor community forums. These resources often provide valuable updates on trail conditions, campsites, and permit requirements, giving you a clearer picture of what to expect. With these tools and insights, you’ll be set for a well-organized outdoor adventure.
How do I pick the best route for my outdoor adventure?
Choosing the right route is essential for a safe and enjoyable outdoor adventure. Start by thinking about your goals, available time, and experience level. Here are some common types of routes to consider:
- Out-and-back: You’ll follow the same trail to your destination and back.
- Loop: A circular trail that brings you back to your starting point without retracing your steps.
- Point-to-point: Starts and ends in different locations, often requiring a shuttle.
- Thru-hike or multi-day: Long routes that connect multiple trail segments, ideal for extended trips.
To narrow down your options, ask yourself a few key questions: How much time do I have? What distance and elevation gain am I comfortable with? Will I need a permit or transportation like a shuttle? For instance, if you’re just starting out, a 2–3 mile loop with little elevation gain might be perfect. On the other hand, seasoned hikers might opt for a multi-day trek along a point-to-point trail.
Once you’ve settled on a route, take time to study topographic maps, check current trail conditions, and make sure you have the right gear and navigation tools. Being prepared helps minimize surprises and ensures a more enjoyable experience. For more advice and to connect with fellow outdoor enthusiasts, head over to Adventurism.co.
What important details should I plan before heading out on an outdoor trip?
Before you set off on your adventure, it’s important to sort out some key logistics to keep things running smoothly. First, check if your destination requires any permits and take care of those ahead of time. Figure out your transportation to and from the trailhead, and double-check all the details – like dates, routes, and campsite locations – especially if you’re traveling with a group. Don’t forget to pack must-have gear, enough food, and plenty of water. And perhaps most importantly, share a detailed trip plan with someone you trust, so they’ll know what to do if something unexpected happens.
Getting these essentials squared away will set you up for a safe and stress-free adventure!