
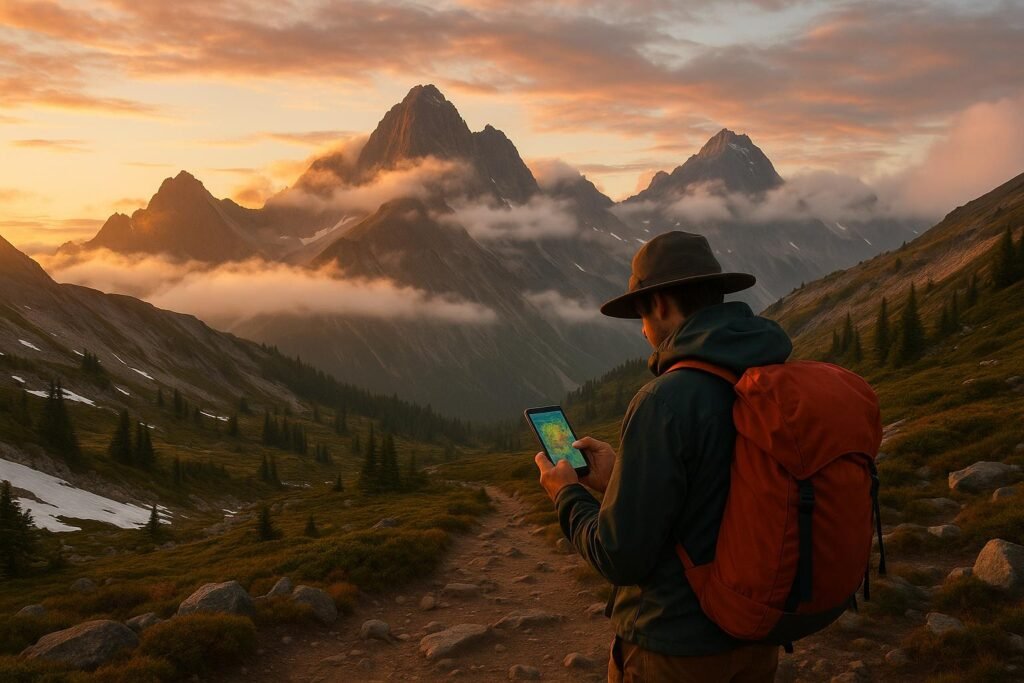
Understanding weather is key to safe and enjoyable backcountry trips. Sudden changes in temperature, wind, precipitation, and storms can create serious risks, like hypothermia, heat stroke, or avalanches. Here’s how to plan and stay prepared:
- Key Weather Factors: Monitor temperature, precipitation, wind, thunderstorms, and snow conditions. Adjust for elevation – temperatures drop 3–5°F per 1,000 feet, and wind speeds increase on exposed ridges.
- Forecasting Tools: Use resources like the National Weather Service (NWS) for pinpoint forecasts based on GPS. Apps like Windy.com and Mountain-forecast.com provide detailed weather by elevation. For snowpack data, check SNOTEL or OpenSnow.
- Pre-Trip Planning: Review seasonal norms and use multi-day forecasts to choose the best dates. Long-range models like ECMWF and GFS help spot trends like storms or high-pressure systems.
- On-Trip Monitoring: Devices like Garmin inReach provide real-time updates. Barometric watches can signal approaching storms. Watch for environmental signs like cloud changes or wind shifts to anticipate weather changes.
Planning around weather ensures a safer, more efficient trip. Always check forecasts, adjust for terrain, and stay alert to changing conditions.
Key Weather Factors for Backcountry Trips
Weather Elements to Monitor
When heading into the backcountry, five key weather elements play a crucial role in ensuring your safety and comfort: temperature, precipitation, wind, thunderstorms, and snow conditions.
- Temperature: This directly influences risks like hypothermia in cold conditions or heat-related illnesses in hot weather.
- Precipitation: Rain, sleet, or snow can drastically change trail conditions, creating mud, ice, or ruts. It also reduces visibility and increases the risk of flooding in areas like canyons, making it critical to plan for staying dry.
- Wind: Strong winds amplify cold through windchill and can make exposed areas dangerous. Sustained winds above 20–25 mph can destabilize hikers and significantly lower perceived temperatures.
- Thunderstorms: These bring immediate dangers, including lightning, sudden temperature drops, heavy rain or hail, and gusty winds. In U.S. mountain ranges, it’s essential to avoid exposed ridges or high passes before storms develop.
- Snow Conditions: Snow depth, crust quality, and whether it’s fresh or wet snow all impact travel speed, avalanche risks, and available meltwater near campsites.
Understanding these elements helps you make informed decisions about gear, timing, and route planning to stay safe and comfortable.
How Terrain Changes Weather
Terrain adds another layer of complexity to weather patterns. Features like mountains, ridges, and valleys actively reshape local conditions, often in ways broader forecasts don’t capture.
- Elevation: As you climb, temperatures drop – typically about 3–5°F for every 1,000 feet gained. For example, a 65°F afternoon at 2,000 feet might feel closer to 45°F at 8,000 feet.
- Orographic Precipitation: Mountains force moist air upward, leading to heavy rain or snow on windward slopes, while leeward slopes stay drier due to the rain shadow effect.
- Wind Exposure: Ridges and mountain passes tend to experience stronger winds, while valleys can trap cold air overnight, leading to much colder mornings compared to mid-slope areas.
- Canyons: These can create localized weather effects, like thunderstorms or convergence zones, that broader forecasts might overlook.
In practice, higher camps are often colder, windier, and wetter than what low-elevation forecasts suggest. Adjust your clothing, shelter, and emergency plans accordingly to account for these terrain-driven changes.
Weather Tracking Time Frames
Once you understand key weather factors and terrain influences, timing becomes essential for effective planning. Backcountry weather tracking works best when you consider three overlapping time frames:
- Seasonal Norms: Start by reviewing the typical weather patterns for your destination during the chosen month. Resources like climate records and SNOTEL summaries can provide insights into average snowpack levels, storm patterns, and overnight lows. This information helps you choose the right time for your trip and prepare appropriate gear.
- Multi-Day Forecasts (2–7 Days Out): These forecasts are crucial for broader trip planning. Global models like the U.S. GFS and European ECMWF provide predictions up to 10 days ahead, though accuracy decreases beyond five days. Use this window to decide whether to proceed with your trip, adjust dates to avoid storms, or pick a lower-elevation route.
- Hourly and Daily Forecasts: Once on the trail, rely on these short-term forecasts to make real-time decisions. They can help you determine the best time to hike to avoid afternoon storms, select campsites with less wind exposure, or decide when to pause if conditions worsen.
BACKCOUNTRY TRIP PLANNING TOOLS
Checking Weather Forecasts Before Your Trip
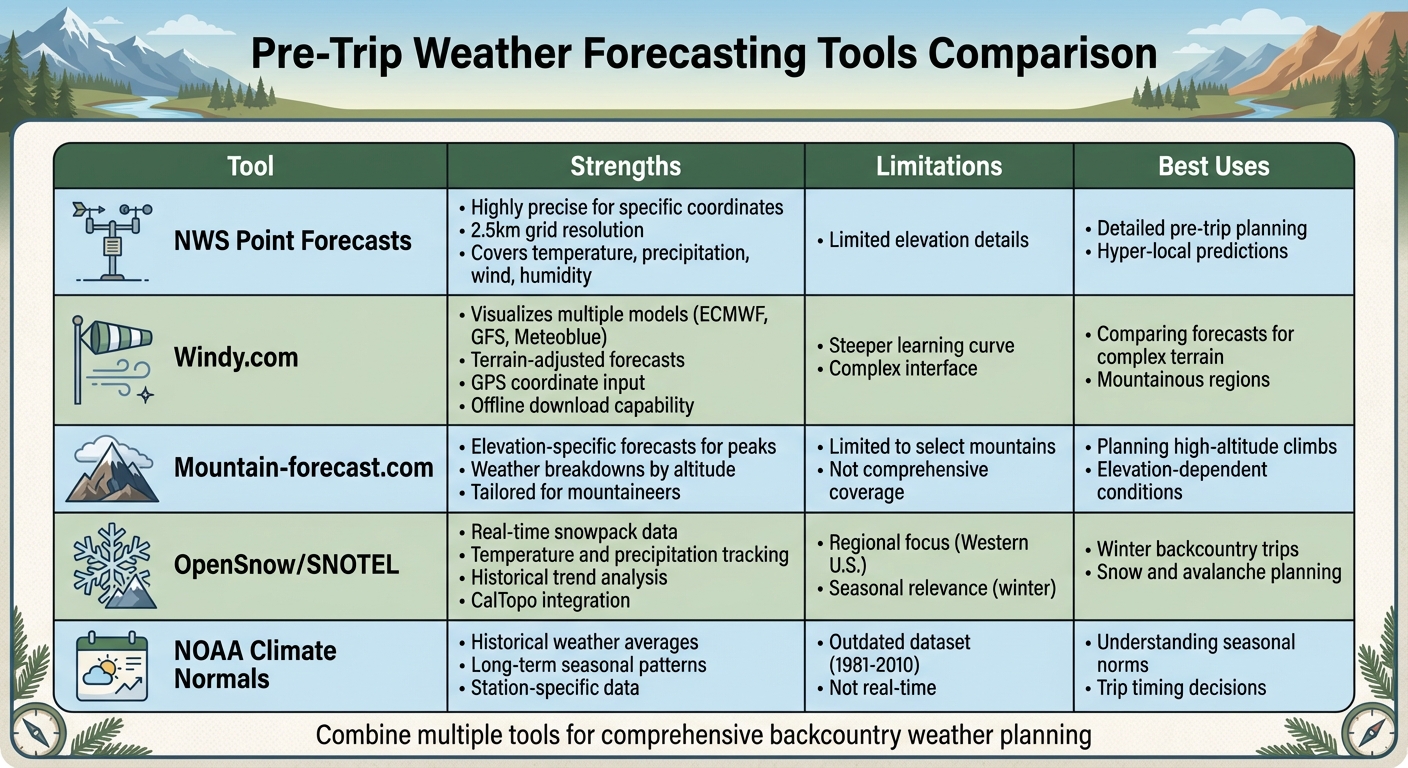
Pre-Trip Weather Forecasting Tools Comparison for Backcountry Planning
Point Forecasts and Specialized Tools
When you’re heading into the backcountry, having precise weather forecasts is crucial to ensure your safety and make informed decisions about your route. The National Weather Service (NWS) point forecast is one of the most reliable resources for this. Unlike standard city weather reports, these forecasts provide hyper-local predictions based on exact coordinates. They cover key details like temperature, precipitation, wind, and humidity, all derived from a 2.5km grid. You can easily access these by entering specific mountain names, campgrounds, lakes, or even latitude and longitude coordinates directly on the NWS website. For example, searching for a particular Sierra Nevada peak gives you location-specific forecasts. Need help finding coordinates? Wikipedia often includes them, and they link directly to the NWS forecast page.
For even more tailored information, specialized mountain tools can be a game-changer. Websites like Mountain-forecast.com provide weather breakdowns by elevation for selected peaks, which is especially helpful when conditions shift dramatically with altitude. If you’re planning a winter trip, OpenSnow delivers detailed snow and weather predictions for mountainous regions, making it a go-to for snow enthusiasts. For those traveling in the western U.S., SNOTEL sites offer real-time data on temperature, precipitation, and snowpack. You can even overlay this data on CalTopo maps and use tools like Report Generator 2.0 to analyze historical trends. Additionally, if you’re venturing into avalanche-prone areas, regional avalanche centers, such as the Colorado Avalanche Information Center (CAIC), combine weather forecasts with snowpack assessments to provide critical safety insights.
These tools give you the foundation to understand the broader weather patterns covered in the next section.
Reading Long-Range Forecasts
While forecasts beyond five days tend to lose accuracy, they’re still useful for identifying general weather trends. Platforms like Windy.com allow you to visualize ensemble models, including ECMWF (updated twice daily and better suited for complex terrain), GFS (updated four times daily with a 22km resolution), and Meteoblue (which incorporates AI for mountainous areas). These models help you spot patterns in pressure systems, wind directions, and precipitation probabilities over the next 10 days. Instead of focusing on exact temperatures or rain timings, look for broader signals like persistent high-pressure systems, which bring stable weather, or low-pressure troughs that indicate unsettled conditions.
For U.S. backcountry trips, satellite imagery can be incredibly helpful. By observing weather systems 300–500 miles west of your destination, you can get a sense of what’s heading your way. A high-pressure ridge usually means clear skies and calm conditions, while a series of low-pressure systems over the Pacific suggests stormy weather ahead. This knowledge can guide decisions like whether to proceed with your trip, adjust your dates to avoid bad weather, or opt for a lower-elevation route as a backup.
Pre-Trip Forecasting Tools
Once you’ve assessed both specific and long-range forecasts, it’s time to refine your planning with pre-trip tools. Using a combination of resources gives you a more complete picture of what to expect. Windy.com is particularly useful, offering detailed visual meteograms that factor in GPS coordinates, elevation, and terrain profiles. It’s widely used by aviators and excels at comparing models like ECMWF, GFS, and Meteoblue for your chosen location. While the interface may take some getting used to, the insights it provides are worth the effort.
For historical weather patterns, NOAA’s Monthly Climate Normals map is a valuable resource. It allows you to select stations near your route and download data from 1981–2010, giving you a sense of average temperatures, precipitation levels, and seasonal trends.
| Tool | Strengths | Limitations | Best Uses |
|---|---|---|---|
| NWS Point Forecasts | Highly precise for specific coordinates | Limited elevation details | Detailed pre-trip planning |
| Windy.com | Visualizes multiple models, terrain-adjusted | Steeper learning curve | Comparing forecasts for complex terrain |
| Mountain-forecast.com | Elevation-specific forecasts for peaks | Limited to select mountains | Planning high-altitude climbs |
| OpenSnow/SNOTEL | Focused on snowpack and precipitation | Regional and seasonal | Winter backcountry trips |
| NOAA Climate Normals | Historical weather averages | Outdated (1981–2010) | Understanding seasonal norms |
sbb-itb-5a98267
Adjusting Forecasts to Your Route
Elevation and Terrain Adjustments
When planning for your route, it’s crucial to adapt general forecasts to account for specific elevation and terrain factors. A good rule of thumb is to adjust temperatures by 3–5°F for every 1,000 feet of elevation gain. For example, if the National Weather Service predicts 60°F at a 5,000-foot trailhead and your route climbs to 9,000 feet, you should prepare for temperatures in the 40–50°F range at the summit, factoring in wind chill. The temperature drop is usually closer to 5°F per 1,000 feet in dry, unstable air and slightly less in humid or stable conditions.
Wind speeds also change dramatically with terrain. Exposed ridges often experience winds that are 1.5–2 times stronger than those in sheltered areas. For instance, if a forecast predicts 15 mph winds at 7,000 feet, you might face sustained winds of 20–30 mph on a ridge at 10,000 feet, with gusts exceeding 35 mph. In contrast, tree-covered areas or leeward sides of mountains usually experience much calmer conditions. While wind models provide a baseline, always account for the localized effects of exposure.
Terrain creates its own microclimates. Ridges and mountain passes are typically colder and windier due to their exposure, while sheltered basins can trap cold air overnight, leading to significantly lower dawn temperatures compared to nearby ridgelines. Canyons may funnel winds, creating strong localized gusts even when the broader forecast appears calm. South-facing slopes warm up more quickly and dry out faster thanks to direct sunlight, while north-facing slopes stay cooler and hold snow longer.
Keep these terrain effects in mind as you interpret forecasts, and remember that seasonal changes and snow conditions can further complicate predictions.
Seasonal and Snow Conditions
The time of year adds another layer of complexity to weather forecasting. Summer afternoons in regions like the Mountain West can bring sudden thunderstorms, making it wise to plan your route to avoid exposed ridges later in the day. In winter, mountains often experience heavier snowfall and stronger winds due to orographic lifting, especially on windward slopes. These conditions demand extra caution to account for avalanche risks and potential whiteouts.
Spring and fall, or the "shoulder seasons", are particularly unpredictable. Temperature swings can vary by 10–15°F from what’s forecasted, so it’s smart to be conservative when planning for river crossings, exposure to wet or cold conditions, and estimating the snowline. Snowpack also plays a major role in how forecasts translate to real conditions. A deep, continuous snowpack reflects sunlight, keeping ground-level temperatures cooler during clear, calm nights. Additionally, recent snowfall combined with high winds can quickly elevate avalanche risks. In such cases, checking real-time SNOTEL data alongside forecasts can help you assess whether even a small amount of snow could create hazardous conditions.
Terrain Adjustment Reference Table
| Terrain Feature | Temperature Impact | Wind Impact | Precipitation/Snow Impact |
|---|---|---|---|
| Ridges & Exposed Passes | 5–10°F cooler than valleys | Winds 1.5–2× stronger; higher gusts | Increased snowfall on windward sides |
| Sheltered Basins & Valleys | 5–15°F cooler overnight (cold pooling) | Significantly calmer winds | Higher moisture retention |
| South-Facing Slopes | 5–10°F warmer during daytime | Variable – depends on exposure | Faster snowmelt, less retention |
| North-Facing Slopes | Cooler throughout the day | Variable – depends on exposure | Snow lingers longer, potential icy conditions |
| Narrow Canyons | Cooler mornings with inversions | Winds may accelerate up to 2× | Variable – depends on orientation |
Tracking Weather During Your Trip
Tools for On-Trip Weather Tracking
Planning ahead is important, but staying adaptable during your trip means keeping an eye on real-time weather updates. Devices like the Garmin inReach can be lifesavers, offering location-specific weather forecasts even when you’re far off the grid. While these require an upfront investment and a subscription, they’re invaluable for remote adventures. For areas with spotty cell service, smartphone apps like Windy are a solid alternative. These apps provide detailed forecasts from models like ECMWF and Meteoblue, along with topographic maps that show wind, temperature, and precipitation patterns for any GPS location. This can be especially helpful in mountainous areas where weather can shift dramatically. Plus, Windy allows you to download data for offline use, making it a reliable backup when you’re out of range.
Barometric watches and handheld altimeters are also handy tools. By tracking pressure trends throughout the day, you can get a sense of what’s coming. For instance, a steady drop in pressure over several hours often signals an approaching storm, while rising pressure usually means improving conditions. Taking readings in the morning and evening can help you spot patterns and make better decisions.
Reading Sky and Environmental Signs
Sometimes, nature itself is the best weather forecaster. Keep an eye on the sky – high, wispy cirrus clouds often mean a warm front is on its way, with rain likely in the next day or two as these clouds thicken into cirrostratus. On the other hand, dark, towering cumulonimbus clouds with an anvil-shaped top are a clear sign of thunderstorms. If you see lightning, you can estimate how far away the storm is by counting the seconds between the flash and the thunder, then dividing that number by five to get the distance in miles.
Wind patterns are another important clue. Stable conditions are usually marked by consistent winds from one direction. But if the wind suddenly picks up, changes direction, or becomes gusty, it could mean a weather front is moving in. Strong gusts, especially from the east or south after a period of calm, often hint at nearby thunderstorm activity.
Other natural signs can also give you a heads-up. For example, pine cones opening up typically indicate low humidity and fair weather, while morning fog that quickly lifts often points to clear skies ahead. On the flip side, fog that lingers could mean overcast conditions later in the day. Even animal behavior can be telling – wildlife seeking shelter or birds going unusually quiet might signal an approaching storm. By combining these observations with your tools, you’ll be better equipped to make informed decisions.
Daily Weather Check Routine
To stay ahead of sudden weather changes, it’s helpful to establish a daily routine. Start each morning by checking your satellite device or weather app for updated forecasts. Focus on key details like wind, precipitation, and temperature for the next 12 to 24 hours. Then, take a moment to scan the sky, noting cloud types, movement, and wind direction. If you’re using a barometric device, review any pressure trends you’ve recorded. Use this information to make cautious decisions about whether to tackle exposed areas like ridgelines or summits.
By midday, take another look at the environment. Mountainous regions, especially in summer, are prone to afternoon thunderstorms, so stay alert for signs of storm development. Pay attention to wind shifts or changes in cloud formations. If you spot lightning, use the thunder-timing method to estimate how close the storm is. Be ready to adjust your route or head to lower ground if conditions start to worsen.
In the evening, review the day’s developments and check for updated forecasts. Note any changes in cloud cover, wind patterns, or pressure trends, as well as any unusual animal behavior. Use this information to plan for the following day – whether that means tweaking your route, choosing a different campsite, or even deciding to turn back early if the signs point to worsening weather. Staying vigilant and adaptable can make all the difference in keeping your trip safe and enjoyable.
Conclusion
Effective weather tracking for backcountry adventures hinges on solid preparation, smart adjustments, and constant awareness. Key resources include the National Weather Service’s point forecasts, mountain-forecast.com for elevation-specific insights, and SNOTEL for snowpack updates. For terrain-focused planning, Windy offers detailed ECMWF and GFS models.
Always factor in elevation when interpreting forecasts – clear skies at the trailhead can turn into snow and high winds at 10,000 feet. Of the two models, ECMWF tends to handle complex terrain more accurately than GFS. Cross-checking multiple sources helps fine-tune your expectations.
Once you’re out in the field, stay flexible. Tools like the Garmin inReach provide real-time forecasts even in remote areas, while a barometric watch can help you detect weather shifts by observing sky conditions. Build a habit of checking the weather regularly – morning, midday, and evening – to stay ahead of any changes. These practices form the backbone of a reliable approach to backcountry weather safety.
FAQs
How do I adjust weather forecasts for elevation changes during a backcountry trip?
When planning for elevation changes during a backcountry trip, it’s important to remember that temperatures tend to drop as you climb higher. A handy guideline is to subtract 3.5°F for every 1,000 feet of elevation gain. Conversely, if you’re descending, you can add 3.5°F for every 1,000 feet. This simple formula helps you estimate how altitude impacts temperature.
Also, be aware that mountain weather can shift quickly. Always check the forecast for both your starting point and the higher elevations you’ll encounter. Being prepared for sudden temperature changes ensures you’ll have the right gear and clothing for your trip.
What are the best tools to monitor real-time weather changes during a backcountry trip?
To keep track of real-time weather changes while exploring the backcountry, reliable weather apps like NOAA Weather Radar, AccuWeather, or Weather Underground are excellent tools. These apps offer detailed forecasts, radar visuals, and location-specific alerts to help you stay informed.
For areas where cell service is spotty, carrying a portable weather radio is a smart backup. These radios are typically lightweight, battery-powered, and can pick up NOAA weather alerts. You can also enable weather notifications on your smartphone’s GPS, ensuring you receive timely updates even when navigating remote trails.
How do ridges and valleys influence backcountry weather?
Ridges tend to have higher pressure and clearer skies, which means they’re usually less affected by sudden weather shifts. On the other hand, valleys often hold onto moisture and colder air, creating conditions ripe for fog, cloud cover, or even storms. These contrasts can play a big role in visibility and safety during your journey, so make sure to factor them into your planning.