
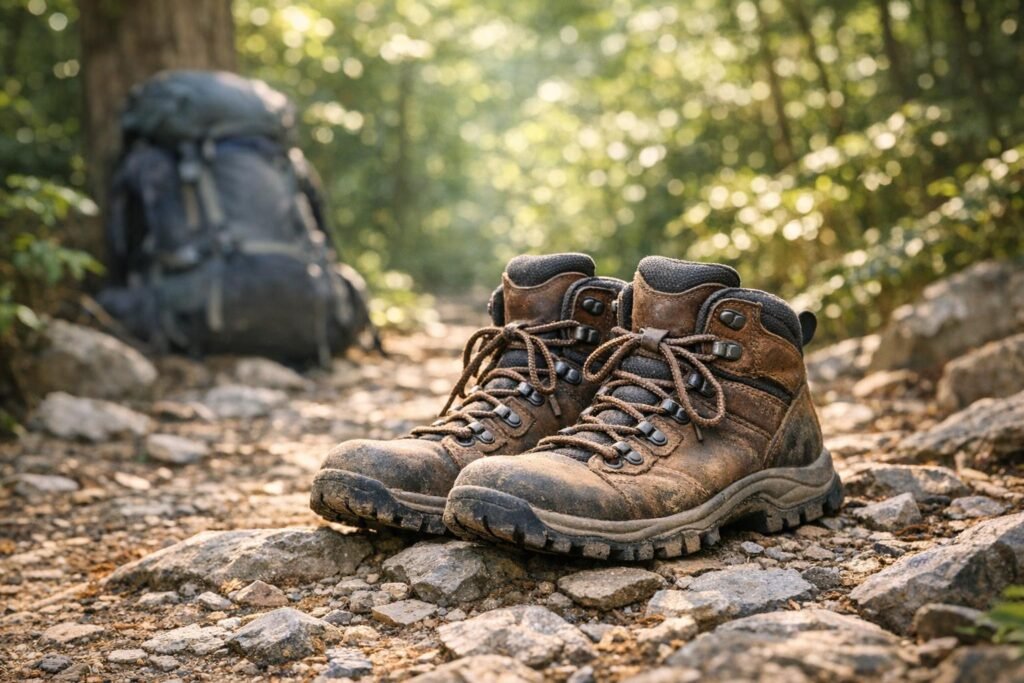
When picking backpacking boots, focus on three key factors: terrain, pack weight, and fit. The wrong boots can lead to discomfort, blisters, or even injuries, while the right pair ensures a safer, more enjoyable hike. Here’s what you need to know:
- Day Hiking Boots: Lightweight, flexible, and great for short trips with light packs (under 35 liters). Best for easy to moderate trails.
- Backpacking Boots: Sturdier with high ankle support and stiffer midsoles. Ideal for multi-day trips carrying 35–75 liters on rugged terrain.
- Mountaineering Boots: Heavy-duty, insulated, and crampon-compatible. Designed for extreme conditions and heavy packs (75–100+ liters).
Fit Tips:
- Measure your feet in the afternoon (when they’re slightly swollen).
- Leave about ½ inch of space between your toes and the boot’s tip.
- Test for heel lift and ensure proper ankle support.
Materials Matter:
- Full-grain leather: Durable but heavier with a longer break-in period.
- Synthetic: Lightweight and breathable but less durable.
Weather and Terrain:
- Wet or snowy conditions: Waterproof boots with aggressive tread.
- Hot, dry climates: Non-waterproof, breathable options.
The right boots depend on your hiking goals, pack weight, and the environment. Always break in your boots before long treks to avoid blisters or discomfort.
Backpacking Boot Types Comparison Guide: Day Hiking vs Backpacking vs Mountaineering Boots
THE Ultimate Guide to Hiking Footwear 🥾
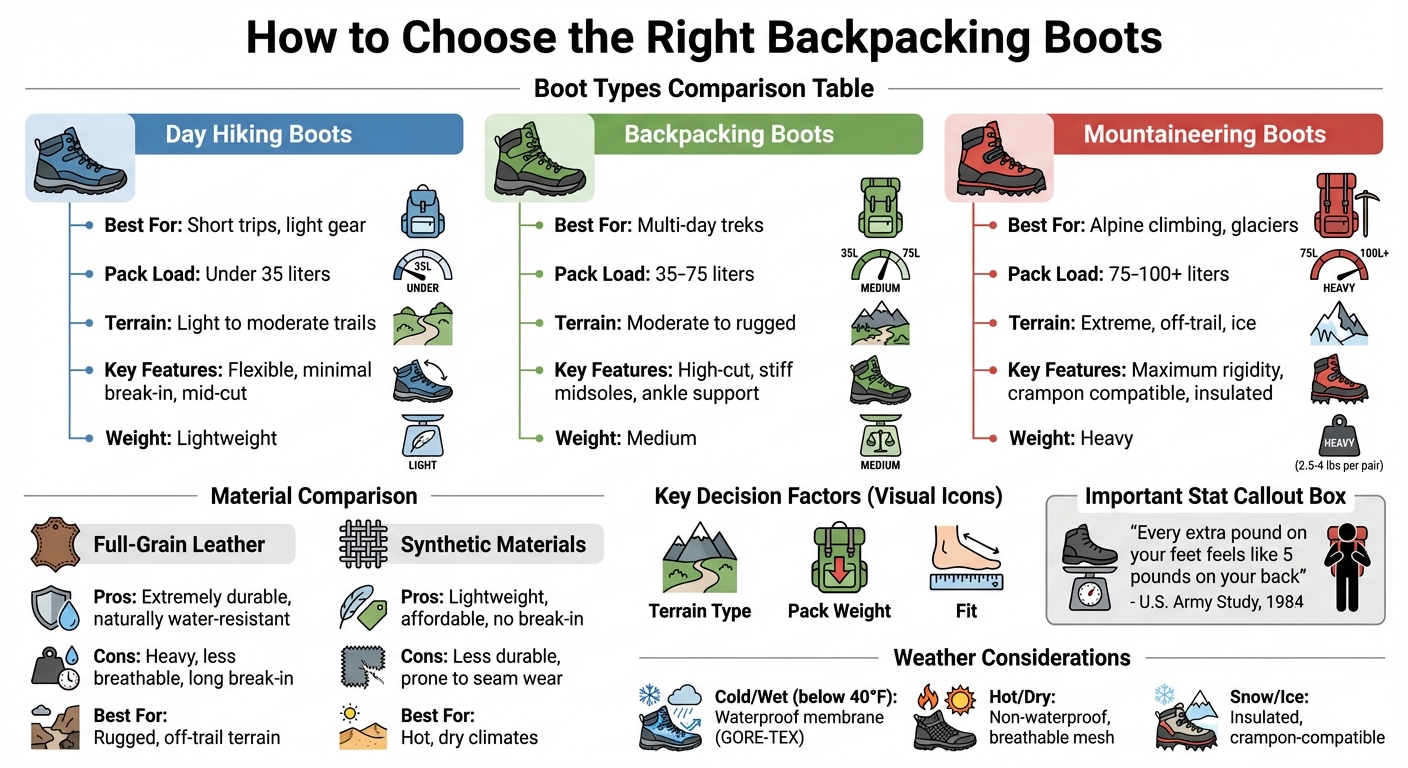
Types of Backpacking Boots
When it comes to choosing the right boots for your adventures, understanding the three main categories – day hiking boots, backpacking boots, and mountaineering boots – is key. Each type is designed with specific uses and conditions in mind.
Day Hiking Boots vs. Backpacking Boots vs. Mountaineering Boots
Day hiking boots are perfect for shorter trips with lighter loads. They typically feature mid- to high-cut designs and have flexible midsoles, making them comfortable straight out of the box. These boots are ideal if you’re carrying less than 35 liters of gear and sticking to light or moderate trails. The downside? They offer less support for heavier loads or rougher terrain.
Backpacking boots are built for multi-day adventures. They feature high cuts that provide ankle support and stiffer midsoles, often reinforced with internal shanks, making them ideal for moderate to rugged terrain. These boots can handle loads between 35 and 75 liters, giving you the stability needed when you’re carrying essentials like a tent, sleeping bag, and food for an extended trip.
Mountaineering boots are the toughest of the bunch, designed for alpine conditions, glaciers, and technical climbing. They’re the heaviest and stiffest option, often insulated and compatible with crampons for ice climbing. These boots can support loads of 75 to 100 liters or even more, making them indispensable for extreme environments.
| Boot Type | Best For | Pack Load | Terrain | Key Features |
|---|---|---|---|---|
| Day Hiking | Short trips, light gear | Under 35 liters | Light to moderate | Flexible, minimal break-in, mid-cut |
| Backpacking | Multi-day treks | 35–75 liters | Moderate to rugged | High-cut, stiff midsoles, ankle support |
| Mountaineering | Alpine climbing, glaciers | 75–100+ liters | Extreme, off-trail, ice | Maximum rigidity, crampon compatible |
Choosing the right type of boot depends on the weight of your pack and the demands of your journey.
How Pack Weight Affects Boot Selection
The weight of your pack plays a huge role in determining the best boots for your trek. If your pack weighs more than 30 pounds, you’ll need boots that provide solid ankle and foot support. Heavier packs shift your center of gravity, making it essential to wear boots with added rigidity to prevent fatigue and maintain stability.
Here’s something to keep in mind: every extra pound on your feet feels like five pounds on your back. This principle, supported by a 1984 U.S. Army study, highlights the importance of not overburdening yourself with unnecessarily heavy boots. The goal is to find the lightest boots that still offer the support you need for your load.
The table above outlines how pack weight aligns with boot type, but the reasoning behind these pairings matters. Lighter packs allow for more breathable and flexible boots, while moderate packs require a balance of support and comfort. For heavy packs, you’ll need maximum stability, provided by stiff midsoles and structured collars.
Terrain also plays a role. If you’re navigating rugged, off-trail conditions with a heavy pack, you’ll benefit from boots with firm outsoles and structured collars. These features protect your feet from rocks and roots, helping to reduce fatigue over long distances.
Next up, we’ll dive into how terrain and weather conditions further influence your boot choice.
Matching Boots to Your Terrain and Conditions
Choosing Boots Based on Terrain Type
The type of terrain you’ll be hiking on plays a huge role in determining the best boots for your adventure. For well-maintained, paved, or groomed trails, lightweight hiking shoes are usually all you need. But when the path gets trickier – think roots, rocks, and elevation changes – you’ll want footwear with added cushioning, stability, and durability to handle the challenges.
If you’re heading into rugged terrain with steep climbs, obstacles, or unpredictable surfaces, high-cut boots with structured collars and firm outsoles are a must. On rocky, uneven, or muddy trails, stiff TPU midsoles and deep, multidirectional lugs provide the grip and protection you need. For snow-covered trails, look for boots with aggressive lugs, waterproof membranes, and insulation. And if icy conditions are on the horizon, make sure your boots are stiff enough to accommodate crampons.
Material also plays a crucial role. Full-grain leather excels in abrasion resistance, making it ideal for off-trail adventures through rocky or brush-filled areas. On the other hand, synthetic mesh uppers are better suited for hot and dry climates, offering superior breathability. For sandy or loose trails, low-cut ankle gaiters can help keep debris out of your boots.
Once you’ve matched your boots to the terrain, it’s time to consider weather and seasonal factors.
Weather and Season Requirements
Weather conditions are just as important as terrain when choosing the right hiking boots. If you’re trekking in consistently cold or wet weather – think temperatures below 40°F or persistent rain – a waterproof membrane like GORE-TEX is essential. As Wesley Trimble, Communications and Creative Director at the American Hiking Society, puts it:
"If the majority of your hiking will be done in weather that’s 40° F or below and you’ll consistently be in wet weather or snow, a waterproof membrane may be a better option".
However, in desert environments, waterproof membranes can trap heat and moisture, leading to discomfort. For these conditions, non-waterproof boots with mesh or perforated uppers are a better choice, as they maximize ventilation and allow sweat to evaporate. If stream crossings are frequent, non-waterproof mesh boots dry more quickly since they let moisture escape easily.
For freezing temperatures, look for boots with integrated insulation – commonly found in mountaineering models – and stiffer midsoles that are compatible with crampons for better ice traction. Waterproofing combined with insulation is crucial in snowy conditions to keep your feet warm and dry from snowmelt. Finally, pay attention to the lug pattern on your boots: shallower, closely spaced lugs work better on wet, smooth rock, while deeper, aggressive lugs are ideal for snow or loose dirt.
What to Look for in Backpacking Boots
When choosing backpacking boots, it’s essential to focus on features that directly impact their performance and durability. Materials, construction, and design elements all play a critical role in how your boots perform on the trail.
Boot Materials and Durability
The materials used in a boot’s upper determine its durability, weight, and break-in period. Full-grain leather is often considered the standard for rugged terrain. It offers excellent abrasion resistance and natural water resistance but requires a lengthy break-in period. Nubuck leather, a buffed version of full-grain leather, provides similar durability but with added flexibility. On the other hand, split-grain leather is lighter and more breathable, though it sacrifices some durability.
For a lighter and more affordable option, synthetic materials like nylon and polyester are worth considering. They require little to no break-in time, making them ideal if you’re eager to hit the trail. However, these materials tend to wear out faster than leather. On average, hiking boots last between 500 and 1,000 miles, depending on how they’re used and maintained. For example, field tests of the Zamberlan 996 Vioz GTX showed its leather upper held up well after nearly 900 miles of hard use.
| Material | Pros | Cons |
|---|---|---|
| Full-Grain Leather | Extremely durable, naturally water-resistant | Heavy, less breathable, long break-in |
| Synthetics | Lightweight, affordable, no break-in | Less durable, prone to seam wear |
Now, let’s look at how midsoles and outsoles work with these materials to provide essential support and grip.
Midsoles, Outsoles, and Cushioning
The midsole is key for cushioning and support. EVA (Ethylene Vinyl Acetate) is a lightweight material known for excellent shock absorption and a softer, cushioned feel – perfect for moderate trails. For instance, the Hoka Kaha 3 GTX boasts almost 2 inches of EVA cushioning, which is nearly double what most standard hiking boots offer. For more demanding trails or heavy loads, TPU (Thermoplastic Polyurethane) is a better option. It’s stiffer and more durable, providing the stability needed for backpacking and mountaineering.
Between the midsole and outsole, you’ll often find shanks (3–5 millimeters thick) that add stiffness for carrying heavier loads. Additionally, rock plates made of carbon fiber or plastic protect your feet from sharp rocks while improving torsional rigidity. The outsole, typically made of rubber, varies in hardness. Harder compounds are more durable on rocky terrain, while softer rubber offers better grip on slick surfaces, though it may wear down faster.
Lug Patterns and Traction
Traction is crucial, and lug patterns play a big role in how well your boots grip different surfaces. For muddy or snowy trails, deep, widely spaced lugs are ideal because they shed debris effectively. For instance, the Merrell Moab Speed 2 features 4-millimeter lugs designed to clear mud efficiently. On wet or smooth rock, shallower and tightly spaced lugs provide better surface contact and improved grip. A heel brake, with pronounced lugs at the heel, adds extra control and helps prevent slipping on steep descents.
Ryan Huetter, a professional mountain guide, praised the Lowa Renegade Evo for its Vibram Rene Trac outsole, noting that its multidirectional lugs made it "easy to cover uneven ground without much effort".
Similarly, the Danner Mountain 600 uses Vibram Megagrip, a rubber compound known for its exceptional stickiness on slick mud and sandstone. These design features can make all the difference when tackling challenging terrain.
sbb-itb-5a98267
Getting the Right Fit
Even the toughest boots can cause discomfort, blisters, or even black toenails if they don’t fit properly. Ensuring a good fit from the start means taking accurate measurements, testing thoroughly, and being patient during the break-in process.
How to Measure Your Feet for Boots
Measure your feet in the late afternoon when they’re at their largest size. Since most people have one foot slightly bigger than the other, always go with the size that accommodates your larger foot. To get the most accurate fit, wear the exact hiking socks and orthotics you plan to use on the trail while measuring.
Hiking boots often need to be a half-size or even a full-size larger than your everyday shoes. This extra space – about ½ inch between your longest toe and the boot’s tip – allows your foot to spread naturally and prevents toe jamming on downhill slopes. For precise measurements, use a Brannock Device (the metal measuring tool found in most shoe stores) to check your heel-to-toe length, arch, and width. If you’re at home, try removing the boot’s insole, place your heel snugly in the heel cup, and ensure there’s roughly a thumb’s width of space at the front.
Another quick test is the one-finger method. Slide your foot forward in an unlaced boot until your toes touch the front. Then, have a friend slide one finger between your heel and the back of the boot. If more than one finger fits, the boot is too big; if no finger fits, it’s too small.
Testing for Comfort and Support
Once you’ve nailed the length, lace up your boots and put them to the test. Stand on the edge of a stair – if your toes hit the front of the boot, you’ll need a larger size. Next, check for heel lift by flexing your foot up and down on the stair edge. A slight lift (about ¼ inch or less) is fine, but too much movement can lead to blisters.
"Heel slippage is a guaranteed blister. It is important to ensure your heel is locked in." – Meindl USA
Your boots should feel snug but not tight. Your toes need enough room to wiggle, while your heel should stay firmly in place. If your foot slides or there’s too much space above the instep when the laces are tight, the boot may have too much volume for your foot. Also, check that the boot bends naturally at the ball of your foot. Walk around the store on various surfaces and inclines to see how they feel. As Carlos Rodriguez, Department Manager at REI, explains:
"The mark of a good shoe is that I’m not thinking about it when I’m outside."
Breaking In Your New Boots
The time it takes to break in boots depends largely on the materials. Trail runners and synthetic boots often feel trail-ready straight out of the box, but full-grain leather or mountaineering boots may take several weeks of consistent wear to soften and mold to your feet. This process not only helps the boots conform to your foot shape but also allows your skin to build protective calluses.
Start indoors by wearing your boots with hiking socks, ensuring the laces are snug and the tongue and gussets are properly aligned. Gradually move to short walks on flat surfaces to pinpoint any hot spots or pressure points. Once they feel comfortable, take them on light day hikes with moderate terrain and a light daypack. Be prepared – carry moleskin and an extra pair of shoes in case any discomfort arises.
Increase your activity level and pack weight gradually, adjusting the laces as needed to relieve pressure. As Zoe Gates, Senior Editor at Backpacker, points out:
"The motion of walking on a flat surface is very different from the ups and downs of a hiking trail."
Avoid shortcuts like soaking boots in water, which can damage leather. If stiff leather uppers crease and dig into your toes – a problem sometimes called "toe chop" – a professional cobbler can mechanically flex the boots to soften the creases. Keep in mind, the break-in process can’t fix a poor fit. If your boots pinch or cause significant pain during these early tests, it’s better to exchange them for a pair that fits properly.
Once your boots are broken in and fit securely, you’re ready to move on to exploring boot cut styles in the next section.
High-Cut vs. Low-Cut Boots: Which Should You Choose?
Deciding between high-cut and low-cut boots really comes down to three main factors: the weight of your pack, the type of terrain you’ll tackle, and how experienced you are as a hiker. High-cut boots are ideal for stabilizing heavier loads (think 35–40 lbs) thanks to their stiff midsoles and shanks. On the other hand, low-cut shoes are better suited for lighter loads (20–30 lbs) and offer a more natural stride. Understanding these differences is key before diving into durability and maintenance.
When it comes to weight, high-cut boots are heavier, usually ranging from 2.5 to 4 lbs per pair. They deliver stability on rugged terrain but can be energy-draining. Meanwhile, low-cut trail runners, weighing just 1 to 2 lbs per pair, are designed for speed and agility, especially on well-maintained trails. Studies even show that heavier boots require significantly more energy to maintain your pace compared to lighter footwear.
Terrain plays a big role in your decision too. High-cut boots shine on technical, uneven terrain, offering extra ankle support and protection. Low-cut shoes, however, are a better match for flatter, groomed trails, particularly when paired with gaiters to keep debris out.
Your experience level also matters. Beginners or hikers without strong stabilizer muscles in their feet and ankles often benefit from the added support of mid- or high-cut boots. As podiatrist Patrick McEneaney from Northern Illinois Foot & Ankle Specialists explains:
"Wearing inappropriate shoes can set you up for stress fractures and sprained ankles".
More experienced hikers with strong ankles might confidently choose low-cut shoes, even for moderately challenging trails.
Durability and climate considerations further set these options apart. Traditional backpacking boots, especially full-grain leather models, are built to last and can often be resoled. In contrast, trail-running shoes generally need replacing after about 500 miles, as their cushioning wears out. High-cut boots are often waterproof but can trap heat and sweat, making them less breathable. Low-cut shoes, made from mesh or synthetic materials, dry faster and help keep your feet cooler in warmer weather.
Conclusion
Picking the right backpacking boots is all about aligning your choice with three key aspects: the terrain you’ll tackle, the weight you’ll carry, and how well the boots fit your feet. For smoother, well-maintained trails, lightweight and flexible hiking shoes might be all you need. However, if you’re venturing into rough, uneven terrain, you’ll want high-cut boots with stiff midsoles and deep lugs to provide the traction and support required. Carrying heavier loads? Opt for boots that offer extra ankle support and structural stability to handle the added strain.
Getting the right fit is just as important as choosing the right style. Try boots on later in the day when your feet are naturally more swollen, mimicking how they’ll feel after hours on the trail. Walk on an incline to ensure your toes have enough space and don’t get crammed during descents. And don’t skip the break-in process – especially with full-grain leather boots. Give them time to soften and conform to your feet before heading out on your adventure. These steps will help you hit the trail with confidence and comfort.
FAQs
How can I pick the right backpacking boots for my trip?
Choosing the perfect backpacking boots comes down to the type of hike, the terrain, and your personal preferences. Start by thinking about your trip – a short day hike, a multi-day journey, or a challenging mountaineering trek all call for different footwear. For lighter loads on well-maintained trails, low-cut or mid-cut hiking shoes are a solid choice. If you’re tackling rough terrain or carrying a heavy pack (over 30 lbs), mid-cut or high-cut boots provide the extra ankle support you’ll need.
The material of the boots is another key factor. Lightweight synthetic or mesh uppers are ideal for warm, dry conditions, while full-grain leather or waterproof designs are better suited for wet or cold environments. When trying on boots, wear your hiking socks to get the most accurate fit. Your heel should stay secure, your toes should have room to move, and you shouldn’t feel any uncomfortable pressure points. Before making a decision, take the boots for a test walk on uneven surfaces to check for stability and comfort. A well-chosen pair of boots can make all the difference in keeping you comfortable and supported on your adventure!
What are the main differences between synthetic and leather backpacking boots?
When it comes to backpacking boots, synthetic and leather options each bring their own set of advantages and trade-offs. Here’s a breakdown to help you decide which might suit your hiking needs:
- Weight: Synthetic boots are noticeably lighter, which can help reduce fatigue during long treks. Leather boots, on the other hand, are heavier but provide better support and stability, especially on uneven terrain.
- Durability: Leather boots are built to last and, with proper care, can serve you for years. Synthetic boots have improved over time but still tend to wear out more quickly.
- Comfort: Leather boots may require a break-in period but will eventually mold to your feet, offering a snug, personalized fit. Synthetic boots are often comfortable straight out of the box but might not offer the same level of tailored support over time.
- Water Resistance: Treated leather naturally repels water and retains warmth in wet conditions. Synthetic boots, while water-resistant, rely on waterproof membranes for protection, which may not be as effective in extreme conditions.
- Breathability: Synthetic materials excel in breathability, keeping your feet cooler in hot weather. Some leather blends are designed to improve airflow, but they generally lag behind synthetic options in this area.
- Cost: If you’re on a budget, synthetic boots are typically more affordable, often priced under $200. Leather boots, however, can range from $250 to $400 or more, reflecting their durability and craftsmanship.
For lightweight comfort and affordability, synthetic boots are a great choice for shorter hikes or less rugged trails. If you’re planning extended adventures in tough conditions, leather boots offer the durability and protection you’ll need to go the distance.
How do I make sure my backpacking boots fit to prevent blisters?
When trying on hiking boots, start by wearing the socks you plan to use on your hikes – this helps ensure the best fit. Stand up straight and slide your foot forward in the boot until your toes lightly touch the front. Then, check the space behind your heel; there should be about a thumb’s width of room. Lace the boots snugly, making sure your heel feels secure and doesn’t slip, but avoid over-tightening – your toes should still have room to move comfortably. A good fit means the boots feel supportive without causing any pinching or discomfort.