
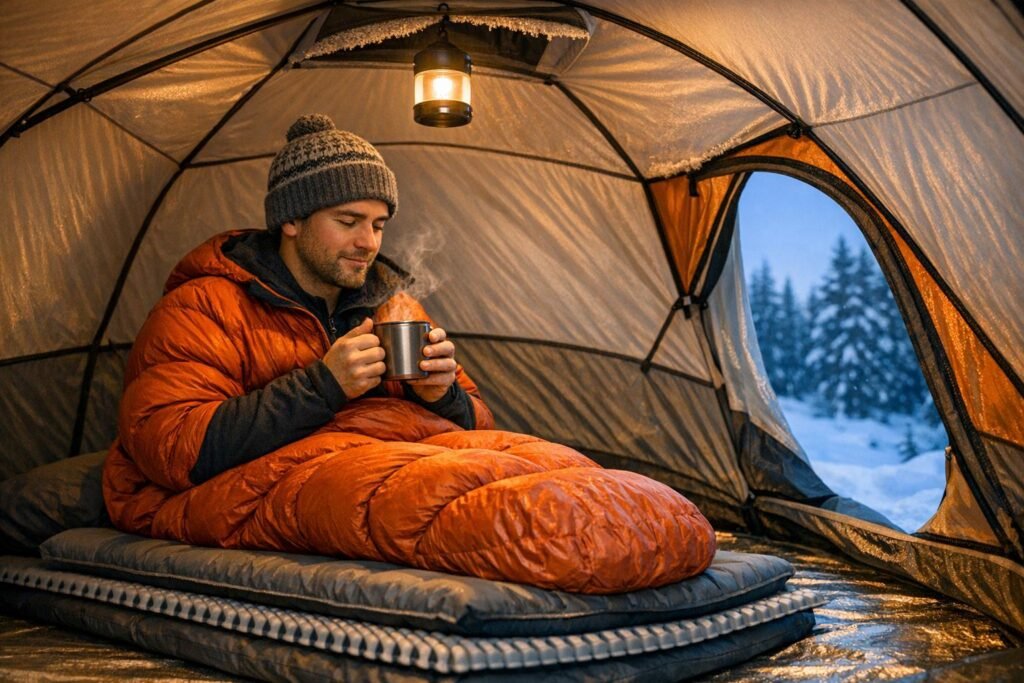
Camping in cold weather can be challenging, but staying warm in a tent isn’t just about comfort – it’s about safety. Here’s what you need to know:
- Gear Matters: Use a 4-season tent with proper insulation (like snow skirts and aluminum poles). Pair it with a sleeping bag rated 10–15°F lower than the coldest expected temperature. A sleeping pad with an R-value of 4.0 or higher is crucial to prevent heat loss to the ground.
- Campsite Selection: Avoid valleys where cold air collects. Choose mid-slope spots with natural windbreaks and south-facing slopes for more sunlight.
- Insulation Tips: Add foam pads, reflective blankets, and tightly pitch your tent to trap heat. Use snow or natural materials to block drafts at the base of the tent.
- Ventilation: Prevent condensation by leaving vents slightly open for airflow. Moisture from your breath can soak gear and reduce insulation.
- Safe Heating: Use hot water bottles or heated rocks for warmth. If using a heater, ensure proper ventilation to avoid carbon monoxide risks.
- Layer Smartly: Wear dry, wool base layers to bed. Stuff extra clothes in your sleeping bag to minimize empty space.
These practical steps ensure you stay warm, dry, and safe during your outdoor adventures.
31 Tips to Stay Warm Camping
sbb-itb-5a98267
Choosing the Right Tent for Cold Weather
Did you know a well-designed tent can keep its interior temperature 5–10°F warmer than the outside air – and even up to 10–15°F warmer if it has sealed snow skirts? That difference can mean the world when you’re out in freezing conditions. The gap between a 3-season tent and a true 4-season model isn’t just marketing fluff; it’s the difference between a sleepless, shivering night and waking up refreshed and ready to tackle the outdoors.
Tent Materials and Insulation Features
When it comes to cold-weather camping, the materials and design of your tent are everything. Unlike 3-season tents that rely on mesh for ventilation, 4-season tents use solid, breathable fabrics to trap heat and block snow (often called spindrift). These tents also feature rainflies that extend all the way to the ground, creating a barrier against wind and moisture.
Double-wall tents are the gold standard for insulation. The gap between the inner tent and the rainfly creates a dead-air space, which helps insulate and directs condensation away from you. This means moisture collects on the rainfly instead of dripping onto your sleeping bag. And don’t skimp on the poles – look for 7000-series aluminum. These poles stay flexible in freezing conditions, unlike fiberglass, which can snap when temperatures plummet.
Snow skirts are another game-changer. These fabric flaps at the tent’s base can be buried in snow to seal in heat and keep out drafts. For structural strength, go for steep walls (like tipi-style tents) or geodesic designs with multiple pole crossing points. These shapes are built to handle the weight of heavy snow, which can reach 20–30 lbs per cubic foot.
| Feature | Why It Matters | What to Look For |
|---|---|---|
| Pole Material | Flexibility in extreme cold | 7000-series aluminum for subzero durability |
| Wall Construction | Heat retention and spindrift protection | Solid, breathable fabric instead of mesh |
| Rainfly Coverage | Blocks wind and precipitation | Full-coverage rainfly reaching the ground |
| Floor Rating | Protects against moisture from melting snow | Hydrostatic head of 3,000mm to 5,000mm |
These features are essential, but they’re only part of the equation. Ventilation is equally critical for staying warm and dry.
Balancing Ventilation and Heat Retention
The trick to staying warm without waking up in a damp sleeping bag? Proper ventilation. On average, a person exhales about 8 ounces of water vapor overnight. Without adequate airflow, that moisture condenses on the tent walls and can soak your gear, ruining its insulation.
"Don’t zip your tent tight, or you’ll create the worst condensation problems. You must create protected airflow paths when dealing with heavy precipitation and wind."
– John Barklow, Special Operations Survival Instructor, Montana Knife Company
To manage this, keep two vents open – one high and one low – for cross-ventilation. Even in extreme weather, leave the top of your tent door slightly unzipped (4 to 6 inches) to let moisture escape. Position your tent at a 45° angle to the wind. This setup encourages airflow without allowing harsh gusts to blow directly inside. And remember: store wet boots and clothing in the vestibule, not inside the tent, to keep humidity in check.
Now, let’s talk about how the size of your tent can make a big difference in staying warm.
How Tent Size Affects Warmth
The size of your tent plays a surprisingly important role in heat retention. A resting body generates about 80–120 watts of heat, which can warm a small tent effectively. But a larger tent? That extra volume means more cold air to heat and more surface area for warmth to escape.
"A larger tent is colder, because your body can’t warm the larger enclosed volume as effectively."
– Ben Gordon, Structural Engineer
The takeaway? Go for the smallest tent that comfortably fits your group. If you’re camping solo, stick to a 1-person tent instead of a larger model. Store your gear in the vestibule to reduce the air volume your body needs to heat. Low-profile dome or tunnel tents are better for retaining warmth than tall cabin-style designs, which allow warm air to rise far above your sleeping area, leaving you chilly on the ground.
Preparing Your Campsite for Warmth
Where you set up camp can make or break your comfort during the night. A well-chosen location can naturally boost your shelter’s warmth, while a poor choice might leave you shivering despite your gear.
Selecting the Best Campsite Location
Your campsite’s surroundings play a big role in staying warm. Cold air acts like water – it flows downhill and collects in low spots. This makes valleys, canyons, and dips in the terrain "frost pockets", where temperatures can plummet. As Philip Werner from SectionHiker.com points out:
"Cold air flows downhill and pools at the bottom of valleys or canyons. To avoid this, don’t camp in a low spot".
A mid-slope position is ideal, as it avoids both the cold air pooling in valleys and the harsh winds often found on ridges. Remember, temperatures drop about 3–4°F for every 1,000 feet of elevation gain, so camping lower – just not at the very bottom – can keep things a bit warmer.
South-facing slopes are a great choice. These areas soak up more sunlight during the day, creating a warmer spot for your tent and speeding up the drying of morning condensation. Look for natural windbreaks like boulders, hills, or clusters of healthy trees to shield your tent from the wind. Werner explains why this matters:
"Moving air and wind will strip heat from you through a process known as convection".
Pay attention to the ground beneath your tent, too. Pine needles, dry leaves, or moss provide better insulation than hard-packed dirt or wet soil. If you’re camping on snow, pack it down with boots or snowshoes to create a firm, insulated base.
A few extra tips: Stay at least 200 feet from lakes or streams, especially in spring when they trap cold air. Check above for "widowmakers" – dead branches or snow-laden limbs that could fall on your tent. And in avalanche-prone areas, avoid slopes steeper than 40 degrees.
Once you’ve picked the perfect spot, focus on setting up your tent to maximize its warmth.
Setting Up Your Tent for Maximum Warmth
Finding the right site is only half the battle; how you pitch your tent matters just as much. Start by placing a ground tarp under your tent to block moisture, which can sap heat. Make sure the tarp is slightly smaller than the tent floor – any excess could collect rain or melting snow and funnel it under your tent.
Pay attention to your tent’s orientation. Position the door downhill and away from the wind to keep cold drafts at bay when you open it.
Ensure the tent is pitched tightly to maintain the insulating air gap between the rainfly and the inner tent. If you’re dealing with deep snow, standard stakes might not work. Instead, bury items like sticks or bags about a foot deep in the snow and pack it down to secure your tent.
For car campers, your vehicle can double as a windbreak, adding another layer of protection to your tent setup. This approach complements the insulated tent and layered sleeping system discussed earlier.
| Feature | Recommendation for Warmth | Reason |
|---|---|---|
| Topography | Mid-slope | Avoids cold air pooling in valleys and strong winds on ridges |
| Aspect | South-facing | Captures more sunlight during the day, warming your tent and drying condensation |
| Ground Cover | Pine needles, moss, or dry leaves | Provides better insulation than bare or wet ground |
| Wind Protection | Leeward side of trees/rocks | Reduces heat loss from wind-chill |
| Proximity to Water | At least 200 feet away | Avoids cold air and humidity near water bodies |
Insulating Your Tent: Floors, Walls, and Ceilings
Once you’ve chosen the perfect campsite and set up your tent, the next step is insulation. Proper insulation is essential to keep heat from escaping, especially in cold conditions. The ground, walls, and ceiling of your tent all play a role in heat retention, so a layered insulation strategy can make a big difference in staying warm.
Using Foam Pads and Insulation Layers
Start with the floor. Place a waterproof footprint under your tent to block moisture, then add a closed-cell foam pad inside as a thermal barrier. These pads typically have an R-value between 1.5 and 3.5, which helps reduce heat loss through the ground. For colder weather, opt for a thicker pad – a 3/4-inch foam pad (R-value 3.0–3.5) works for temperatures around 0–20°F, while a 1-inch pad (R-value 4.0–4.5) is better for extreme cold below 0°F.
When using reflective materials like Mylar blankets, placement matters. Instead of putting the blanket under your sleeping pad, position it between the pad and your sleeping bag. This setup creates an air gap that reflects up to 90% of radiant heat back toward you. Combining foam pads with reflective layers can cut heat loss by 40–60%.
For the ceiling, attach a reflective blanket to trap rising heat. Since a lot of warmth escapes through the roof, this step is critical. Use binder clips, clamps, or magnets to secure the blanket to the tent poles – avoid using duct tape, as it can damage the fabric. Reflectix, a reflective bubble wrap available at hardware stores, is an even better option. It combines a radiant foil barrier with air pockets for added insulation. Leave a 2–4-inch gap between the insulation and the tent wall to create a "dead-air space", which significantly improves heat retention.
Draft-Proofing and Thermal Liners
Sealing drafts is just as important as adding insulation. Tents often have small gaps where cold air can sneak in, especially around seams. Apply seam sealer to the underside of your rainfly and the inner tent body to close these gaps. Chris Pottinger, Senior Tent Designer at REI, highlights this issue:
"Many tents come with seams that are sealed, but the sealant can wear out over time, letting water [and air] leak through".
At ground level, block drafts by stuffing old socks, towels, or scarves into corners where cold air might enter. If you’re camping on snow, you can pack snow around the base of your tent to act as a natural wind barrier. For wall tents, consider using "sod cloths" – vinyl bands sewn to the bottom of the walls. Fold them inward and weigh them down with dirt to seal out cold air.
Make sure your rainfly is pitched tightly to maintain the insulating air gap between it and the tent body. A well-staked rainfly can offer an R-value of about 0.9 in cold conditions. However, while sealing gaps, leave a little ventilation. Keeping upper vents slightly open allows moisture from your breath to escape, preventing condensation from reducing insulation effectiveness.
With the floor, walls, and ceiling insulated, you’re ready to focus on building a layered sleep system to maximize warmth.
Building a Layered Sleep System
Sleeping Pad R-Value Guide for Cold Weather Camping
Once your tent is properly insulated, the next step is fine-tuning your sleep system to retain body heat effectively. A sleep system includes your sleeping bag, sleeping pad, and sleepwear. The aim? To trap still air around your body and minimize heat loss through conduction, convection, radiation, or evaporation. This layering strategy ensures maximum insulation. Brad Brooks, founder of Argali, explains:
"Still, trapped warm air provides insulation. Your sleeping pad and your sleeping bag are both performing this function all around your body".
Your sleeping pad plays a key role – arguably even more important than the sleeping bag. The ground pulls heat away from your body much faster than the air, so without proper insulation beneath you, even the warmest sleeping bag won’t suffice. Ziggy Samuels from Epic Expeditions emphasizes:
"A proper sleeping pad is even more crucial for warmth than the bag itself".
Choosing the Right Sleeping Bag
When selecting a sleeping bag, go for one rated 10°F to 15°F lower than the coldest temperature you expect to face. If you’re someone who tends to feel cold at night, prioritize the Comfort rating.
The choice between down and synthetic insulation is another important decision. Down provides excellent warmth-to-weight efficiency and packs down small, making it perfect for backpacking. However, it loses its insulating ability when wet unless treated with a water-resistant coating. Synthetic insulation, while bulkier and heavier, retains warmth even when damp and dries quickly.
Mummy bags are generally more efficient at keeping you warm than rectangular bags because they reduce the amount of air your body needs to heat. Ed Zebrowski, a Product Information Specialist at REI Co-op, explains:
"Excess air pockets require extra body heat to warm".
To enhance warmth further, consider adding a sleeping bag liner. Liners made of silk, wool, or synthetic materials can increase your bag’s temperature rating by 10°F to 20°F, while also keeping the bag cleaner.
| Sleeping Bag Type | Temperature Range | Best For |
|---|---|---|
| Summer | 35°F to 50°F | Warm nights, fair weather |
| 3-Season | 15°F to 30°F | Spring and fall conditions |
| Cold Weather | 0°F to 15°F | Freezing temperatures |
| Extreme | -20°F to 0°F | Arctic expeditions |
Sleeping Pads and R-Value Comparison
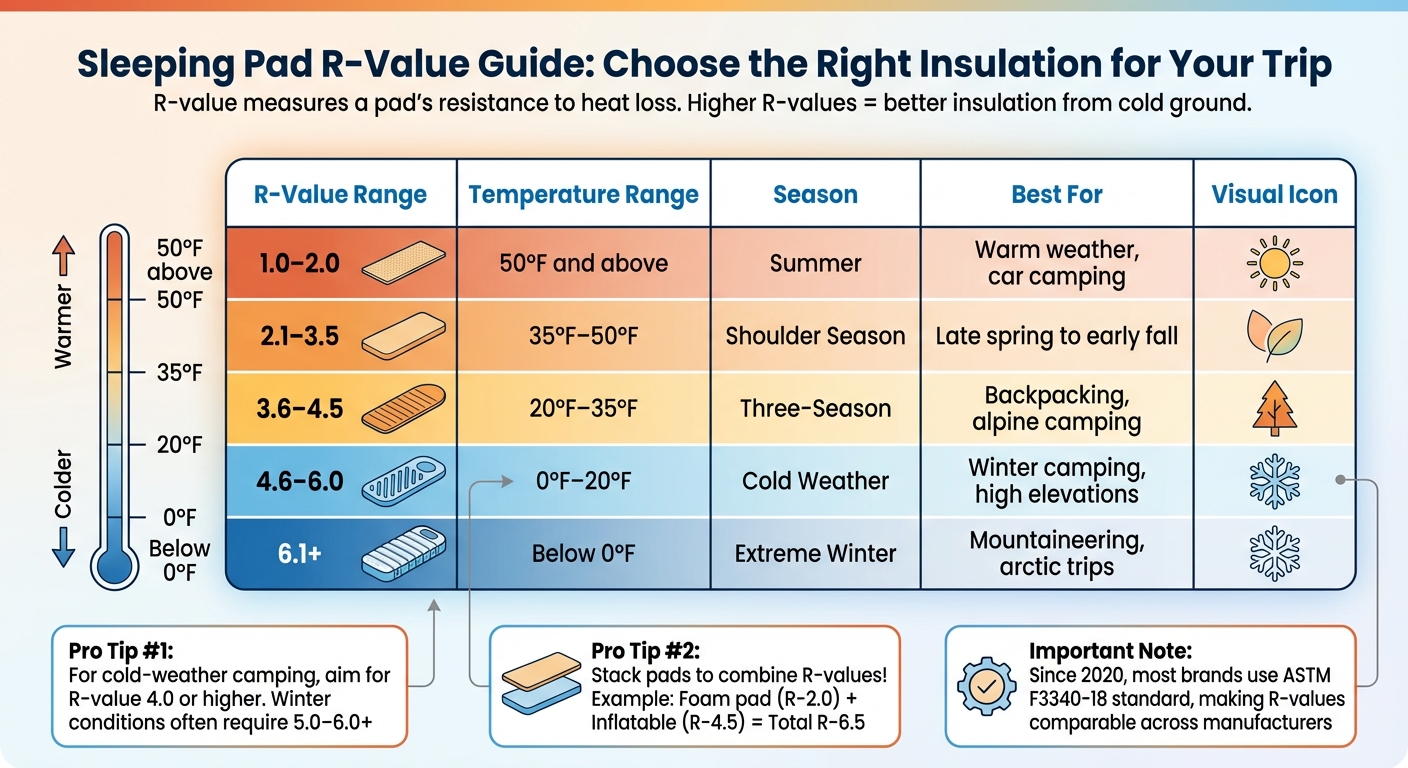
A sleeping pad’s R-value measures its ability to resist heat loss to the cold ground. The higher the R-value, the better the insulation. Since 2020, most major brands have adopted the ASTM F3340-18 standard, making it easier to compare products across manufacturers. For cold-weather camping, aim for a pad with an R-value of 4.0 or higher. Winter conditions often require a combined R-value of 5.0 to 6.0+.
R-values can be combined. For example, stacking a closed-cell foam pad (R-2.0) beneath an insulated inflatable pad (R-4.5) gives you a total R-value of 6.5. This setup not only boosts insulation but also protects the inflatable pad from punctures while adding extra cushioning. To maximize comfort, fully inflate the pad, then release a small amount of air until your hips and shoulders feel cushioned but aren’t touching the ground.
| R-Value Range | Temperature Range | Season | Best For |
|---|---|---|---|
| 1.0–2.0 | 50°F and above | Summer | Warm weather, car camping |
| 2.1–3.5 | 35°F–50°F | Shoulder Season | Late spring to early fall |
| 3.6–4.5 | 20°F–35°F | Three-Season | Backpacking, alpine camping |
| 4.6–6.0 | 0°F–20°F | Cold Weather | Winter camping, high elevations |
| 6.1+ | Below 0°F | Extreme Winter | Mountaineering, arctic trips |
A quick tip: use a pump sack to inflate your pad instead of your breath. Moisture from exhaled air can freeze inside the pad or lead to mold, reducing its insulating performance.
Layering with Blankets and Clothing
Switch into dry, sleep-only base layers before bed. Merino wool is a great option for its ability to regulate temperature and resist odors. Synthetic fabrics dry faster but may not handle odors as well. Avoid cotton entirely – it absorbs moisture and loses its insulating properties.
To reduce the amount of air your body needs to warm, stuff loose, dry clothing into the bottom of your sleeping bag. Before settling in, do light exercises like jumping jacks or squats to generate body heat, and eat a high-fat, high-protein snack to fuel your internal "heater".
For added warmth, consider using a hot water bottle. Fill a leak-proof bottle (like a Nalgene) with boiling water and place it near your core or at your feet inside the sleeping bag. This can provide hours of heat.
With these adjustments, your sleep system will be ready to handle the cold, leaving you to focus on managing moisture and staying safe inside your tent.
Safe Heating Options and Moisture Management
Once you’ve optimized your tent’s insulation and layered sleep systems, the next step is managing heat and moisture effectively to ensure a comfortable environment. While it might be tempting to rely on active heat sources, it’s safer to depend on your gear for warmth. Active heating can introduce dangers like carbon monoxide poisoning, fire risks, and excessive moisture. As the U.S. Consumer Product Safety Commission advises:
"The U.S. Consumer Product Safety Commission recommends never using a portable heater while sleeping in an enclosed space, such as a tent or an RV".
Portable Tent Heaters: Safety First
If you have access to electricity, electric heaters are the safest option for active heating. They don’t produce carbon monoxide or add moisture to the air. For a 4-person tent (55–70 square feet), you’ll need about 550–700 watts of power. A small electric heater costs around $26, but powering it off-grid may require a portable power station like the Jackery Explorer 1500, which can cost approximately $2,699.
Propane heaters, such as the Mr. Heater Buddy series (around $130 for a 9,000 BTU model), are another option. These heaters come equipped with safety features like Oxygen Depletion Sensors (ODS) and tip-over shutoff mechanisms. However, propane combustion generates a significant amount of water vapor, which can increase moisture levels inside your tent. For example, a 3,800 BTU propane heater requires at least 4 square inches of ventilation for safe use. If you opt for any fuel-burning heater, always carry a battery-operated carbon monoxide detector.
To minimize risks, use heaters sparingly – just to warm the tent before bed or upon waking. Place the heater on a stable, non-flammable surface to prevent tipping, and if using an electric heater with an extension cord, create a "drip loop" outside the tent to keep rainwater away from connections.
| Heater Type | Safety Risk | Moisture Level | Power Source | Approx. Cost |
|---|---|---|---|---|
| Electric | Low (Fire/Trip) | Dry | AC Hookup/Power Station | $26+ |
| Propane | High (CO/Oxygen) | Very Wet | Propane Canister | $105–$130 |
| Catalytic | Medium (Oxygen) | Low/Medium | Propane Canister | Varies |
| Candle Lantern | Low/Medium (Fire) | Dry | Wax Tealights | $15–$20 |
Now, let’s look at simple DIY methods for adding warmth without using fuel or complex equipment.
DIY Heating Methods
If you prefer to avoid fuel or electricity, there are several safe, low-tech ways to add warmth. One popular method is using a hot water bottle. Fill a durable bottle with boiling water, wrap it in cloth, and place it in your sleeping bag to pre-warm it.
Another option is heated rocks. Warm non-porous stones at the edge of your campfire, wrap them in a towel, and place them on a blanket to protect your tent floor. Candle lanterns, like UCO models (costing around $15–$20), can also provide modest heat – about 30–50 watts per tealight – while reducing condensation risks compared to open flames.
For extra insulation, drape a reflective Mylar emergency blanket (about $1–$5) over your sleeping area to help retain body heat. Also, keep inner tent compartments zipped to minimize the volume of air that needs warming.
With heating addressed, let’s shift focus to managing moisture, which is just as critical for maintaining warmth.
Managing Condensation and Moisture
Moisture control is key to staying warm and comfortable. Did you know that an adult exhales about 1 liter of water vapor during a single night’s sleep? When this warm, humid air hits the cold walls of your tent, it condenses into droplets that can soak your gear and reduce insulation effectiveness.
Ventilation is your best defense. As camping expert Asher Stone explains:
"Ventilation is your primary defense. Even in cold or rainy conditions, keeping air moving through your tent will prevent the majority of condensation problems".
A slight drop in temperature inside the tent is far better than waking up in a damp environment. Using a battery-powered fan can cut moisture buildup by 60–70% compared to relying on passive airflow alone.
Here are a few additional tips to manage moisture effectively:
- Store wet clothes, boots, or gear outside the sleeping area, such as in the vestibule or a waterproof dry sack.
- Avoid cooking or boiling water inside the tent, as steam quickly leads to condensation.
- Try not to breathe directly into your sleeping bag; allowing your breath to disperse helps maintain insulation.
If condensation forms on the tent walls, wipe it off immediately with a microfiber towel to prevent water from dripping onto your gear. Use a footprint or groundsheet to block moisture from the ground, and consider a double-wall tent design. The mesh layer between the walls allows vapor to escape, keeping your sleeping area drier.
Wrapping Up: Staying Warm in a Tent During Cold Weather
Keeping warm in a tent when temperatures drop boils down to three key strategies: smart preparation, effective insulation, and safe heating practices. It starts with picking the right campsite. Look for natural windbreaks like trees or hills to shield you from the wind, and steer clear of low-lying areas where cold air tends to settle. Don’t underestimate the importance of your tent either – a well-made 4-season tent can keep the inside temperature 5–10°F higher than the outside air.
Ground insulation is critical. The cold ground can sap your body heat through conduction, so a sleeping pad with an R-value of 4.0 or higher is a must for cold-weather camping. Pair that with a sleeping bag rated for the "Comfort" temperature to ensure a good night’s sleep. Women often need sleeping bags rated about 15°F warmer than those for men to achieve the same comfort level.
When it comes to heating, passive methods are safer and more reliable. For instance, slipping a hot water bottle into your sleeping bag 20–30 minutes before bedtime can keep you warm for hours without the risks associated with heaters. If you do use a portable heater, always maintain ventilation – even in freezing weather – and never leave it running while you sleep. Safety should always come first.
Finally, moisture management is essential. Proper ventilation in your tent helps prevent condensation, which can dampen your gear and reduce its insulating ability. It also reduces the risk of carbon monoxide buildup if you’re using heaters.
With the right mix of preparation, gear, and safety precautions, you can camp comfortably even in sub-freezing temperatures. For more tips and expert advice on outdoor adventures, check out Adventurism.co – your go-to source for wilderness know-how!
FAQs
How do I know if my sleeping bag rating is warm enough for my trip?
To make sure your sleeping bag keeps you warm, check its comfort rating against the lowest temperature you expect to face. It’s a good idea to pick a bag rated at least 10°F below the forecasted low. For instance, if the temperature might drop to 30°F, go with a sleeping bag rated for 20°F. Remember, other factors like your sleeping pad, the clothes you wear, and the conditions at your campsite can influence how warm you feel, so take these into account for the best insulation.
What’s the best way to reduce tent condensation without getting colder?
To keep tent condensation at bay without sacrificing warmth, focus on boosting ventilation. Crack open vents, windows, or doors to allow humid air to escape. Store wet gear outside the tent and always cook outdoors to cut down on indoor humidity. By improving airflow and reducing moisture sources, you can stay both dry and comfortable inside your tent.
How can I stay warm in a tent without using a heater?
To keep warm in a tent without a heater, start by dressing in insulated layers and using a high-quality sleeping bag designed for cold conditions. Choose a campsite that provides natural wind protection, such as near trees or rocks. Opt for a smaller tent, as it traps heat more effectively than larger ones.
You can also insulate the tent by adding layers, like a tarp or an extra blanket, on the floor or walls. Another trick is to heat up rocks by the campfire, wrap them in towels, and place them inside the tent for extra warmth. Just don’t forget about ventilation – keeping some airflow helps prevent moisture buildup, which can make the tent feel colder.