

Ever wonder why some landscape photos feel flat while others take your breath away? It’s all about composition. The way you arrange elements in a scene can make or break your photo. Even without fancy gear, you can create powerful, eye-catching images by following a few simple techniques:
- Rule of Thirds: Use a 3×3 grid to position key elements like horizons or focal points for a balanced look.
- Leading Lines: Rivers, trails, or roads can guide the viewer’s eye through the scene.
- Framing: Natural frames like tree branches or rock arches draw attention to your subject.
- Foreground Interest: Add depth by including rocks, flowers, or other elements close to the camera.
- Balance and Symmetry: Ensure no part of the image feels too “heavy” by balancing light, color, or objects.
These techniques, combined with a structured process – observe, plan, arrange, and refine – can transform your outdoor shots. Practice one method at a time to sharpen your skills and bring your vision to life. Ready to level up your photography? Let’s dive in.
ULTIMATE guide to COMPOSITION in landscape photography
Basic Composition Techniques
Learn how to elevate your landscape photography by mastering a few essential techniques that guide the viewer’s eye and bring balance to your images.
Rule of Thirds
Imagine your frame divided into a 3×3 grid. By placing key elements – like a mountain peak, a lone tree, or the sun – at the grid’s intersections, you can create an image that feels more dynamic and visually appealing.
Pay special attention to the horizon. If the sky is your focus, such as during a dramatic storm or a colorful sunset, position the horizon along the lower third of your frame. On the other hand, if the foreground – like a field of wildflowers or unique rock formations – is the star, align the horizon with the upper third. Avoid centering the horizon, as this often results in a flat and less engaging photo.
Most cameras and smartphones offer a grid overlay feature in their settings. Activating this tool can help you see exactly where those thirds fall, making it easier to align your key elements. Take time to experiment with your angles and refine your composition until everything falls into place.
Leading Lines
Leading lines are natural or man-made elements that guide the viewer’s eye through the scene, adding depth and movement. Think of rivers, trails, roads, fences, or even rows of rocks – these lines can transform a static image into one that feels alive and engaging.
To make the most of leading lines, position them so they begin at the edge of the frame and lead toward your main subject. Adjust your angle to ensure the lines don’t pull the viewer’s eye out of the frame. Instead, they should direct attention to your focal point or loop back into the composition.
As you explore, keep an eye out for details that can serve as leading lines. A winding stream, a fallen log, tire tracks in the sand, or even patterns in the snow can all create this effect. Pair these lines with a striking foreground element to make your photo even more compelling.
Framing Elements
Framing uses natural features to create a "frame within the frame", drawing attention to your subject while adding depth and simplifying the scene. Tree branches, rock arches, cave openings, or overhanging foliage can all act as framing elements that isolate your subject and make it stand out.
For the best results, the framing element should be darker or slightly out of focus, ensuring it doesn’t compete with your subject. For example, deep green branches framing a distant, sunlit mountain can add contrast and direct the viewer’s gaze. Adjust your position to control how the framing element interacts with the scene, keeping the subject clear and unobstructed.
Nature offers countless framing opportunities. Whether you’re in a forest, canyon, or along the coast, look for natural "windows" like tree tunnels, rock arches reminiscent of those in Utah or Arizona, or cliffs that form dramatic viewpoints. To take this technique even further, combine framing with the rule of thirds – placing your framed subject at one of the grid’s intersections rather than dead center. This small adjustment can give your photo added depth and impact.
Next, we’ll dive into techniques for adding depth and perspective to your images.
Adding Depth and Perspective
Taking your landscape photography to the next level means moving beyond basic composition techniques to add depth and perspective. Without these elements, landscapes can feel flat and uninspiring. A great way to bring your photos to life is by layering – placing distinct features at varying distances to create a sense of three-dimensionality. Let’s dive into how foreground details, balanced compositions, and dynamic lines can transform a static scene into something immersive and captivating.
Foreground Interest
Foreground elements can make a huge difference in your composition, acting as an anchor that draws viewers into the scene. Think about adding details like wildflowers, textured rocks, weathered logs, or even a piece of gear from your hiking adventures. These elements provide scale, context, and a natural entry point for the eye.
To emphasize your foreground, try shooting 1–3 feet away from your subject with a wide-angle lens. Lower your camera – sometimes just inches from the ground – so objects like rocks or flowers appear larger and more prominent. Place these features along rule-of-thirds lines rather than dead center, subtly guiding the viewer’s eye toward your main subject, such as a distant mountain or canyon.
For sharp and detailed shots, use an aperture between f/8 and f/16, ensuring both the foreground and background remain in focus. Before finalizing your shot, zoom in on your camera’s LCD to check for crisp textures. A blurry foreground can weaken the sense of depth, so experiment with angles until the elements enhance rather than clutter the scene.
Balance and Symmetry
A well-balanced frame helps lead the viewer’s eye naturally through your photo, avoiding areas that feel too heavy or flat. For instance, if a dark mountain dominates one side of the image, balance it with lighter elements like clouds or a sunlit patch of sky on the opposite side. This contrast creates dynamic tension, encouraging the viewer to explore the entire frame.
Symmetry can also work beautifully to convey depth. A mountain reflected in a still lake is a classic example, but adding a foreground element – like shoreline rocks or reeds – grounds the composition and enhances its dimensionality. In more asymmetric scenes, balance a large, dominant feature with a smaller, contrasting one on the other side. Adjust your position or focal length to avoid one side feeling overly heavy, which can flatten the image. Once you’ve mastered balance, you’re ready to incorporate diagonal compositions for even more depth.
Diagonals and Geometric Shapes
Diagonal lines are a powerful tool for adding energy and depth to your shots. They guide the viewer’s eye across the frame, connecting the foreground to the background. Look for natural diagonals, like rivers, trails, roads, or ridgelines, and position them so they start near a lower corner and lead toward your main subject.
A slight shift in your camera angle can turn a horizontal or vertical line into a compelling diagonal. S-curves – such as winding rivers or switchback trails – are especially effective, as their changing direction naturally pulls the viewer deeper into the scene.
Geometric shapes, particularly triangles, bring stability and depth to your composition. Mountains, pyramid-shaped hills, converging paths, or clusters of rocks often create natural triangles. By positioning a triangle so one corner is near your camera while the opposite side stretches into the distance, you create a visual pathway that enhances the sense of depth. Overlapping triangles – like a foreground rock formation echoing the shape of a far-off peak – add rhythm and guide the viewer’s eye seamlessly through the image.
sbb-itb-5a98267
Advanced Composition Methods
Take your landscape photography to the next level by incorporating advanced techniques that emphasize patterns, textures, and color contrasts. These methods work with the way our eyes naturally explore a scene – drawn to repetition, tactile elements, and subtle color shifts. Let’s break down how these elements can enhance your compositions.
Patterns and Textures
Repeating shapes bring a sense of rhythm and structure to your images. Seek out natural patterns like rows of sand dunes, cascading ocean waves, or expanses of wildflowers to create visual harmony. To make your composition even more compelling, introduce a break in the pattern – a solitary tree in a field or a single rock among waves. This disruption provides a focal point, giving the viewer’s eye a place to pause after following the rhythm.
Textures, on the other hand, add a sense of touch to your visuals. Capture details like the grooves of tree bark, the cracks in frozen ice, or the rough surface of weathered rocks. To highlight texture, position your camera low and use a wide-angle lens, letting the textured element dominate the lower third of the frame. For the best results, shoot during golden hour when side-lighting accentuates surface details. Align any breaks in the pattern with rule-of-thirds intersections to maximize visual interest.
Color and Tonal Contrast
Color contrast is a powerful tool to guide the viewer’s eye. Complementary hues or shifts in color temperature – like the cool, muted tones of shadows leading to warm highlights – naturally draw attention. These transitions not only create depth but also set the emotional tone of your image. Warm colors bring energy, while cooler tones suggest tranquility.
Tonal contrast also plays a key role. Use gradients from light to dark to guide the viewer’s gaze. Placing darker elements around brighter subjects creates a natural frame, funneling attention toward the focal point. Sunrise and sunset are ideal for capturing these transitions, as the landscape naturally shifts from shadow to light. Slightly underexposing shadows (by 1/3 to 2/3 of a stop) can enhance these gradients, and you can further refine the effect with dodge and burn techniques during post-processing.
Field Composition Tips
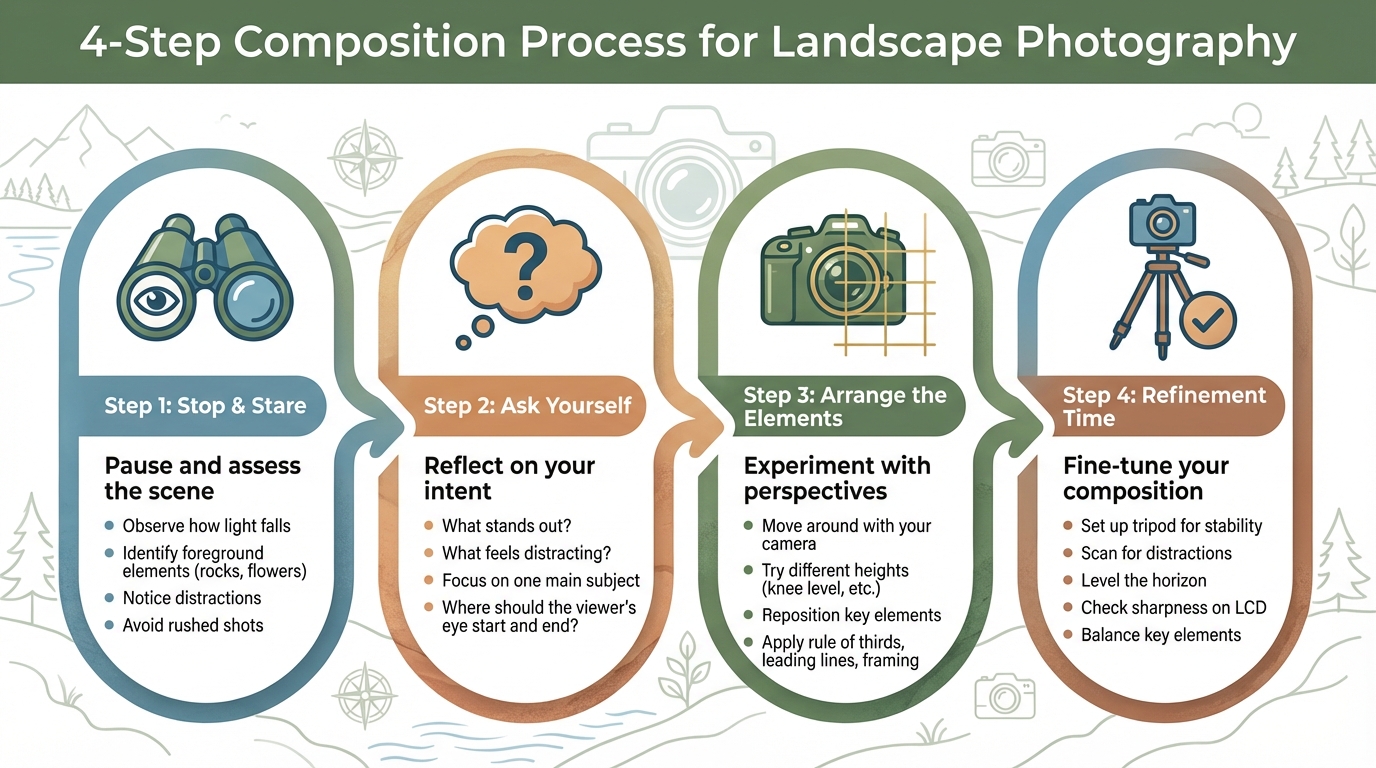
4-Step Landscape Photography Composition Process
When you’re out in the field, applying composition techniques requires more than just theoretical knowledge. It’s about adapting to real-world variables like shifting light, unpredictable weather, and uneven terrain. A structured approach can help you slow down, focus on the essentials, and create stronger images without wasting time or energy.
4-Step Composition Process
Stop & Stare
Take a moment when you arrive at a location. Look around and assess the scene. Notice how the light falls, identify potential foreground elements like rocks or flowers, and be mindful of any distractions that could weaken your composition. This pause helps you avoid rushed shots and allows you to catch details you might otherwise miss.
Ask Yourself
Before framing your shot, reflect on your intent. What stands out to you in the scene? What elements feel out of place or distracting, like power lines or cluttered backgrounds? Narrow your focus to one main subject and think about what you can exclude to keep the image clean. Decide where you want the viewer’s eye to start and where it should end. This quick mental evaluation sharpens your focus and saves time.
Arrange the Elements
Treat the scene like a puzzle. Move around with your camera, experimenting with different perspectives. Lower it to knee level, shift to the side, or step forward and back to reposition key elements. For example, in a mountain scene, dropping lower might align a foreground rock with a distant peak, creating natural leading lines. Try shooting from unique angles – like along a riverside – to find paths or curves that add depth. This is where you put techniques such as the rule of thirds, leading lines, and framing into action.
Refinement Time
Once you’ve identified a strong composition, set up your tripod and make small adjustments. Scan the frame for distractions, level the horizon, and ensure key elements are balanced. Use your tripod to fine-tune the shot, keeping everything sharp and steady. Zoom in on your LCD to confirm that leading lines guide the eye effectively and that no bright or distracting objects pull attention away from your subject. These deliberate final touches can elevate your image.
Mistakes to Avoid
Even with careful planning, some common pitfalls can undermine your composition. Here’s how to avoid them:
Cluttered Compositions
Too many competing elements can make your image feel chaotic. Check for distractions like stray branches, litter, or people near the edges of your frame. During the "Arrange" stage, adjust your angle to isolate your subject and focus on larger, impactful elements. Pay attention to the corners of your frame and clean them up visually.
Over-Reliance on Rules
Composition guidelines like the rule of thirds are helpful, but they aren’t rigid. Some scenes, such as a mountain reflected in still water, might work better with a centered horizon. Be open to breaking the "rules" when the scene demands it. Also, avoid defaulting to eye-level shots, as they can sometimes lack depth. Experiment with different heights and angles.
Weak or Absent Foreground Interest
A wide landscape without a compelling foreground can feel flat. Include elements like rocks, flowers, or textured surfaces in the lower part of your frame to add depth. Many beginners shoot from too high a vantage point – dropping to knee level can make a big difference in guiding the viewer’s eye from foreground to background.
Leading Lines That Exit the Frame
If leading lines like trails or rivers extend out of the frame, they can unintentionally pull the viewer’s attention away from your subject. Adjust your position or framing to ensure these lines curve or end within the composition, ideally near your main subject. Well-placed lines should connect the foreground to the background, keeping the viewer’s eye engaged.
Conclusion
This guide has explored essential techniques like the rule of thirds, leading lines, framing, foreground interest, balance, diagonals, patterns, and tonal contrast – all tools to help create more compelling landscape photography. While these principles provide a strong foundation, the real magic happens through practice, as repeated application makes these techniques second nature. They’re not just rules; they’re a gateway to in-field experimentation and creativity.
The 4-step composition process simplifies the art of creating impactful images. First, pause to observe your surroundings. Then, identify what naturally captures your attention. Next, adjust your position to arrange the elements in a way that feels cohesive. Finally, fine-tune your composition with deliberate adjustments. As landscape photographer Mark Denney explained, this structured approach transformed his photography by allowing him to align key elements like mountains and trees with simple positional changes. Over time, this process becomes intuitive, reducing stress and unlocking greater creativity in the field.
To truly internalize these concepts, focus on intentional practice. Dedicate each outing to mastering a single technique – whether it’s framing or tonal contrast – to build confidence and clarity. Pair this with the 4-step process to refine your skills and develop a sharper eye for composition.
Remember, thoughtful composition can elevate any photo, regardless of your gear. Before pressing the shutter, ask yourself: Is the subject clear? Are the lines guiding the viewer’s eye? Have you minimized distractions? These quick checks can make all the difference.
Take these techniques with you on your next adventure and let your images tell the story. With every shot, you’ll strengthen your compositional instincts and capture the beauty and emotion of the landscapes you encounter. For more inspiration and tips, visit Adventurism.co. Consistent practice will not only refine your skills but also deepen your connection to the art of landscape photography.
FAQs
What are leading lines, and how can I use them in landscape photography?
Leading lines are powerful visual tools that guide the viewer’s eye through a photograph, often directing attention to a specific subject or focal point. In landscape photography, these lines can be found in features like winding roads, flowing rivers, fences, or trails that naturally draw the eye deeper into the scene.
To make the most of leading lines, position them intentionally within your composition to add depth and perspective. Aim to have these lines lead toward the main elements of your shot. Play around with angles and framing to refine the image’s flow and balance, creating a dynamic sense of movement that ties the scene together.
What are the most common mistakes to avoid in landscape photography composition?
When it comes to landscape photography, certain composition mistakes can easily diminish the impact of your shots. Here are a few common missteps to watch out for:
- Skipping the rule of thirds: Placing your subject dead center too often can leave your photos feeling rigid and lifeless. Shifting your subject off-center creates a more dynamic scene.
- Missing leading lines: Natural lines, like winding roads, rivers, or the horizon, guide the viewer’s eye through the image. Ignoring them can make your photo feel directionless.
- Busy or distracting backgrounds: Too much clutter in the background pulls focus away from your main subject, reducing the overall clarity of the image.
- Weak framing: Overlooking natural frames – like tree branches or archways – can leave your composition feeling unfinished and less impactful.
- Forgetting foreground interest: Without an engaging foreground element, your photo might lack depth and come across as flat.
Paying attention to these details can help you craft landscape photos that are both balanced and visually engaging.
What is the rule of thirds, and how does it improve landscape photography?
The rule of thirds is a straightforward composition method that involves dividing an image into nine equal sections using two horizontal and two vertical lines. By positioning key elements along these lines or at their intersections, your photos can achieve a sense of balance and draw the viewer’s attention more effectively.
This technique helps guide the viewer’s eye naturally through the scene, emphasizing important areas and creating a harmonious feel. It’s a simple yet impactful way to enhance your landscape photography and make your shots more captivating.