
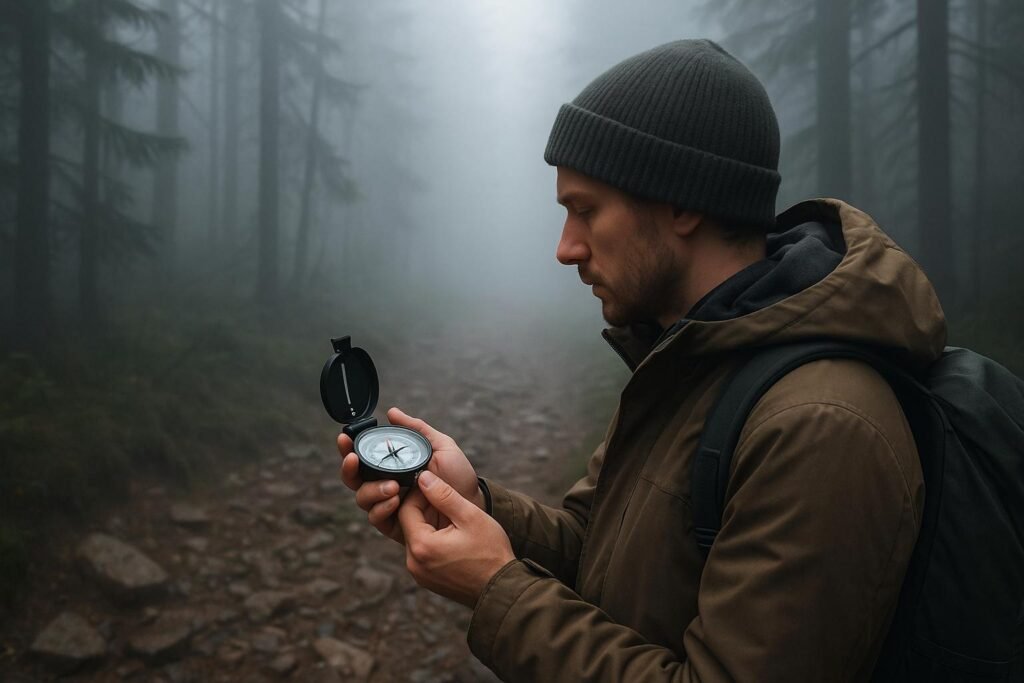
When visibility drops – whether due to fog, snow, or darkness – a compass becomes a critical tool for navigation. Relying on landmarks or instincts in these conditions can lead to disorientation. This guide explains how to use a compass effectively, covering basics like adjusting for magnetic declination, setting bearings, and tracking distance. It also includes advanced techniques like spiral and sweep searches for locating lost trails or landmarks. Here’s what you’ll learn:
- Compass Basics: Understand key parts like the magnetic needle, baseplate, and bezel. Learn how to adjust for magnetic declination to avoid errors.
- Setting Bearings: Accurately align your compass and map to stay on course, even when landmarks are hidden.
- Tracking Distance: Use pacing and timing to measure how far you’ve traveled, especially in featureless terrain.
- Emergency Techniques: Spiral and sweep searches can help you recover lost bearings or locate key points in low visibility.
- Pre-Trip Prep: Plan your route, check weather updates, and pack essential gear like maps, a whistle, and extra batteries.
Mastering these skills ensures you can navigate safely and confidently, even in challenging conditions.
The Alpkit Survival Guide | How to Navigate in Poor Visibility with the Edale Mountain Rescue
Compass Basics You Need to Know
Understanding your compass and how it works is essential, especially when visibility is poor. Let’s break down the essentials so you can navigate confidently, even in challenging conditions.
Main Compass Parts
Each part of a compass serves a specific purpose, making it an indispensable tool for navigation. At its core is the magnetic needle, which always points toward magnetic north. This needle floats in a liquid-filled housing, which helps steady its movement, even on uneven terrain.
The clear plastic baseplate is another critical feature. It often includes rulers marked in inches and millimeters, making it easier to measure distances on your map. The direction-of-travel arrow on the baseplate indicates the heading you’re following.
The bezel, marked with degrees from 0 to 360°, allows you to set your bearing. To get an accurate reading, rotate the bezel and align the red magnetic needle over the orienting arrow – a technique often referred to as keeping the "red in the shed."
How to Adjust for Magnetic Declination
Magnetic declination – the angle difference between true north and magnetic north – can significantly impact your navigation if not accounted for. In the continental United States, this difference varies widely: on the West Coast, declination can be nearly 20° east, while on the East Coast, it can reach 20° west. Even a small error, such as 15°, can cause you to end up about a quarter-mile off course over just a mile-long hike.
To adjust, remember these simple rules: "East is least" (subtract the declination) and "West is best" (add the declination). For east declination, subtract the value from your map bearing; for west declination, add it. Always check the latest declination values using topographic maps or NOAA, as they can change over time and vary by location.
If you want to simplify the process, consider using a compass with an adjustable declination feature. Brands like Brunton and Suunto offer models that allow you to preset the declination, eliminating the need for manual calculations during stressful moments.
Once your declination is set, you’re ready to align your map and compass for accurate navigation.
How to Align Your Map and Compass
Proper alignment ensures your map reflects the landscape around you, which is crucial for staying on track.
Start by setting your compass declination if you haven’t already. Then, place the compass on your map with the direction-of-travel arrow pointing toward the top. Rotate the map and compass together until the magnetic needle lines up with the orienting arrow – keeping "red in the shed."
When aligned correctly, your map will match the terrain. Maintaining this orientation relative to magnetic north also spares you from repeatedly adjusting for declination when taking new bearings.
Even in low visibility, understanding where landmarks should be relative to your position helps you anticipate terrain changes and stay on course. Mastering this alignment technique is key to safe and effective navigation in challenging conditions.
Step-by-Step Compass Navigation in Low Visibility
When the fog thickens or night falls, your compass becomes your lifeline. The trick is to break navigation into smaller, manageable steps and rely on your compass, even when your instincts might tell you otherwise.
Once your map is aligned, the next crucial move is setting a precise bearing.
How to Set and Follow a Bearing
In low visibility, distant landmarks often disappear, so setting a bearing requires a careful, step-by-step process. Start by placing your compass on your map, ensuring the direction-of-travel arrow points toward your destination. Rotate the compass housing until the orienting lines align with the map’s north-south grid. Don’t forget to adjust for magnetic declination. Hold the compass steady at chest height and turn your body until the red magnetic needle sits within the orienting arrow.
When fog or darkness obscures far-off objects, focus on closer features. Look for a nearby tree, rock, or other distinct point within your sightline. Walk toward it while keeping your compass steady. Once you reach it, reset your bearing and repeat the process.
If you’re navigating with a partner, teamwork can make this process even smoother. Have your partner move ahead on the bearing while you guide them using simple arm signals: extend your left arm for "go left", your right arm for "go right", and raise both arms for "stop".
Once your bearing is locked in, the next step is figuring out how far you’ve traveled.
How to Use Pacing and Timing
In poor visibility, estimating distance becomes essential. Pacing – counting your steps – is a simple and reliable way to measure how far you’ve gone. Before heading out, determine your personal stride length by counting every other step (one full stride) over a set distance, like 100 yards. On average, a stride is about 4 feet, but this can vary based on terrain and individual differences. Practice pacing on different surfaces, as slopes or dense vegetation can affect your step length. For longer distances, pacing beads can help you keep track without losing count.
Timing offers a useful backup. If your usual walking speed is around 2.5 mph (about 4 km/h) during the day, expect it to slow to roughly half that in darkness or challenging terrain. Adjust your timing for uphill climbs and remember the 5 Ds: Distance, Direction, Duration, Description, and Destination.
Solo and Team Navigation Methods
Whether you’re navigating alone or with a group, combining accurate bearings, pacing, and timing is key. For teams, having a navigator at both the front and rear of the group works best in low visibility. The lead navigator sets the bearing and pace, while the rear navigator double-checks the heading and ensures no one falls behind. A leapfrogging method – where each person takes turns leading – can help maintain orientation on featureless terrain.
If you’re on your own and lose your bearings, the spiral search method can be a lifesaver. Start from your last known position and move outward in an expanding spiral, keeping your compass aligned. This approach helps you systematically cover ground while staying oriented to your original bearing.
To stay on track, plan your route in short, manageable sections before you set out. Mark intermediate waypoints, like a stream crossing or a ridge line, to confirm your location as you progress. In low visibility, trust your compass and rely on your pace count rather than gut feelings, which can easily lead you astray.
Advanced Methods for Staying on Course
When conditions take a turn for the worse – like heavy fog, snow, or darkness – basic navigation techniques might not cut it. That’s where advanced methods step in, helping you stay on track even when visibility drops to near zero.
Spiral and Sweep Search Methods
The spiral search method is a go-to for solo adventurers who suspect they’re close to their destination but can’t see it due to poor visibility. Here’s how it works: first, figure out your visibility limit by observing how far a moving object remains visible. Use a distance slightly shorter than that as your baseline. Starting from your current location, walk that distance along your bearing, then turn 90° to the right and walk double the initial distance. Turn again and walk three times the baseline length. Keep expanding the spiral outward until you either find your destination or spot something familiar. To avoid veering off track, leave small markers – like rocks, sticks, or snowballs – at key points to guide your progress.
For groups, the sweep search method is more effective. Spread out the group members so they can just see one another while walking in a straight line. Together, comb the area until someone finds a checkpoint or landmark. The leader should position themselves in the middle or slightly behind the line to keep everyone aligned and moving at a steady pace.
"Almost every time it’s fatigue, a curved path or a confusing slope that’s throwing off your sense of direction – but not the compass."
– Jonathan Elder, OS Shop and GetOutside
Combining these two approaches can be very effective. For instance, start with a sweep search to cover a broader area quickly, then switch to a spiral search in promising spots if the group search doesn’t lead to results.
How to Track Distance Accurately
In low visibility, knowing how far you’ve traveled can make all the difference. A reliable method is pace counting, where you track the number of steps you take over a set distance. However, be aware that different terrains – like steep slopes, deep snow, or dense underbrush – can throw off your stride. To improve accuracy, pair pace counting with time tracking. For example, if you know how long it usually takes to cover a certain distance, you can cross-check your pace count against the clock. Regularly reassessing your estimates helps catch errors early, so they don’t lead you too far off course.
sbb-itb-5a98267
Safety Tips for Low Visibility Navigation
Navigating in low visibility conditions requires preparation, sharp attention, and quick decision-making. Your safety depends on what you do before you even set foot on the trail. Along with mastering compass techniques, these tips can help ensure your journey remains safe and manageable.
Pre-Trip Planning
The Edale Mountain Rescue Team emphasizes this point perfectly: "Navigation starts at home". Before heading out, carefully plan your route. Mark key landmarks, identify escape routes, and familiarize yourself with the terrain. This groundwork can make all the difference when visibility drops.
Check the weather forecast thoroughly. Low visibility often accompanies sudden weather changes, so stay alert to updates, paying close attention to visibility conditions, wind, and temperature. Double-check your gear: a reliable map, a well-calibrated compass, extra clothing, a head torch with spare batteries, an emergency whistle, and a first aid kit are non-negotiable.
Once you’ve planned and packed, prepare to stay vigilant when you’re out on the trail.
How to Stay Aware of Your Surroundings
Staying oriented in foggy or low-visibility conditions requires a methodical approach. Regularly check your compass and note any shifts in the landscape. Look for clear reference points – like distinct rock formations or tree lines – that can help confirm your position. Move slowly and deliberately, as rushing can lead to missed details or disorientation.
In foggy conditions, lower your head torch to handheld height to reduce glare and improve visibility. Pausing periodically to recheck your bearing is another smart move. Small corrections as you go can prevent major confusion later.
That said, even with careful monitoring, emergencies can still happen.
What to Do in Emergency Situations
If you realize you’re lost, the first step is to stay calm. Stop moving, take a moment to think, observe your surroundings, and plan your next steps.
If retracing your path doesn’t work and the area isn’t immediately hazardous, stay where you are. Check your phone for a signal and call 911 or send a text if possible. Use your emergency whistle by blowing three sharp blasts at regular intervals to signal for help. Bright clothing or a signal mirror can also make you more visible to rescuers. If conditions allow, a small campfire can serve as both a heat source and a signal.
If you have a personal locator beacon or a two-way satellite messenger, activate it to transmit your exact GPS coordinates to rescuers.
While waiting for help, focus on staying warm, dry, and as visible as possible. Patience and preparation can make all the difference.
Navigation Method Comparison for Low Visibility
When navigating in low-visibility conditions, picking the right method can make all the difference. The terrain you’re dealing with – whether it’s wide-open spaces, intricate environments, or a group setting – will determine the most suitable approach. Below, we break down how different navigation methods perform in various scenarios.
Navigation Methods Comparison Table
| Method | Best For | Pros | Cons | Accuracy Level |
|---|---|---|---|---|
| Compass Bearing | Open terrain, solo navigation | Provides precise directional guidance | Can lose accuracy in complex terrain; requires stability | High in open areas; moderate in dense terrain |
| Pacing + Compass | Medium distances, varied terrain | Combines directional guidance with distance estimation; improves with practice | Less accurate on uneven ground; requires consistent pace counting | High when practiced |
| Leapfrogging | Team navigation on featureless ground | Enables course corrections through team observations | Needs clear communication and at least two people | Excellent for teams |
| Spiral Search | Finding a lost trail or landmark | Ensures systematic area coverage | Time-intensive | Moderate |
| Sweep Search | Large area searches with a team | Offers a methodical search pattern | – | High |
This table provides a quick overview, but let’s dig deeper into how these methods work and when to use them.
Compass bearings shine in open terrain, offering precise directional guidance. However, in dense or complex environments, their accuracy may waver due to obstacles that make it harder to maintain a straight path.
Pacing combined with a compass adds another layer of accuracy by estimating distances. This method works well across varied terrain, but uneven ground can disrupt your stride, potentially affecting distance calculations.
Leapfrogging is a favorite for group navigation. It involves one person moving ahead on a set compass bearing while another stays behind to provide corrections. This teamwork-based approach ensures timely adjustments and works especially well in featureless areas where landmarks are scarce.
For situations where you’ve lost your trail or need to pinpoint a landmark, spiral and sweep searches are invaluable. A spiral search allows you to systematically cover an area, though it can be time-consuming. Meanwhile, a sweep search is ideal for larger groups, offering a coordinated way to comb through a broad area.
The terrain plays a significant role in determining which method to use. Open spaces favor compass bearings, while complex or uneven landscapes may require pacing or group-based techniques like leapfrogging. Stride consistency, communication, and coordination are critical factors that can influence the effectiveness of these methods.
Group size also impacts the choice. Solo hikers often rely on compass bearings and pacing, while teams can benefit from leapfrogging for greater accuracy. Larger groups, on the other hand, may find sweep searches particularly effective for covering expansive areas.
Experienced navigators often mix and match techniques to adapt to changing conditions. For instance, they might use a compass for direction, pacing for distance, and switch to search patterns when precision becomes critical. This flexibility ensures they have backup options when their primary method encounters challenges.
Conclusion: Main Points for Low Visibility Navigation
Navigating in low visibility conditions calls for a mix of technical know-how and solid preparation. Techniques like accurate bearings, pacing, and systematic search patterns are essential to staying safe in challenging environments.
Regular practice builds confidence and reduces the chances of mistakes. Mountain Rescue data underscores the importance of methods such as spiral searches, leapfrogging, and making precise declination adjustments.
Even small errors in bearings can lead to major deviations over long distances. That’s why it’s crucial to align your map and compass with magnetic north, especially when visible landmarks are hidden by poor weather or darkness.
Tracking distance through pacing and timing becomes a lifeline when visual markers disappear. Tools like pacing beads can help you keep an accurate step count. Pairing this with frequent position checks adds extra layers of security to your navigation strategy, forming a reliable toolkit for low visibility scenarios.
The best navigation methods depend on the terrain and group size. Solo hikers often rely on spiral searches and precise bearings, while groups can employ techniques like leapfrogging or sweep searches. Always have a backup plan – using back bearings to retrace your steps is a reliable way to stay oriented when conditions take a turn for the worse.
FAQs
How do I adjust my compass for magnetic declination when traveling between areas with different values?
To ensure your compass is accurate, you’ll need to account for magnetic declination, which varies depending on your location. Start by finding the declination value for both your current position and your destination. You can usually find this information on local maps or through online tools like magnetic declination calculators.
Once you have the value, adjust your compass accordingly. Use the declination adjustment screw or rotate the bezel to make the correction. If the declination is east, add the value; if it’s west, subtract it. This adjustment ensures your compass aligns with true north, keeping you on the right path even when magnetic fields shift across different regions.
What should I do if I get lost while using a compass in low visibility?
If you ever find yourself disoriented in low visibility, the most important thing is to stay calm and rely on your compass. Start by double-checking your bearing to confirm you’re on the right path. Avoid making sudden moves or aimlessly wandering, as that can make things worse.
If you’re uncertain about your location, pause and reassess the situation. Look around for any recognizable landmarks, even faint ones, and, if available, use tools like a GPS or a map to assist you. When following a set bearing, move slowly and deliberately to stay on track. If needed, retracing your steps can often help you find your way back.
In these moments, patience and careful navigation are your best allies until visibility improves or you regain your sense of direction.
How can I measure distance accurately in difficult terrain or dense vegetation?
Measuring distance in tough terrain or thick vegetation can be tricky, but there are ways to keep your measurements accurate. One common method is pacing, where you count your steps to estimate distance. While simple, it’s not always dependable in uneven or obstructed areas. To get better results, consider using tools like a measuring wheel or a handheld rangefinder, both of which are designed to handle challenging landscapes.
You can also rely on landmarks to break the distance into manageable parts. For instance, pick a visible tree or rock ahead, measure the distance to that point, and repeat the process. This method is especially useful when visibility is limited or the terrain makes direct measurement difficult.
If you’re gearing up for an outdoor adventure, practicing these techniques ahead of time can be a game-changer. For more outdoor tips and inspiration, head over to Adventurism.co – a great resource for adventurers of all levels!