
Taking care of your kayak is simple but essential for safety, performance, and longevity. Here’s what you need to know:
- After Every Paddle: Rinse off dirt, salt, and debris using fresh water. Dry it thoroughly to avoid mold and material damage. Store it in a cool, shaded area, preferably upside down or on its side.
- Weekly Inspections: Check for cracks, dents, or loose hardware. Tighten screws and bolts, and apply silicone to prevent leaks. For plastic kayaks, minor dents can be fixed by leaving them in sunlight for a few hours.
- Rudders and Skegs: Rinse and lubricate pivot points and cables after use, especially in saltwater. Avoid heavy oils that attract grit.
- Off-Season Storage: Clean thoroughly, apply UV protectant, and store off the ground to prevent warping. Remove all water to avoid freeze damage in winter.
- DIY Repairs: Small cracks and scratches can be fixed with basic tools like epoxy and sandpaper. Replace worn bungee cords and straps to maintain functionality.
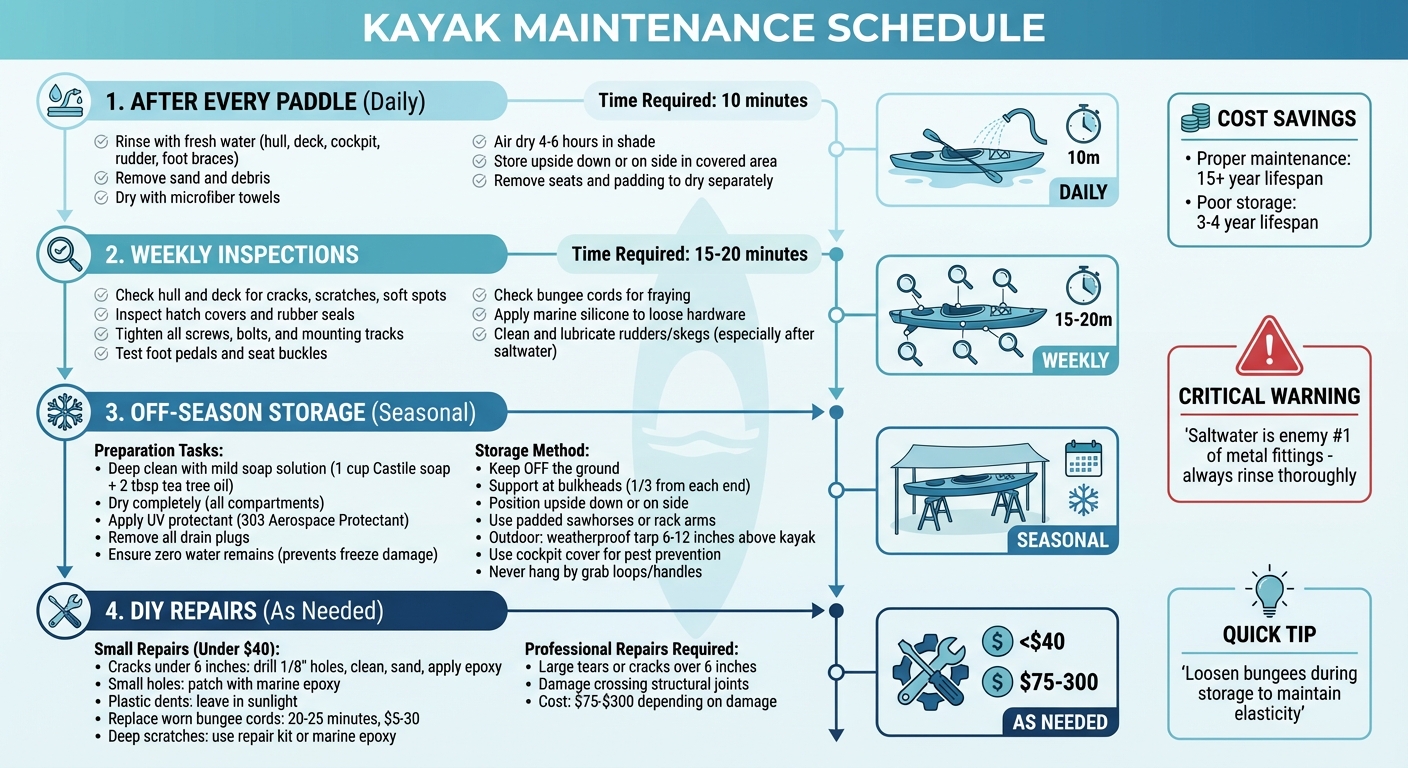
Essential Kayak Maintenance Schedule: After Every Paddle to Off-Season Storage
Kayak Care And Maintenance: Everything You Need to Know
sbb-itb-5a98267
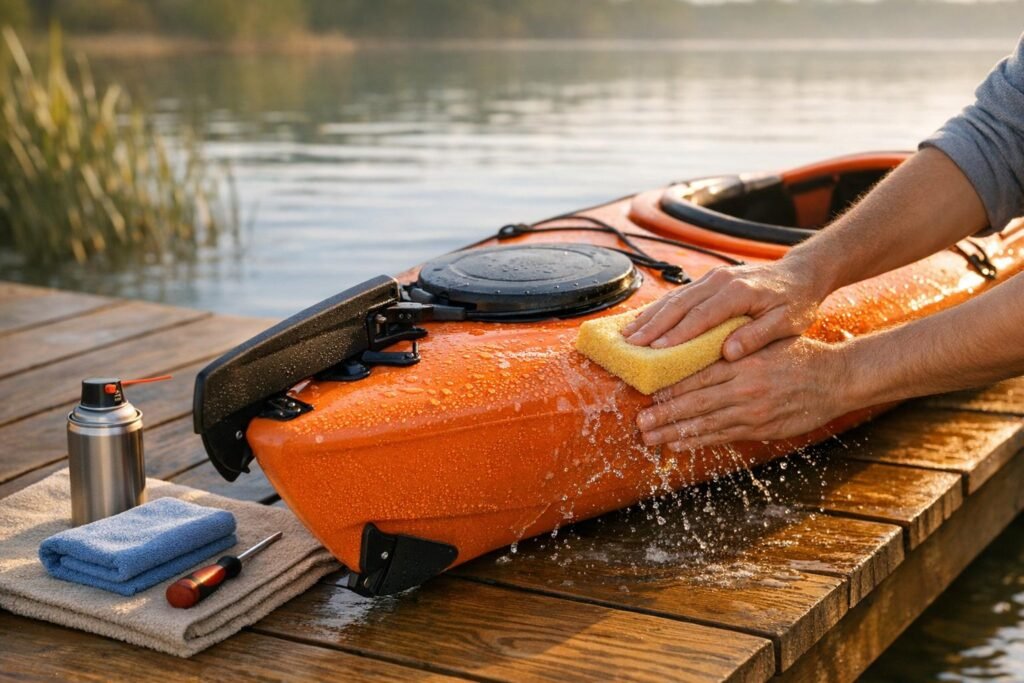
After Every Paddle: Basic Cleaning Steps
Taking just 10 minutes to clean and dry your kayak after each trip can save you from long-term headaches and damage.
Rinse Off Dirt and Debris
Start by giving your kayak a good rinse with a garden hose. Pay special attention to the hull, deck, cockpit, rudder systems, and foot braces – these spots tend to trap the most dirt and grime. If you’ve been paddling in saltwater, a thorough rinse is even more critical to protect any metal parts.
"Cleaning your kayak thoroughly after kayaking in saltwater is an absolute MUST. Saltwater is enemy number one of any metal fittings and fastenings." – Sam O’Brien, Founder, WaterSportsWhiz
Tilt the kayak to shake out sand and pebbles. For stubborn dirt, use a soft sponge or microfiber cloth with a bit of mild soap. Skip the pressure washer, though – it can harm the kayak’s finish.
Rinsing isn’t just about keeping your kayak looking good. It also helps prevent the spread of invasive aquatic species, which is required by law in many areas.
Once rinsed, drying your kayak right away is the next step to keep it in top shape.
Dry and Store Your Kayak
Use microfiber towels to wipe down your kayak and remove any remaining water. Open all storage hatches and drain plugs to let air circulate through the internal compartments. For the best results, allow the kayak to air dry for 4 to 6 hours in a shaded, cool area.
A little sunlight can speed up drying, but don’t overdo it – prolonged UV exposure can wear out the hull. When storing, place your kayak upside down or on its side in a covered area. This keeps rain and debris out of the cockpit and shields it from the sun. Don’t forget to remove seats and padding, and separate your paddle at the ferrule for complete drying.
"Mold loves damp spots – and an ignored, poorly maintained ‘yak is like a five-star hotel for the stuff." – Sam O’Brien, Founder, WaterSportsWhiz
Weekly Checkups and Inspections
Weekly inspections are a great way to spot small problems before they turn into expensive repairs. By adding these checks to your routine, you can boost your kayak’s longevity and keep it safe for use.
Check the Hull and Deck for Damage
Run your hands over the hull and deck to feel for soft spots that might point to structural issues. Look closely for cracks, deep scratches, punctures, or signs of UV wear like fading or brittleness [6,15,17]. If you have a composite or fiberglass kayak, fine white lines might appear – these could indicate resin fractures.
Plastic kayaks, on the other hand, often develop dents or "oil canning" from improper storage or heat exposure [6,16]. The good news? These dents usually aren’t a big deal. A simple fix is to leave your kayak in direct sunlight for a few hours. The heat softens the plastic, helping the hull return to its original shape [6,16].
"These dips and dents are quite common and generally are not a cause for concern. You can try to coax the kayak back into its original shape by leaving it in the sun for a few hours, which will soften the plastic." – Angle Oar
Don’t forget to check hatch covers and rubber seals for cracks, as these are key to keeping your kayak watertight [4,17]. If you suspect a leak, fill the dry hull with water and watch where it seeps out. For deep scratches, use a repair kit or marine epoxy designed for your kayak’s material to avoid water damage [3,6,17].
Inspect and Tighten All Hardware
Give all screws, bolts, and mounting tracks a once-over – regular use can loosen them over time. Make sure foot pedals slide easily and seat adjustment buckles work smoothly without any signs of wear or fraying [4,6].
Sand, salt, and dirt can make hardware stick, so clean these areas with a damp cloth. For metal parts, apply WD-40 or a similar corrosion-resistant product to keep things moving freely [3,16].
Check bungee cords and perimeter lines for fraying or loss of elasticity, and look at plastic pad-eyes for cracks caused by UV exposure [6,16]. If you find loose hardware, remove the screw, apply marine silicone to the threads and the surface underneath, and then refasten it. This helps prevent leaks.
"We recommend that you waterproof your kayaks at the end of your first season… by removing all screwed-on hardware, applying a layer of marine silicone sealant underneath the hardware as well as to the threads, then fasten the hardware back on." – Brooklyn Kayak Company
These weekly checkups go hand-in-hand with your post-paddle cleaning routine and set the stage for taking care of more complex components like rudders and skegs.
Maintaining Rudders and Skegs
Taking care of rudders and skegs is a key part of keeping your kayak in top shape. These steering components are essential for smooth navigation, but they can be prone to issues caused by saltwater, sand, and grit. Regular maintenance ensures they work seamlessly, improving your kayak’s handling and overall performance.
Clean and Lubricate Moving Parts
After paddling in saltwater, it’s important to rinse the rudder assembly, skeg box, and foot pedals with fresh water. While rinsing, move the rudder or skeg through its full range of motion to dislodge any trapped salt and debris. For sticky skeg cables, tilt the kayak forward and flush fresh water through the guide tube while cycling the control knob.
To keep everything moving smoothly, use a silicone-based spray on pivot points, pedals, and sliders. You can also apply a small amount of lubricant, like Boeshield T-9 or a wax-based dry formula, along the cable housings. These products are great because they won’t attract sand, unlike heavier oils.
"Avoid grease or heavy oils like the plague, as they attract sand and grit and create a real mess." – bnystrom, Paddling.com
Once cleaned and lubricated, make sure to address any salt residue to prevent corrosion.
Flush Out Saltwater to Prevent Corrosion
Saltwater is tough on metal parts. Even stainless steel, which is designed to resist rust, can corrode over time. Salt crystals can speed up wear, especially on aluminum parts where they meet steel fittings. Pay extra attention to areas like the rudder housing, skeg blade, and sliders when rinsing.
"Salt water greatly accelerates the corrosion of metals; we use stainless steel wherever possible, however it should be noted that this is only corrosion resistant, not corrosion proof." – P&H Sea Kayaks
If your skeg or rudder becomes stuck, avoid forcing the controls, as this could damage the internal components. Instead, manually lower the fin and check for lodged debris like pebbles. For long-term storage, leave the skeg deployed and loosen the rudder pedal straps to help maintain the elasticity of the bungees.
Off-Season Storage Tips
When paddling season wraps up, how you store your kayak can make or break its longevity. A well-stored kayak can last over 15 years, while poor storage might leave you shopping for a replacement in just 3 to 4 years. The goal? Protect your kayak from warping, cracking, and sun damage while it takes a break.
Clean Thoroughly Before Storing
Before stashing your kayak away, give it a proper cleaning. Start by removing all accessories – seats, pedals, rudders – and rinse the entire kayak, inside and out, with fresh water to wash away salt, sand, and debris. For a deeper clean, try mixing 1 cup of Castile soap with 2 tablespoons of tea tree oil in a bucket of water. This eco-friendly solution not only cleans but also helps prevent mold growth.
"Castile soap and tea tree oil are gentle, antimicrobial options that are gentle on your kayak." – Brooklyn Kayak Company
Pay extra attention to cockpit rims, hatch covers, tracks, and seams. Stick to mild cleaning agents and avoid power washing, which can strip protective coatings. Once clean, let the kayak dry completely and apply a UV protectant spray – like 303 Aerospace Protectant – to both the interior and exterior. This step is crucial for maintaining the hull’s durability during long-term storage.
How to Store Your Kayak Properly
Once your kayak is clean and dry, it’s time to store it the right way. Avoid placing it flat on a hard surface, which can lead to warping. Instead, use padded sawhorses or rack arms, and position the kayak upside down (hull facing up) or on its side. Support it at the bulkheads – about one-third of the way from each end – to evenly distribute its weight.
"The no. 1 rule of kayak storage is to keep it off the ground, especially when you’re storing it during the winter." – Storage Rentals of America
If you’re storing it outdoors, find a shaded spot and set up a weather-resistant tarp about 6 to 12 inches above the kayak. This setup allows for airflow and prevents moisture buildup, which tight coverings can encourage. Don’t forget to use a cockpit cover to keep out pests like rodents and insects. And whatever you do, avoid hanging the kayak by its grab loops or handles, as this can lead to a permanent "banana" shape.
Avoid Freezing Damage
Preventing freeze damage is another key step. Before temperatures drop, remove all drain plugs and ensure every bit of water is expelled from the hull, hatches, and compartments. Water expands as it freezes, which can crack the hull or cause seams to separate.
"Repeated freeze-thaw cycles can be detrimental if water enters the seams or cracks of the kayak." – Brooklyn Kayak Company
Even if you’re storing your kayak indoors, double-check for hidden moisture in hard-to-reach areas. A completely dry kayak can handle freezing temperatures, but even a small amount of water in the wrong spot can lead to serious damage. Following these steps will not only protect your kayak but also ensure it’s ready for action when paddling season returns.
Basic Repairs You Can Do Yourself
After completing routine cleaning and inspections, you can handle some minor repairs on your own. Small dings and cracks are often quick fixes, taking less than an hour and saving you both time and money. The trick is knowing which repairs you can manage yourself and when it’s better to bring in a professional.
When to DIY vs. Hire a Professional
Start by assessing the damage. Minor cracks (less than 6 inches) or holes no larger than a golf ball are usually manageable at home. However, larger damage or anything crossing a structural joint is best left to a professional.
| Factor | DIY | Professional |
|---|---|---|
| Damage Size | Cracks under 6", small holes | Large tears, joint-crossing damage |
| Tools Needed | Heat gun, sandpaper, epoxy, putty knife | Industrial welders, vacuum bagging kits |
| Pros | Low cost, quick, builds skills | Reliable results, preserves warranty |
| Cons | Risk of errors (e.g., overheating) | Higher cost, may require transporting |
Cost is another consideration. For example, fixing a small crack yourself might only cost $15–$25 in materials, while a professional repair for the same issue could range from $75–$150. Similarly, repairing a medium-sized hole at home might cost $25–$40, compared to $150–$300 at a shop. If your kayak is still under warranty, check with the manufacturer first – DIY repairs could void your coverage.
For DIY repairs, start by drilling a 1/8-inch hole at each end of the crack to help distribute stress before patching. Then, clean the area with isopropyl alcohol or acetone, and sand it with 80-grit sandpaper to ensure the adhesive bonds well. These small fixes not only extend your kayak’s lifespan but also keep it safe for your next adventure.
Once you’ve dealt with minor damages, it’s worth checking and replacing worn bungee cords to keep your kayak in top shape.
Replace Worn Bungee Cords and Straps
Frayed bungee cords and stretched-out straps are some of the simplest repairs you can tackle. The main culprit behind their wear and tear is UV exposure, so if your cords look faded or feel loose, it’s time to replace them.
You’ll need a few basic tools: a utility knife, scissors, a tape measure, and marine-grade shock cord (which costs around $5–$30 total). Start by cutting off the old cord and measuring it against the new one, adding a few extra inches for adjustments. Use a pen to guide the new cord through eyelets or D-rings, then secure both ends with overhand knots. Thread the cord in a criss-cross pattern, starting from the center of the kayak and working outward. The entire process takes just 20–25 minutes.
"Weather seal tape is a better choice than duct tape for quick sealing holes and other leaks in a kayak." – Michael Gray, Founder, Uncommon Adventures
To help your new bungees last longer, loosen them during long-term storage to maintain their elasticity. These easy fixes not only improve the durability of your kayak but also ensure safer, more enjoyable trips on the water.
Conclusion
Caring for your kayak boils down to a few consistent habits. A quick rinse after each outing, regular checks for wear and tear, and storing it properly can go a long way in protecting your investment. These straightforward practices help avoid corrosion, material damage, and expensive repairs.
"Keeping your boat and gear in top shape isn’t difficult. It just takes a little forethought and consistent habits." – Aqua Bound
Don’t overlook safety – make it a priority to inspect and lubricate essential components routinely. Plus, proper maintenance enhances performance. A clean, well-kept hull moves through the water more smoothly, letting each paddle stroke work its magic.
"Taking care of your kayak doesn’t have to be a chore. By incorporating these practices into your routine, you’ll prolong the life of your kayak and ensure safe and enjoyable paddling adventures." – SafeKayaking.com
FAQs
How can I tell if my kayak damage is serious?
To figure out if the damage to your kayak needs immediate attention, look for signs like hairline cracks, large cracks, holes, or water inside the hull – these could require repairs or even professional assistance. On the other hand, surface-level scratches or dents are typically harmless but should still be watched to ensure they don’t get worse over time. Make it a habit to inspect your kayak thoroughly after every use. This helps you spot potential issues early and keeps your kayak in good shape.
What should I lubricate, and what lube should I use?
To keep hatch seals flexible and ensure they provide a proper seal, you should lubricate both the seals and their rims. Opt for a silicone-based lubricant that’s safe for use with rubber or silicone seals. Before applying the lubricant, make sure to clean the seals and rims thoroughly. Removing any salt, dirt, or grime not only helps the lubricant work better but also prevents cracking and keeps the seals functioning smoothly.
What’s the best way to store a kayak if I don’t have a garage?
If you don’t have a garage, consider using wall hangers or racks to store your kayak. This keeps it off the ground and reduces the risk of damage. Choose a shaded, sheltered outdoor spot to protect it from direct sunlight and extreme weather conditions. Always make sure the kayak is completely dry before storing it to avoid mold or mildew. For extra protection, use a breathable tarp or cover. Wall-mounted storage systems are also a great way to save space while preserving the kayak’s shape.