
Even the clearest mountain streams can hide harmful pathogens. Drinking untreated water in the backcountry risks exposure to over 100 organisms like Giardia, Cryptosporidium, and E. coli. Symptoms can include diarrhea, vomiting, and dehydration within 24 hours. The key to staying safe? Learn how to locate, assess, and treat water effectively.
Quick Takeaways:
- Finding Water: Focus on valleys, ravines, and high-elevation streams. Snow and ice are backup options but must be melted first.
- Assessing Quality: Avoid stagnant water, areas near beaver dams, or streams with visible contamination. Always check upstream for hazards.
- Treating Water: Use methods like boiling, chemical tablets, filters, or UV purifiers. Combining techniques ensures better protection.
- Gear Tips: Carry lightweight filters like the Sawyer Squeeze ($40) or chemical drops as a backup. Protect filters from freezing temperatures.
Preparation is everything. Map water sources, carry two treatment methods, and prioritize safety over convenience. Proper hydration keeps your trip enjoyable and safe.
WATER – The Ultimate Backpacker’s Guide To Water & Purifying
sbb-itb-5a98267
How to Find Water Sources in the Backcountry
When you’re out in the wild, finding water is all about understanding the landscape. Water naturally flows downhill, so focus on valleys, gullies, and low spots where hidden streams might be tucked away. In mountainous areas, check spots like the base of talus fields, under rock overhangs, or inside narrow ravines – these are common places where water tends to surface.
Pay attention to your surroundings. The sound of running water can guide you, and the sight of lush vegetation – like willows, cattails, cottonwoods, or moss – often signals moisture nearby. Even animal behavior can help; many creatures head toward water sources at dawn.
Cold water is a good sign that you’re close to the source. Small, high-elevation streams (about 4–5 feet wide) are generally safer than large rivers, which are more likely to be contaminated. Water that flows directly from the ground or drips from a snowfield is often a reliable choice.
If streams are scarce, snow and ice can serve as emergency options. Just remember, never eat snow directly – it can lower your body temperature and drain your energy. Instead, melt it first, and add a small amount of liquid water to help the process along. In dry creek beds, dig a few feet into areas with damp soil or green plants. With a little patience, water may seep through.
Here are some specific methods for finding clean streams, natural springs, and other water sources.
Finding Clean Streams and Rivers
Fast-moving water, especially over rocks and gravel, is usually cleaner than stagnant pools. The constant flow helps reduce bacterial growth. Small, high-elevation streams are ideal because the water hasn’t traveled far enough to collect many contaminants.
Before collecting water, always inspect the area upstream. Avoid streams near beaver dams, grazing livestock, or heavily trafficked campsites – these can increase the risk of contamination. The type of rock in the area also matters. For example, granite-heavy regions, like parts of the Sierras, often produce clearer water since sediments settle quickly. In contrast, sandstone, clay, and limestone can keep particles suspended longer.
"The colder it is, the closer to the source it is. If the water didn’t travel too far from the source to the point where you are, it’s likely it’s still quite good for drinking." – Outdoor Revival
Keep in mind that bacteria levels can spike during spring runoff but tend to decrease as summer progresses. If possible, hike upstream to collect water from the highest and least disturbed point.
Finding Natural Springs
Natural springs occur when underground aquifers reach the surface, often at the base of mountains or cliffs. Use topographic maps to locate valleys or other geological features that might indicate spring activity. Look for thick vegetation or mossy rock faces – these are telltale signs of water.
Seeps, where water trickles out of narrow cracks in rock walls, are another excellent option. These are often found in sandstone formations and are naturally filtered, making them some of the purest sources. Look for vertical streaks or moss-covered patches on rock faces to spot them.
That said, don’t assume all spring water is safe. A study found that over 90% of 37 roadside springs failed at least one health-based water standard. Always treat spring water before drinking it.
Collecting Snow, Ice, and Rainwater
Rainwater is one of the cleanest options if collected directly from the sky. During storms, set up a tarp angled into a container to catch the rain. Avoid runoff from trees or rocks, as these can carry contaminants. Dew collection can also work in an emergency – tie absorbent cloths around your ankles and walk through tall grass at dawn, then wring out the moisture into a container.
When using snow or ice, choose clean, deep layers away from animal tracks or discoloration. Freshwater ice usually looks bluish and crystalline, while salty ice tends to be gray and opaque. Melt snow with a stove rather than relying on body heat, as warming frozen water this way can actually dehydrate you.
A good rule of thumb is to carry at least one liter of water for every two hours of hiking. Plan your stops carefully, and map out potential water sources ahead of time to avoid running out between refills. After finding water, the next step is making sure it’s safe to drink – stay tuned for tips on assessing water quality.
How to Assess Water Quality
Finding water is just the first step – making sure it’s safe to drink is equally important. Even water that looks pristine can hide dangers, so knowing how to evaluate its quality in the field is a skill every outdoor enthusiast should have.
What Clean Flowing Water Looks Like
Clear, fast-moving water is a good indicator of a potentially safe source. Look for water that’s free of visible particles, foam, or surface scum. Streams that flow briskly over rocks help prevent bacteria from settling and multiplying. Colder water may suggest it’s coming from a nearby source with less contamination. High-elevation, narrow streams are often safer because they typically encounter fewer pollutants.
Natural signs of filtration can also be helpful. Thick vegetation or moss along a stream might indicate that the water has been naturally filtered and is less likely to have been accessed by large animals. Water emerging from narrow rock cracks – commonly referred to as "seeps" – can be especially clean, as it often passes through sandstone, which acts as a natural filter.
However, appearances can be deceiving. Research found that Giardia cysts were present in 43% of 222 water samples collected from three watersheds in Washington.
"A mediocre water source properly treated is much safer than an apparently pristine source not treated at all." – Buck Nelson, Wilderness Researcher
No matter how clean water looks, always treat it before drinking.
Why to Avoid Stagnant Water
Stagnant water is a red flag for contamination. Algae, surface scum, or discoloration are strong indicators of harmful microorganisms. Without the movement of flowing water, bacteria and parasites thrive in these conditions.
Warm, still water can be particularly risky, as it may host toxic algal blooms or microbes that settle into sediment and floating debris, making them harder to eliminate with sunlight or chemical treatments.
Interestingly, a UC Davis study found that the top 12 inches of calm lake water might actually be safer than some flowing streams. Sunlight’s ultraviolet rays are more effective at killing bacteria in still water. If you must collect water from a stagnant source, skim the surface and avoid disturbing the sediment at the bottom.
How to Spot Contamination Risks
Before collecting water, always check upstream for potential hazards. Watch for animal carcasses, droppings, or signs of grazing wildlife, such as elk, cattle, or sheep. Beaver dams are another warning sign, as they are often linked to the spread of Giardia.
Human activity can also introduce pollutants. Stay away from water that flows under roads, through urban areas, or near industrial zones. These sources are more likely to contain chemical contaminants like pesticides or heavy metals, which cannot be removed by boiling or standard filters.
The geology of the area matters, too. Granite-rich regions often produce clearer water because sediments settle quickly. In areas with sandstone, clay, or limestone, water tends to be cloudier, making purification more challenging.
Finally, trust your senses. If the water has an unusual smell – like sulfur or animal waste – or tastes metallic, it’s best to find another source or use advanced filtration methods. Collecting water from the highest possible point can also reduce the risk of contamination from wildlife or other hikers.
Once you’ve identified potential risks, the next step is to purify the water to make it safe for consumption.
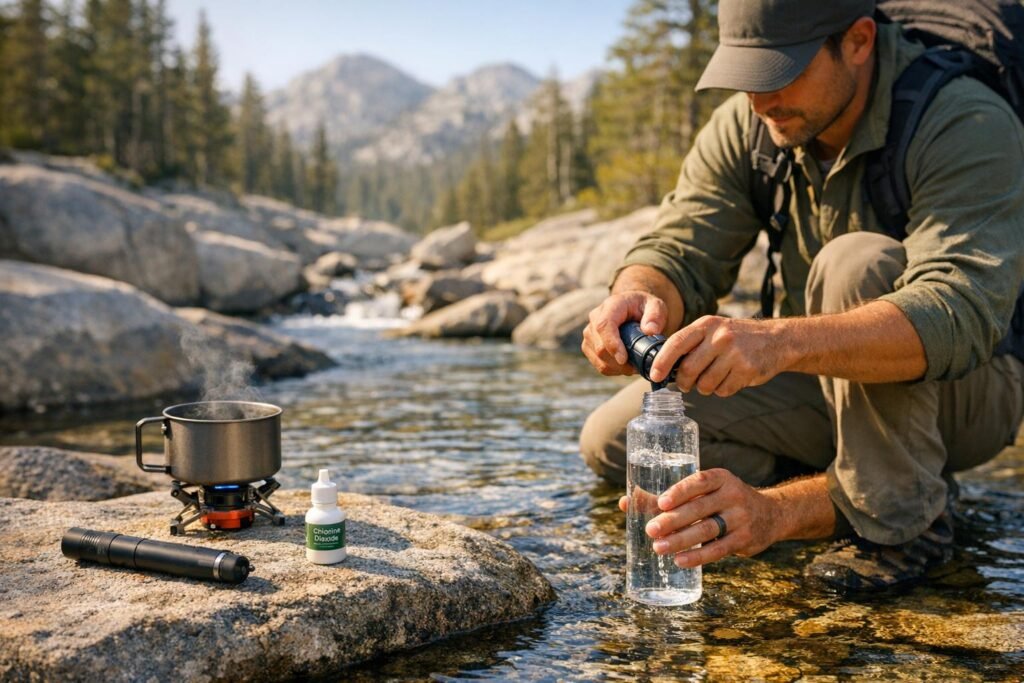
Water Treatment Methods for Backpackers
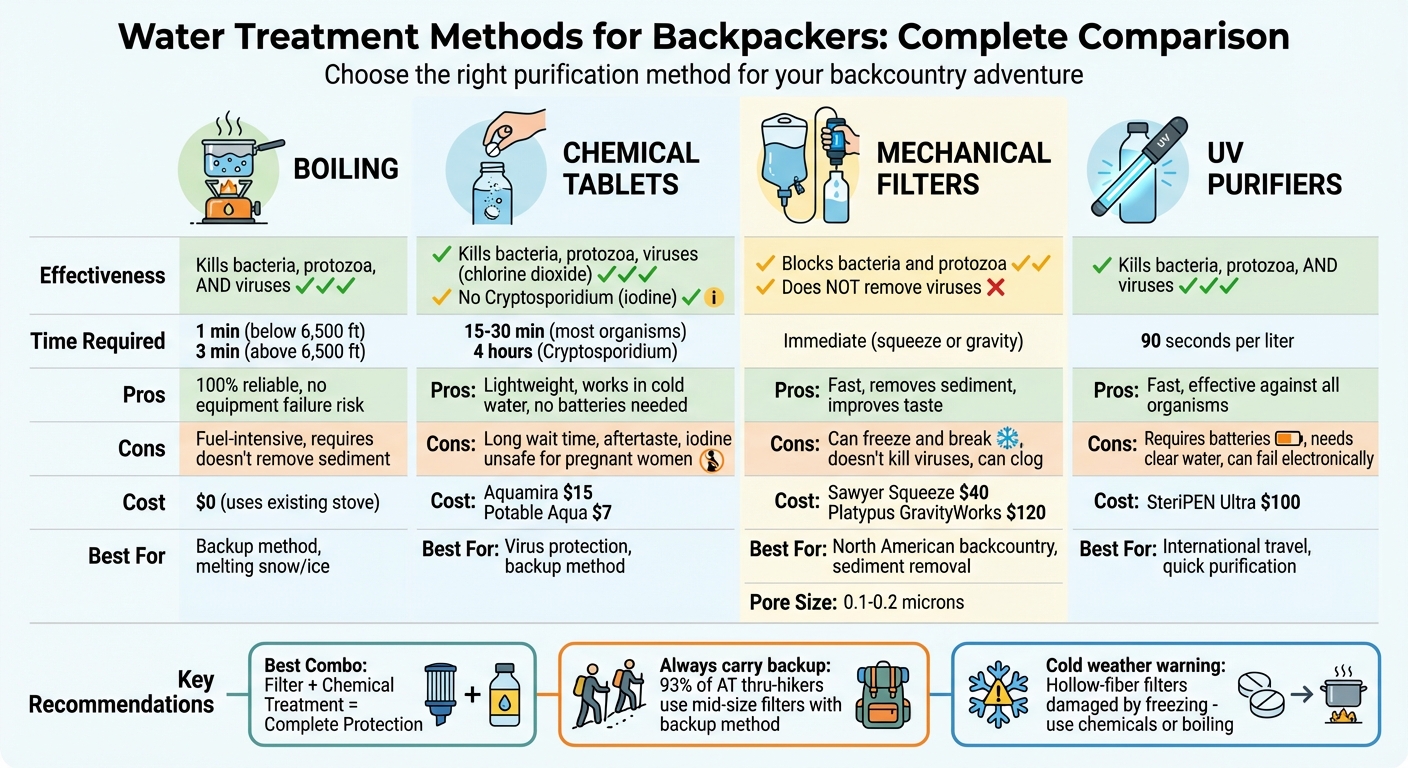
Backpacking Water Treatment Methods Comparison Chart
Treating water is a must for safe hydration during backcountry trips. Even if a stream looks crystal clear, it can still hide harmful microbes. That’s why choosing the right purification method is so important.
The distinction between a filter and a purifier is key. Filters block bacteria and protozoa but can’t trap viruses, which are much smaller. Purifiers, on the other hand, handle all three: protozoa, bacteria, and viruses. In North America, viruses in backcountry water are rare but become a concern in areas with poor human waste management.
Each treatment method has its pros and cons. Boiling is reliable but fuel-intensive, filters are fast but miss viruses, chemical treatments are lightweight but require waiting, and UV devices are quick but need batteries and clear water. Let’s break these options down.
How to Boil Water for Purification
Boiling is a trusted method that kills bacteria, protozoa, and viruses. The steps are simple: bring water to a rolling boil for 1 minute if you’re below 6,500 feet, or for 3 minutes at higher elevations. However, boiling has its drawbacks. It uses a lot of fuel, takes time for the water to cool, and doesn’t remove sediment or improve taste. Because of these limitations, boiling is often a backup method or used when you’re already melting snow or ice for water.
If the water is murky, strain it first using a bandana or coffee filter to remove debris. While this won’t purify the water, it makes boiling more effective.
"Boiling is the best way to kill disease-causing organisms, including viruses, bacteria, and parasites." – National Park Service
Using Chemical Purification Tablets
Chemical treatments are compact and easy to carry. The two main options are chlorine dioxide and iodine, each with its own strengths. Chlorine dioxide is the better choice, as it kills bacteria, protozoa, and viruses, including Cryptosporidium. However, Cryptosporidium requires a 4-hour wait time, while most bacteria and viruses are neutralized in 15–30 minutes. Products like Aquamira drops (around $15) are effective, even in cold water, and leave a mild aftertaste.
Iodine tablets, such as Potable Aqua (about $7), work faster but have limitations. They don’t kill Cryptosporidium and often leave a strong taste. Iodine is also unsuitable for pregnant women or people with thyroid issues.
To use, add the chemical, shake the bottle to coat all surfaces, and wait the required time before drinking. While chemical treatments are effective, the waiting period can be frustrating, especially when you’re thirsty.
"The combination of chlorine dioxide and the Squeeze or GravityWorks may make the ultimate purifier combination." – Andrew Skurka, Professional Backpacker
Don’t forget to loosen the cap and let treated water rinse the bottle threads to avoid recontamination.
Chemical treatments are excellent for viruses, while mechanical filters are better for removing sediment and larger organisms. Using both can provide more thorough protection.
Water Filters and UV Purifiers
Mechanical filters work by straining water through membranes with tiny pores (0.1–0.2 microns) that block bacteria and protozoa but not viruses. Popular models like the Sawyer Squeeze (around $40) and Platypus GravityWorks 4.0 (approximately $120) are reliable options.
Squeeze filters are straightforward: fill a "dirty" water bag, attach the filter, and squeeze clean water into a separate bottle. Gravity systems are hands-free, making them ideal for groups, though they can be slower and less effective in shallow water sources.
One downside of filters is their vulnerability to freezing. If water inside the filter freezes, it can damage the membrane, making the filter unusable. To prevent this, keep your filter warm by storing it in your sleeping bag or close to your body on cold nights.
UV purifiers, like the SteriPEN Ultra ($100), are fast and effective. They use ultraviolet light to disrupt the DNA of microbes, neutralizing bacteria, protozoa, and viruses in about 90 seconds per liter. However, they require clear water and battery power, and their performance can drop in murky or silty conditions.
For the best protection, consider combining methods. For example, use a filter to remove sediment and protozoa, then follow up with chlorine dioxide to eliminate viruses. Always carry a backup method – filters can clog, UV devices can run out of power, and mechanical parts can fail. Chemical drops are a lightweight and reliable fallback when your primary method doesn’t work.
Water Collection and Treatment Gear
Getting the right gear is essential for effective water collection and treatment. The tools you choose not only purify water but also make it easier to collect and store. A solid setup should include a reliable filtration or purification device and containers for both collection and storage. The trick is finding gear that balances weight, durability, and ease of use.
Portable Water Filters and Purifiers
Hollow-fiber filters are a favorite among backpackers. These filters use straw-like tubes with tiny pores (0.1–0.2 microns) to remove contaminants. The Sawyer Squeeze is a standout option, costing just over $40, weighing only 3 ounces, and rated to filter up to 100,000 gallons. Another popular choice is the Katadyn BeFree, priced between $45 and $53. It boasts a quick flow rate and can be cleaned easily by shaking, though its soft bladder might wear out faster with heavy use. For those looking for speed, the Platypus QuickDraw ($55–$80) filters up to 3 liters per minute.
For larger groups or a basecamp setup, gravity systems are the way to go. The Platypus GravityWorks 4.0 (around $120) is a great example. Simply hang the dirty water reservoir, and gravity handles the filtration – no squeezing or pumping required. In 2025, Backpacker Magazine’s senior gear editor, Benjamin Tepler, tested the HydraPak 42MM Filter Cap in Washington’s North Cascades. After filtering 20 liters of silty water, he found the flow rate held steady at one liter every 40 seconds throughout a week-long trip.
If viruses are a concern, you’ll need a purifier. The Grayl GeoPress ($100) uses electroabsorption and activated carbon to remove viruses, heavy metals, and chemicals in just 8 seconds for 24 ounces of water. For more rugged conditions, the MSR Guardian Purifier ($400) is built to last. Its 0.02-micron pores physically block viruses, and it even cleans itself as it works. OutdoorGearLab’s Amber King tested its durability in 2025 by dropping it from six feet onto concrete. It passed the test, continuing to function perfectly.
To keep your hollow-fiber filter working efficiently, backflush it as soon as you notice the flow slowing. Use the provided syringe or a sports-cap bottle for this. Protect your filter from freezing temperatures – ice can damage the fibers, allowing pathogens to slip through. Keep it warm by storing it in your sleeping bag or close to your body at night. If backflushing doesn’t restore the flow, soaking the filter in vinegar can help dissolve mineral buildup.
While treatment devices are essential, proper water storage is just as important for staying hydrated and safe on the trail.
Water Storage Options
The most efficient approach combines soft-sided reservoirs and hard-sided bottles. Soft reservoirs, like the Cnoc VectoX 2L (about $65), are lightweight (5.8 ounces), collapsible, and easy to fill thanks to their wide top openings. These make excellent "dirty" water bags to avoid cross-contamination. If you need ultralight bulk storage for dry environments, the Evernew Water Carry 2L weighs only 1.5 ounces.
For stability and convenience, hard-sided bottles are a better choice at camp or for quick drinks. The Igneous NOBO 1L ($22) is made from durable HDPE (High-Density Polyethylene), which resists UV exposure and doesn’t shed microplastics like single-use bottles. At 2.3 ounces, it’s only slightly heavier than a Smartwater bottle but much tougher.
Thread compatibility is another factor to consider. Most filters use 28mm threads, which fit standard water bottles and the Sawyer Squeeze. However, the Katadyn BeFree and HydraPak systems use 42mm threads. For easy access on the move, the HydraPak Tempo 525ml ($9) attaches to pack straps for one-handed drinking. Meanwhile, the HydraPak UltraFlask 500ml ($50) includes a filter cap, letting you filter water as you drink.
According to a 2023 Appalachian Trail Thru-Hiker Survey, 93% of hikers relied on mid-size filters like the Sawyer Squeeze or Katadyn BeFree, usually paired with 1L to 2L storage containers. Always keep your "dirty" water bags and "clean" bottles clearly marked to avoid accidental cross-contamination. Proper organization is key to safe hydration on the trail.
Planning Your Water Strategy Before the Trip
Having a well-thought-out water plan is key to avoiding emergencies and staying hydrated on the trail. Before setting out, take the time to identify water sources and figure out how much water you’ll need to carry. This step is as critical as picking the right gear for your adventure.
Mapping Water Sources Along Your Route
Start with 1:24,000 scale topographic maps to locate water sources and identify subtle terrain features. Then, cross-check this information using digital tools like Gaia GPS or CalTopo. If you’re hiking well-known trails like the PCT or CDT, real-time water reports from platforms like pctwater.com or apps like FarOut (formerly Guthook) can provide invaluable updates.
On your map, solid blue lines indicate permanent streams, while stippled lines point to seasonal flows, which may dry up during late summer or droughts. To confirm these sources, use Google Earth or satellite imagery to check their existence and surrounding terrain. Additionally, reach out to park rangers or land managers for the most up-to-date conditions – they can confirm whether specific springs or creeks will be flowing during your trip.
Once you’ve pinpointed reliable water sources, calculate distances between them to decide how much water you’ll need to carry. A general rule of thumb is 1 liter for every 5 miles of hiking, but this varies based on heat, terrain, and personal needs. For time estimates, plan for 30 minutes per mile on flat terrain and add 30 more minutes for every 1,000 feet of elevation gain. If you’re facing a long, dry stretch of 20 miles or more, consider hiking during cooler parts of the day, like early morning or late evening, to minimize sweating and conserve water.
This careful planning also ties into your chosen water treatment methods, ensuring you’re prepared for safe hydration throughout your journey. Once your water sources and distances are mapped, make sure to plan for backup purification methods.
Bringing Backup Purification Methods
Even with a solid plan, things can go wrong – filters can clog or freeze when you least expect it. That’s why carrying backup purification methods is essential. Chlorine dioxide tablets or drops are an excellent choice. They’re lightweight, easy to pack, and effective, even if your primary filter fails. Backpacking expert Andrew Skurka suggests using chlorine dioxide alongside your main filter for treating larger quantities of water or for overnight purification.
Always bring enough purification tablets to cover at least a full day’s water needs in case your gear fails. If you’re relying on a UV purifier like a SteriPEN, having a backup method is crucial, as UV devices require clear water and are prone to battery or electronic issues. In freezing conditions, chemical treatments or boiling water become your most reliable options since hollow-fiber filters can be permanently damaged if the water inside them freezes.
For particularly questionable water sources, such as cow ponds, use a multi-step approach: pre-filter the water with a bandana to remove debris, chemically treat it to kill viruses, and then run it through your filter. This layered method provides the best protection when dealing with poor-quality water.
Conclusion
When you’re out in the wilderness, having access to safe water is non-negotiable. No single method guarantees complete protection, so it’s always wise to err on the side of caution and purify any water you collect.
Every choice you make – from finding water sources to selecting a purification method – plays a critical role in your safety. Staying hydrated and healthy in the backcountry boils down to three key steps: preparation, assessment, and treatment. Before heading out, plan ahead by mapping out water sources and estimating the distances between them. Once on the trail, take the time to evaluate the area around each source. Looks can be deceiving – according to a 2013–2014 survey of 37 springs, over 90% failed to meet at least one health-based drinking water standard.
Carrying a backup purification option is a must. Standard filters work well against bacteria and protozoa, but only purifiers – like UV devices, specific chemicals, or ultra-fine filters – can tackle viruses effectively.
Good hygiene is just as important as purification. Follow Leave No Trace principles by separating "clean" and "dirty" containers and disposing of soapy water at least 200 feet away from water sources.
FAQs
When should I use a purifier instead of a filter?
When you need protection against viruses in your water, opt for a purifier instead of a filter. Purifiers are designed to remove not just protozoa and bacteria but also viruses, offering a greater level of safety – especially when dealing with potentially virus-contaminated water sources. Filters, while effective at removing protozoa and bacteria, generally do not eliminate viruses.
What’s the safest way to treat cloudy or silty water?
The best way to handle cloudy or silty water is by prefiltering it before applying any filtration or purification method. Prefiltration helps remove turbidity, debris, and silt, which not only improves the performance of your primary filter or purifier but also extends its lifespan. Using a prefilter or even a simple cloth to strain out larger particles ensures your water treatment process runs smoothly, delivering safer drinking water and reducing the risk of clogs.
How do I keep my water filter from freezing overnight?
To keep your water filter from freezing, try wrapping it in clothing or tucking it into your insulated backpack. Another option is to carry it close to your body to keep it warm. For added security, you can use drinking tube insulation or fill your water reservoir with warm water before starting your trip. These simple measures can help protect your filter from the cold and ensure it stays functional.