
Trail markers and blazes are your guide to navigating hiking trails safely. They help you stay on track, avoid getting lost, and understand trail directions. Here’s a quick breakdown of what you need to know:
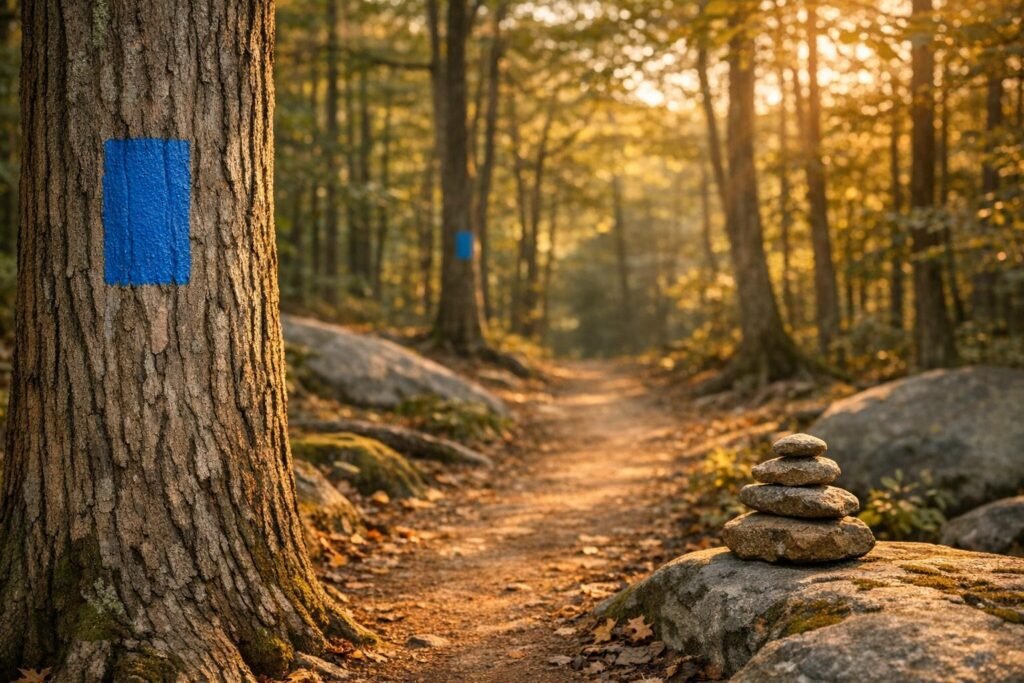
- Trail Markers: These are visual guides like painted blazes, cairns (rock piles), or affixed signs on trees and posts. They indicate the trail’s path and direction.
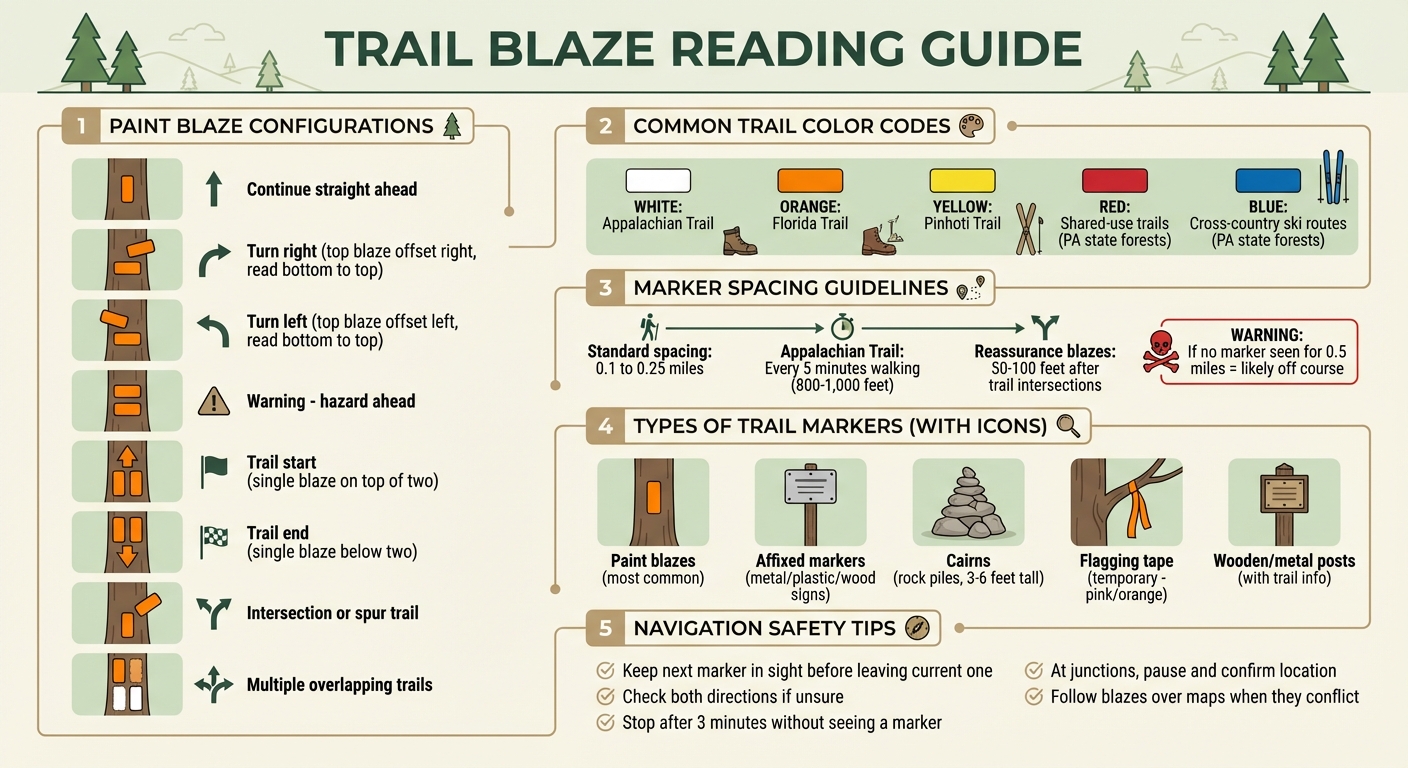
- Blaze Configurations: A single vertical blaze means to keep straight, two stacked blazes signal a hazard, and offset blazes indicate turns.
- Color Codes: Different trails use specific colors (e.g., white for the Appalachian Trail) to differentiate routes.
- Spacing: Markers are typically spaced every 0.1–0.25 miles. If you don’t see one for about half a mile, you may have gone off course.
- Navigation Tips: Always keep the next marker in sight, use maps or GPS as backups, and retrace your steps if you lose sight of markers.
Guide to Reading Trail Blazes and Marker Configurations
How to Read Trail Signs
sbb-itb-5a98267
Types of Trail Markers
Hiking trails across the United States use a variety of marking systems tailored to different terrains, helping you stay on course no matter where your journey takes you.
Paint Blazes
Paint blazes are the most common trail markers in North America. These rectangular marks, painted on trees, rocks, or posts, are a familiar sight on everything from local paths to long-distance hiking routes. A single vertical blaze means the trail continues straight ahead, while stacked or offset blazes indicate turns or changes in direction. Their durability makes them a dependable choice for marking trails.
Affixed Markers
In addition to paint, many trails use permanent affixed markers. Trails like the Pacific Crest Trail or Continental Divide Trail often feature these pre-made signs, crafted from metal, plastic, or wood, and attached to trees or posts. These markers can take on various shapes, such as diamonds or circles, and may include trail logos or symbols to help identify the route. While they resist fading better than paint, they are not immune to weather damage, wildlife interference, or other environmental factors.
Flagging Tape and Other Indicators
Temporary markers, like flagging tape, serve specific purposes in certain situations. Neon pink or orange flagging tape is often used during trail maintenance, after natural disasters, or when rerouting sections of a trail. These markers are meant to indicate temporary adjustments, so it’s crucial to stay alert when you spot them.
In treeless or desert landscapes, cairns are the go-to navigation aid. These rock piles range from small stacks of three or four stones (sometimes called "ducks") to taller structures that can reach up to six feet, designed to remain visible in snow or fog. Lauren Stites, author at Trails That Rock, notes:
"Cairns are piles of rocks used where there are few to no trees, typically out west or above the treeline. They are used to mark trails where trees and other vegetation are scarce, and the ground cannot easily hold a signpost."
You might also come across wooden or metal posts in open areas like meadows or ridgelines. These posts often provide extra details, such as trail names, distances, or maps of junctions. Carved blazes – symbols etched into tree bark – are less common today, as this method is discouraged due to the harm it causes to living trees.
Familiarizing yourself with these different marker types ensures you can navigate trails safely and confidently.
How To Read Trail Markers and Blazes
Reading Paint Blaze Configurations
Trail blazes, often painted on trees or posts, are your guide to staying on the right path. A single vertical blaze means you’re on track – just keep going straight. These blazes are typically 2 inches by 6 inches and placed at eye level, though in snowy regions, they might be positioned higher for visibility.
When you see two blazes with the top one offset, it signals a turn ahead. If the top blaze shifts right, the trail turns right; if it shifts left, the trail veers left. Read these blazes from bottom to top to understand the direction. Two blazes stacked directly on top of each other serve as a warning for potential hazards ahead.
Three blazes are used for more specific markers. For instance, an upward-pointing arrow (a single blaze on top of two others) marks the trail’s starting point, while a downward-pointing arrow (a single blaze below two others) marks the end. If one of the three blazes is offset to the side, it usually indicates an intersection or a spur trail. Additionally, stacked blazes in different colors mean that multiple trails are overlapping.
To ensure you’re still on the right path, keep an eye out for consistent markers. If you’ve been walking for about three minutes without spotting one, stop and look around – you might have strayed off the trail. Always check both directions for blazes if you’re unsure.
Understanding Color Codes
Once you’ve mastered blaze configurations, the next step is decoding their colors. These color codes are especially useful at intersections where trails may cross or converge. For example, the Appalachian Trail uses white blazes, with one appearing roughly every 70 feet. Other trails, like the Florida Trail, use orange, while the Pinhoti Trail relies on yellow.
Color systems can vary depending on the region or the managing agency. In Pennsylvania’s state forests, for instance, red marks shared-use trails (for activities like horseback riding, biking, and hiking), orange is for state forest hiking trails, yellow designates local hiking trails, and blue highlights cross-country ski routes. It’s always a good idea to familiarize yourself with the specific color codes of the trail you’re hiking before setting out.
When trails overlap, they are often marked with co-blazes, where two colors appear together on the same tree or post to guide you. If you haven’t seen your trail’s designated color for more than a quarter-mile, it’s time to backtrack to the last marker – you might have wandered off course.
Navigation Tips for Safe Hiking
Keep Trail Markers in Sight
Always ensure you can see the next trail marker before leaving the current one. On most trails, markers – called blazes – are spaced every 0.1 to 0.25 miles. If you’ve gone half a mile without spotting one, it’s a strong indication that you may have veered off course. Stop immediately and assess your location.
If a blaze isn’t visible ahead, turn around and check behind you. Markers are often painted on both sides of trees to guide hikers traveling in either direction. In rocky or alpine areas, where stone cairns replace painted blazes, pause at each pile to locate the next cairn before moving forward – this is especially critical in foggy or low-visibility conditions. Familiarizing yourself with common marker patterns also helps you spot deviations and stay on track.
Learn Common Marker Patterns
Knowing how markers are typically spaced can help you anticipate when something isn’t right. For example, the Appalachian Trail Conservancy places blazes every 5 minutes of walking, or roughly 800 to 1,000 feet. After trail intersections, reassurance blazes appear 50 to 100 feet beyond the junction to confirm your chosen path is correct. If you’ve gone 10 to 15 minutes without seeing a marker, it’s better to backtrack to your last known blaze than to risk continuing in the wrong direction.
Be alert for false trails. Logs, brush, or debris placed across a path often signal "rogue" trails or drainage ditches that shouldn’t be followed. Similarly, water bars – logs or rocks used to divert water – can sometimes mislead hikers into following drainage channels. At switchbacks, look for double-offset blazes, which signal sharp turns.
Use Maps and GPS With Trail Markers
Trail markers are your main navigation tool, but maps and GPS devices are invaluable backups, particularly when visibility is poor or blazes are hard to find. The Appalachian Trail Conservancy advises:
"When your map or guidebook indicates one route, and the blazes show another, follow the blazes".
Markers reflect current trail conditions, including reroutes that older maps may not show.
Trail junctions serve as "islands of certainty", where you should pause to confirm your location using a map or GPS before proceeding. Snap a photo of the trailhead kiosk map for quick reference later. In federally designated wilderness areas, where markers can be spaced up to a quarter-mile apart, maps and compasses become indispensable. If you lose your bearings and all navigation tools fail, rely on the S.T.O.P. method: Stop, Think, Observe, and Plan your next steps.
Conclusion
Understanding trail markers and blazes is a game-changer for anyone who enjoys hiking. By learning the meaning behind blaze patterns and color codes, you can navigate trails confidently without always relying on technology.
Philip Werner from SectionHiker highlights the importance of honing navigation skills beyond just using a compass or GPS. Developing this ability not only boosts your confidence for tackling tougher trails but also lets you focus on the journey itself.
"Without worrying about getting lost, individuals are able to fully immerse themselves in the beauty that is Pennsylvania’s outdoors." – Allyson Ritchey, DCNR Office of Communications
Trail markers do more than guide you – they help preserve delicate ecosystems by keeping hikers on designated paths. While maps and GPS devices are excellent tools, especially in low-visibility situations, blazes often provide the most up-to-date guidance, reflecting current trail conditions better than outdated maps.
Make it a habit to practice spotting blazes and cairns on every hike. The more you do, the more second nature it becomes. By mastering these techniques, you’ll not only navigate with ease but also fully embrace the wonders of the trail.
FAQs
How can I tell if I’ve wandered off the trail?
If you’ve walked about half a mile without seeing a trail marker or blaze, it’s a good indication you might have wandered off the path. Blazes are usually placed every 0.1 to 0.25 miles, so if they’re missing for a while, it’s a warning sign. Pause, backtrack, and look for markers to verify your location and find your way back to the trail.
What do the different trail blaze colors mean?
Trail blaze colors play a key role in guiding hikers and signaling the trail’s purpose or allowed activities. In the U.S., you’ll often see these common blaze colors:
- Red: Marks shared-use trails, welcoming hikers, horseback riders, and mountain bikers.
- Orange: Indicates foot-only trails, typically in state forests, where motorized vehicles or horses are not allowed.
- Blue: Reserved for cross-country ski trails, often groomed specifically for winter use.
On long-distance or well-known trails, blaze colors often function as unique identifiers rather than indicating specific activities. For example, the Appalachian Trail features white blazes, while the Pinhoti Trail is marked with yellow blazes.
Spotting a blaze? Pay attention to its color – it helps you understand the trail’s purpose and ensures you’re heading in the right direction!
Why are stone cairns used instead of painted trail markers in some areas?
Cairns are often found in areas where painting trail markers on trees or other surfaces isn’t an option. Think alpine zones, rocky landscapes, or open, treeless terrain. These carefully stacked stones provide a sturdy and highly visible guide for hikers navigating such environments.
Unlike painted blazes, cairns blend more seamlessly into natural surroundings and hold up better against extreme weather. This makes them a practical choice for marking paths in remote or challenging landscapes.