
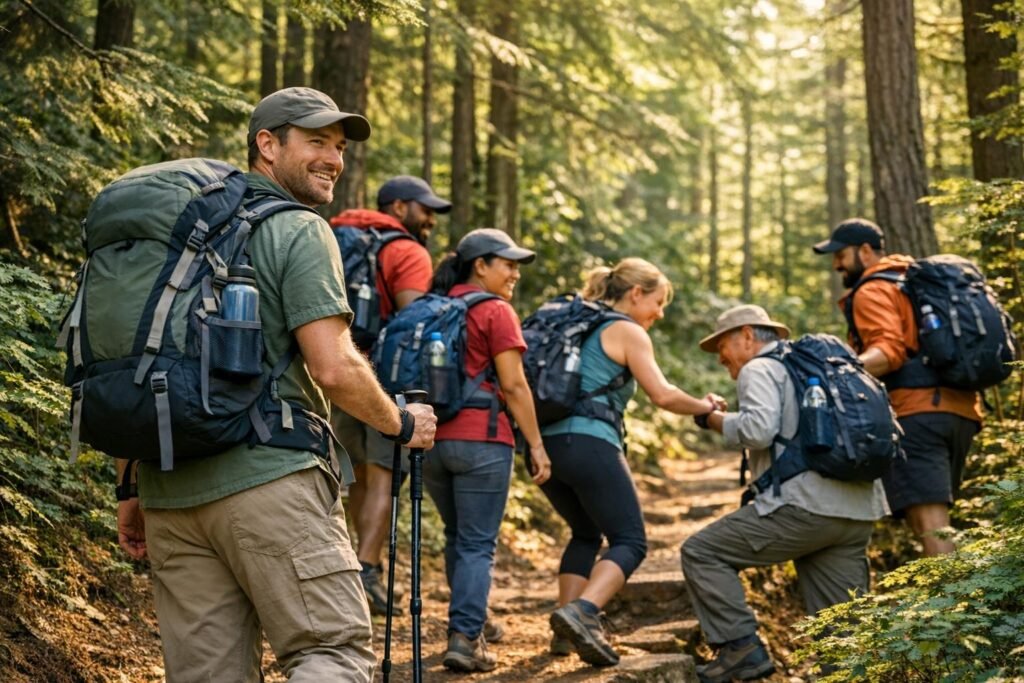
Hiking in a group can be an enjoyable and safer way to explore the outdoors, but it requires careful planning and teamwork. Here’s what you need to know to plan a successful group hike:
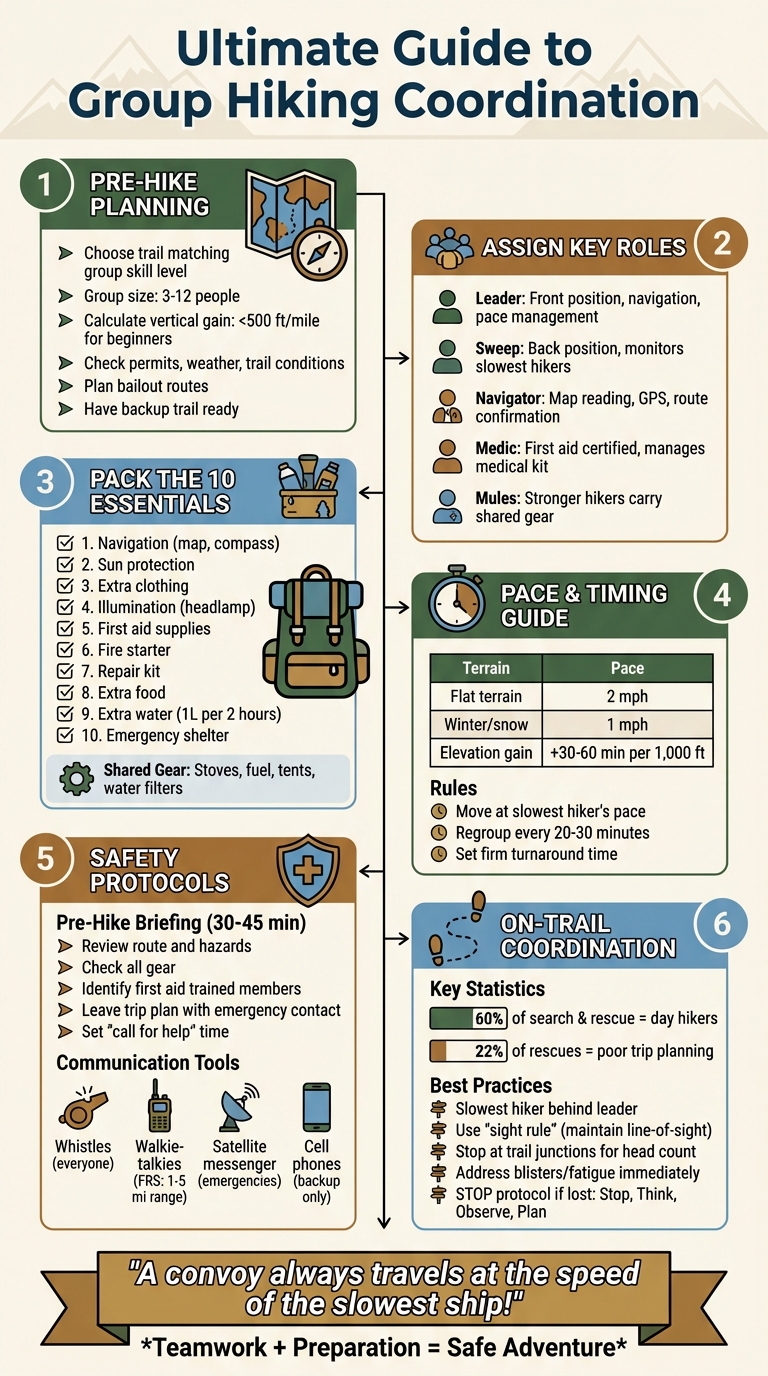
- Plan Ahead: Choose a trail that matches the skill level of your group. Ensure the group size is between 3 and 12 people to stay safe and comply with regulations.
- Assign Roles: Designate key roles like Leader, Sweep (to stay at the back), Navigator, and Medic to keep the group organized and prepared.
- Pack Properly: Everyone should carry the 10 Essentials (like navigation tools, first aid supplies, and extra food/water). Share heavier gear like tents and stoves among the group.
- Set a Pace: The group should move at the pace of the slowest hiker. Plan regular breaks and regroup at key points like trail intersections.
- Check Conditions: Research trail conditions, permits, and weather forecasts. Always have a backup plan in case of unexpected closures or bad weather.
- Safety First: Conduct a pre-hike safety briefing, stick together on the trail, and have clear communication tools like whistles or radios for emergencies.
Essential Steps for Planning and Executing a Safe Group Hike
Choosing the Right Trail and Planning the Trip
Picking the right trail is the first step to ensuring a smooth and enjoyable group hike. A misstep here can lead to fatigue, injuries, or even contribute to the alarming statistic that nearly 60% of search and rescue operations involve day hikers. The key is finding a trail that balances the group’s abilities with logistical considerations like permits, weather, and timing.
Matching Trails to Skill Levels
When planning your route, always consider the abilities of the least experienced or slowest member of your group. As the American Hiking Society aptly notes:
"When traveling as a group, you are only as fast as the slowest person in the group".
Trail ratings like "Easy" or "Moderate" can be misleading since they’re often subjective. Instead, calculate the vertical gain per mile by dividing the total elevation gain by the trail’s length. For beginners, look for trails with less than 500 feet of vertical gain per mile. For example, a 4-mile trail with 1,200 feet of elevation gain (300 feet per mile) will be far less taxing than one with 2,400 feet of elevation gain (600 feet per mile).
Terrain is another critical factor. Trails with boulder fields, scrambling sections, or dense vegetation can be intimidating or outright dangerous for newer hikers. Josh Cole, Program Director at Outward Bound‘s Northwest School, advises choosing routes with a:
"strong reward-to-effort ratio: Good views, swimming holes, and easy miles rarely disappoint".
Before heading out, study the map for "bail-out" routes – alternate trails that can serve as emergency exits if someone in the group can’t complete the planned loop. Also, keep in mind that group hikes tend to move at a slower pace than solo outings.
Researching Trail Conditions and Regulations
Knowing the current trail conditions can save your group from unpleasant surprises. Apps like AllTrails or Gaia GPS often include recent trip reports, but it’s also wise to call the local ranger station to confirm trail closures, hazards, or permit requirements. Many wilderness areas limit group sizes to 12 people, so double-check that your group complies with these rules.
Permits and vehicle passes, such as the Northwest Forest Pass or Discover Pass, may also be required. Popular trails often require reservations weeks in advance, so plan accordingly. Additionally, familiarize yourself with specific park rules, like whether bear canisters are mandatory or if dogs are allowed, to avoid any last-minute hiccups.
Always have a backup trail in mind. Your first choice might not work out due to full parking lots, unexpected closures, or bad weather. Remember that summit conditions can be vastly different from those at the trailhead, so check weather forecasts for the elevation you’ll be hiking. With a backup plan ready, you can adjust as needed and ensure your hike stays on track.
Scheduling the Hike
Start by estimating how long the hike will take. On flat terrain, plan for a base pace of 2 miles per hour, adding 30–60 minutes for every 1,000 feet of elevation gain. For winter or snowy conditions, reduce the pace to about 1 mile per hour.
Be mindful of daylight hours, especially for late-autumn hikes, and set a firm turnaround time to ensure the group begins heading back well before darkness or bad weather sets in. Early in the hike, take a 10–15 minute break to adjust clothing and assess the group’s pace.
Leaders should arrive at the meeting spot at least 15 minutes early to check gear and introduce everyone. If possible, scout the route ahead of time to check parking availability and road conditions.
| Condition/Scenario | Estimated Pace Adjustment |
|---|---|
| Standard Flat Terrain | 2 miles per hour |
| Winter/Snow Conditions | 1 mile per hour |
| Elevation Gain | Add 30–60 minutes per 1,000 ft |
When choosing a date, prioritize safety over convenience. If the forecast predicts thunderstorms or extreme heat, it’s better to reschedule. Planning several weeks ahead gives you enough time to secure permits and adapt to changing conditions.
Assigning Roles and Responsibilities
Planning for a hike isn’t just about packing gear or picking a trail. It’s also about ensuring everyone has a clear role to keep the group organized and safe. When roles are properly assigned, a scattered group becomes a well-coordinated team. On the flip side, unclear roles can lead to confusion, slower progress, and even safety risks. Assigning roles helps everyone understand their responsibilities and fosters accountability throughout the hike.
Main Roles in Group Hiking
The Group Leader takes charge at the front, guiding the group by managing navigation, keeping an eye out for trail markers like blazes or cairns, and maintaining a steady pace. Hiking guide Hartley Brody emphasizes the importance of this role:
"The person at the front has a crucial role in keeping the group together, safe and in high spirits".
Meanwhile, the Sweep, also known as the "caboose", stays at the back to ensure no one is left behind. They monitor the pace and check in with slower hikers, relaying updates to the leader.
The Navigator handles map reading and GPS tracking, double-checking the route at crucial points like trail junctions or river crossings to prevent the group from splitting up. Then there’s the Medic or First Aid Lead, who ideally has Wilderness First Aid or CPR certification. This person manages the group’s medical kit and addresses common issues like blisters, dehydration, or injuries.
Other members can take on roles that match their specific strengths. For example, stronger hikers might carry heavier group gear as "mules", while those with culinary skills can take charge of meal prep.
Once roles are defined, the next step is matching each hiker’s skills to the tasks at hand.
How to Assign Roles
The key to assigning roles is to align responsibilities with individual strengths, ensuring smooth coordination. Josh Cole, Washington Program Director for Outward Bound’s Northwest School, advises tailoring tasks to each person’s abilities.
For groups with more than 10 members, it’s wise to designate an additional experienced hiker to assist the leader with navigation and gear logistics. Familiarity with the trail can significantly boost leadership effectiveness. You might also consider a rotating "Leader of the Day" system, which allows everyone to develop their skills and share the responsibility.
Before setting out, hold a quick 30–45 minute meeting at the trailhead. Use this time to assign roles, review emergency procedures, identify who has first aid training, and confirm the location of communication devices. Organizations like The Mountaineers require aspiring leaders to join at least three group hikes before earning certification, showing that leadership skills are best built through hands-on experience.
Packing Gear and Planning Meals
Once roles are assigned, the next step is packing efficiently and planning meals to support the hike. Proper packing ensures everyone carries the essentials without unnecessary weight, reducing risks and improving the overall experience.
Creating a Packing Checklist
Each group member should have the 10 Essentials: navigation tools (like a map and compass), sun protection, extra clothing, illumination (such as a headlamp), first aid supplies, fire-starting tools, a repair kit, extra food, extra water, and emergency shelter. While electronics like GPS devices are helpful, always include a waterproof paper map and compass as backups. For hydration, plan on 1 liter of water for every 2 hours of hiking, up to 3 liters total, and carry backup purification methods like filters or iodine tablets.
Footwear and clothing are just as important. Wear broken-in hiking boots and moisture-wicking fabrics to prevent blisters and stay warm. The Appalachian Mountain Club emphasizes:
"Cotton kills"
because it retains moisture and draws heat away from your body. Use a layering system: base, mid, insulating, and shell layers. Start your hike feeling slightly cold by removing layers to avoid sweating, which keeps your clothes dry. Other must-haves include a whistle for signaling and a multi-tool for quick gear repairs. And don’t forget sunscreen – UV radiation increases by 10% to 12% for every 3,000 feet of elevation gain.
Shared vs. Personal Gear
To lighten individual loads, groups can share certain items like stoves, fuel, water filters, and tents. However, everyone must still carry their own 10 Essentials for safety. Josh Cole, Washington Program Director at Outward Bound’s Northwest School, advises:
"Divide group gear and chores based on aptitude, not based on numeric equality".
This means stronger hikers might carry heavier items like cooking pots or bear canisters, while others take on tasks like navigation or meal preparation.
Using a shared spreadsheet can help coordinate gear and avoid duplicates. Before heading out, inspect everyone’s gear to ensure nothing critical is missing – like a warm sleeping bag – and to eliminate unnecessary items. Personal packs should have extra space for shared gear or food. Once the gear is sorted, meal planning becomes the next priority.
Planning Simple Group Meals
Just like with gear, thoughtful meal planning is essential to keep everyone energized and safe on the trail. Meals should balance quick-energy carbohydrates with fats and proteins for sustained fuel. Plan for each person to consume 1.5–2.5 pounds of dry food daily, providing 2,500–4,500 calories. To save cooking time and fuel, pre-cook proteins before the trip. For breakfast, choose easy-to-eat options like breakfast burritos or egg muffins. To prevent egg breakage, crack them into a wide-mouth plastic bottle before packing.
In areas where water is scarce, avoid meals that require a lot of boiling, like pasta or rice. Instead, go for lighter options such as wraps, pitas, or sandwiches. Foil packet meals, like chicken with vegetables, can be cooked directly over coals, making cleanup easier and allowing for individual dietary preferences. Always pack at least one extra day’s worth of food beyond your planned itinerary to prepare for unexpected delays and keep morale high. Snack regularly on items like nuts, cheese, meat sticks, and dried fruit to maintain energy throughout the day.
sbb-itb-5a98267
Safety and Communication Strategies
Once you’ve nailed down roles, gear, and meals, it’s time to focus on safety and communication – two critical aspects of a successful hike. A solid safety plan and clear communication can help prevent emergencies and ensure the group is ready to handle surprises on the trail.
Setting Up Pre-Hike Safety Protocols
Before hitting the trail, gather your group for a 30–45 minute safety briefing. Use this time to introduce leaders, review the route with a physical map, highlight potential hazards, and double-check everyone’s gear. Make sure everyone knows where the group medical kit is stored and review participants’ medical information, noting who has first aid training.
Leave a detailed trip plan with someone who isn’t joining the hike. Include your route, expected return time, vehicle details, and license plate number. Also, set a specific "call for help" time, such as 12 hours after your planned finish or a set hour like midnight. This ensures your contact knows when to alert authorities if you don’t check in. According to the National Park Service, about 22% of rescue cases in 2013 involved insufficient trip planning or poor judgment.
During the briefing, inspect each hiker’s gear to confirm they have the 10 Essentials, enough water, and proper clothing for the conditions. Establish group rules, such as sticking together, using the buddy system, and pausing at trail intersections or water crossings. Define "No Go" criteria for situations like lightning storms or extreme temperatures. As the Utah State University Field Safety Handbook points out:
"the success and overall safety of a team is more associated with the quality of its leadership, teamwork, and communication than it is with its overall skill level".
With safety protocols in place, the next step is ensuring effective communication.
Communication Tools for Group Hiking
On the trail, reliable communication tools are a must. Most groups benefit from using a mix of devices, as no single tool works perfectly in every situation.
Cell phones are great for navigation and photos, but they’re not always dependable in remote areas due to weak signals and quick battery drain in cold weather. Walkie-talkies, especially Family Radio Service (FRS) models, are handy for internal group coordination. They don’t require a license, but their range is limited – typically 1–5 miles in wooded areas. General Mobile Radio Service (GMRS) radios offer a slightly better range (3–10 miles in peak-to-valley settings) but need an FCC license. As Rocky Talkie explains:
"for use in skiing, a good rule of thumb is that you will usually have adequate range while on the same side of the mountain, but will lose contact entirely when there is a mountain blocking the signal".
Here’s a quick breakdown of communication tools:
| Tool | Pros | Cons |
|---|---|---|
| Cell Phones | Easy to use, familiar, and include GPS features. | Unreliable in remote areas; batteries drain quickly. |
| Walkie-Talkies (FRS) | No license needed; good for group coordination. | Limited range; requires line-of-sight. |
| Satellite Messenger (e.g., inReach) | Offers two-way messaging, SOS coverage, and tracking. | Expensive device; requires a subscription. |
| Personal Locator Beacon (PLB) | Highly reliable SOS signal; no subscription needed. | Limited to emergency use; no routine messaging. |
| Whistle | Lightweight, battery-free, and audible over long distances. | Can only send simple auditory signals. |
Every group member should carry a whistle as a backup. Unlike shouting, a whistle’s sound carries farther and doesn’t rely on batteries. For electronic devices, keep them on your person rather than in your backpack – you don’t want to lose access if you’re separated from your gear.
Once communication tools are sorted, stay alert for weather changes and be ready for emergencies.
Weather and Emergency Preparedness
Always check both valley and high-elevation weather forecasts before your hike. Conditions above the treeline can be much harsher. Use resources like the National Weather Service for accurate trailhead forecasts, and check recent trip reports for issues like snow or high water levels. Plan for an extra hour of hiking time per 1,000 feet of elevation gain.
Make sure you’re familiar with bailout routes in case you need to exit the trail quickly. Set a hard turnaround time to ensure the group gets back before dark, even if you haven’t reached your destination. Keep an eye out for early signs of hypothermia in cold or wet conditions, or heat-related illnesses in hot weather – both can escalate fast.
If the weather or trail conditions change, call a quick group meeting to reassess. Use the "Go/No Go" approach to decide whether it’s safe to continue. Never let someone wait alone or return to the trailhead by themselves – always use the buddy system if the group needs to split up. A good leader fosters an environment where everyone feels comfortable speaking up. As the Utah State University Field Safety Handbook explains:
"sets a tone in which participants and co-leaders feel they can speak up, question and share observations without fear of reprisal".
On-Trail Coordination and Problem Solving
While pre-hike safety measures set the foundation, staying coordinated on the trail is what keeps the group safe and adaptable. No matter how much planning goes into a hike, unexpected challenges can arise, and being prepared to handle them in real-time is key. The secret? Balancing flexibility with the safety rules you’ve already put in place.
Managing Group Pace and Regrouping
One of the most important rules of group hiking is this: the group moves at the pace of its slowest member. Darren Edwards, Founder of Trail Hiking Australia, puts it best:
"A convoy always travels at the speed of the slowest ship!"
To keep things running smoothly, place the slowest hiker right behind the leader. This prevents gaps from forming. At the same time, a designated "sweep" or "whip" – usually an experienced hiker – should stay at the back to ensure no one is left behind.
Use a "sight rule" to maintain line-of-sight between hikers. If anyone loses sight of the person ahead, they should call out immediately to stop the group. Plan regrouping points at critical spots like trail junctions, water crossings, or after steep climbs. At each stop, take a head count to make sure everyone is accounted for.
Break times should be consistent and clear: short pauses for water, slightly longer for bathroom stops, and around 30 minutes for meals. Announce a two-minute warning before resuming after long breaks, and consider stopping 15 minutes into the hike so hikers can adjust layers as they warm up. If someone leaves for a bathroom break, they should leave their pack visible on the trail to help the group locate them easily.
Handling Common Challenges
Hiking problems often start small but can snowball if ignored. The trick is to address issues early, before they disrupt the entire group.
| Challenge | Solution | Who’s Responsible |
|---|---|---|
| Fatigue | Slow the pace, redistribute heavy gear to stronger hikers, and take a snack break. | Leader / All Members |
| Blisters | Stop at the first sign of friction and apply moleskin or tape. | Individual / Leader |
| Getting Lost | Stop at the last known trail marker, consult your map or GPS, and retrace steps. | Leader |
| Group Spreading | Put the slowest hiker in front and use walkie-talkies to stay connected. | Leader / Sweep |
| Unexpected Weather | Tighten the group, ensure rain gear is ready, and reassess the situation. | Leader |
Check in regularly with your group to monitor hydration, energy levels, and foot health. Catching small issues – like redistributing a heavy pack from a tired hiker to a stronger one – can prevent hours of discomfort later. If the trail becomes unclear, stop immediately and look back for the last confirmed marker. Wandering aimlessly only makes things worse.
These strategies help ensure that minor problems don’t turn into major setbacks.
Dealing with Unexpected Situations
Sometimes, even the best safety plans fall short. If a hiker gets lost, follow the STOP protocol: Stop (stay calm and stay put), Think (review landmarks and your route), Observe (use tools like a compass or trail markers), and Plan (only move if you’re absolutely sure of your direction; otherwise, stay put). Whistles can be a lifesaver for regaining contact if someone becomes separated.
Emergencies like injuries, severe weather, or a missing hiker require decisive leadership. In critical situations, directive decision-making – where the leader makes quick, clear decisions – is essential. For less urgent adjustments, like changing break times or rerouting slightly, use consultative decision-making that involves group input to keep morale high.
As highlighted in the Utah State University Field Safety Handbook:
"Experience alone does not develop conservative judgement! … Reflection from one’s experience that leads to a modified future action is just as important."
Encourage open communication among the group. If someone spots a potential issue – whether it’s worsening weather, a missing member, or rising tension – address it right away. In tough conditions, close the gaps between hikers to keep the leader and sweep within easy contact.
Conclusion
Main Takeaways
A successful group hike comes down to thoughtful planning, open communication, and shared responsibilities. Start by researching your route, checking the weather, and assigning roles to each group member. Before hitting the trail, take 30–45 minutes for a safety briefing. Use this time to go over the route, identify who has first-aid training, and review emergency protocols.
While hiking, keep a pace that works for everyone. Plan to regroup every 20–30 minutes to check on hydration, morale, and physical well-being. As certified guide Maryanne Heath explains:
"Teamwork makes tasks easier and quicker… it also makes us safer on the trail".
Stick to a group size of 3 to 12 people to ensure safety while minimizing your environmental footprint. Be flexible – adjust your plans if weather conditions or group abilities shift unexpectedly.
Fostering a sense of accountability within the group is key. Everyone should feel heard and responsible. Using frameworks like CFOR (Clarify, Facilitate, Organize, Resolve) can help manage conflicts. Encourage open communication to address small issues before they escalate. When everyone carries the 10 Essentials and contributes based on their strengths, the whole group benefits.
From choosing the right trail to problem-solving on the go, each decision highlights the importance of teamwork and preparation. These strategies will help you confidently plan and lead your next hike.
Plan Your Next Adventure
With these tips in mind, you’re ready to take on your next group hike. Choose a trail that matches your group’s skill level and offers something special, like stunning views or a refreshing swimming spot. Screen participants to ensure they have the right gear and experience, and be sure to file a trip report afterward to assist future hikers.
For more advice on outdoor adventures, gear recommendations, and trail suggestions, check out Adventurism.co. Whether you’re organizing your first group hike or honing your leadership abilities, preparation is the key to a safe and enjoyable experience. Hit the trail, stay safe, and make unforgettable memories together.
FAQs
What roles are important for organizing a successful group hike?
For a group hike to go off without a hitch, assigning roles can make things run more smoothly and keep everyone on the same page. Here are a few key roles to consider:
- Trail Leader: This person takes charge of guiding the group, setting a comfortable pace, and ensuring everyone sticks to the planned route.
- Navigator: Equipped with maps, GPS, or trail apps, the navigator makes sure the group stays oriented and knows where they’re headed.
- Safety Officer: Responsible for carrying first-aid supplies and being ready to handle any emergencies that might arise.
- Logistics Coordinator: Keeps track of the group’s gear, food, and other essentials to ensure nothing gets left behind.
- Morale Booster: The go-to person for keeping spirits up, encouraging teamwork, and making the hike fun for everyone.
With these roles in place, your group will be better prepared, more organized, and ready to enjoy the adventure to the fullest.
How can I pick a hiking trail that suits everyone in my group?
To pick a trail that suits everyone in your group, start by gauging the skill levels of each hiker. Think about how far each person is comfortable hiking in a day – 2 to 4 miles works well for beginners, while those with more experience might prefer something in the 6 to 10-mile range. Elevation gain is another key factor to consider. For mixed-ability groups, aim for trails with an elevation gain of 200 to 400 feet per mile. Check the trail’s length, elevation gain, and difficulty rating ahead of time, and choose a route that aligns with the abilities of your least experienced hiker. If flexibility is important, an out-and-back trail can be a great option, allowing you to turn back whenever needed.
The trail’s terrain also plays a big role. Beginners typically feel more at ease on well-maintained paths without steep inclines or tricky sections, while seasoned hikers might enjoy the challenge of stream crossings or rocky terrain. If you’re hiking with a group that has a mix of experience levels, look for trails that offer optional loops or side routes. This way, everyone can adjust the difficulty to their liking.
Lastly, plan your hike with your group’s pace and schedule in mind. Set regular meeting points every 20 to 30 minutes or 1 to 2 miles to check on energy levels and make sure everyone’s doing well. Before heading out, don’t forget to check the weather forecast, trail conditions, and whether you’ll need any permits. A little planning goes a long way in ensuring a safe and enjoyable hike for everyone!
What are the key safety tips for group hiking?
Safety in group hiking begins long before you step onto the trail. Preparation is key. Start by checking the weather forecast and studying maps for alternative routes and water sources. Make sure everyone is familiar with the 10 Essentials: a first-aid kit, whistle, communication device, headlamp, water, food, weather-appropriate clothing, sturdy footwear, fire starter, pocket knife, and navigation tools like a map and compass. It’s also smart to share an emergency plan with your group and someone who isn’t coming along. Include meeting points and contact numbers in case of unexpected situations.
On the trail, keeping the group together is a top priority. Set a pace that works for the slowest member and take regular breaks to regroup. Smaller groups are not only easier to manage but also reduce the impact on the environment. Always follow Leave No Trace principles by staying on marked trails, using designated campsites, and carrying out all your trash. If conditions take a turn for the worse, reassess your plans and make adjustments with safety in mind.
Each hiker should carry a personal safety kit that includes a whistle, an emergency blanket, and a fully charged phone or satellite device. Keep an eye on everyone’s hydration, nutrition, and clothing to ensure they’re prepared for the weather. Watch for warning signs of hypothermia, heat-related illnesses, or altitude sickness. With thoughtful planning and teamwork, your group can enjoy a safe and memorable adventure.