
When planning a multi-day backpacking trip, preparation is key. You’ll need to choose a destination that matches your fitness level and experience, research trail conditions and regulations, and create a detailed itinerary. This includes planning daily mileage, campsites, and water sources. Gear selection is crucial – pack light but include essentials like a tent, sleeping bag, and navigation tools. Food and water logistics are equally important; aim for calorie-dense meals and reliable water treatment methods. Safety is non-negotiable: know how to handle weather changes, wildlife, and emergencies. Finally, train physically and test your gear on shorter practice hikes to ensure a smooth and enjoyable adventure.
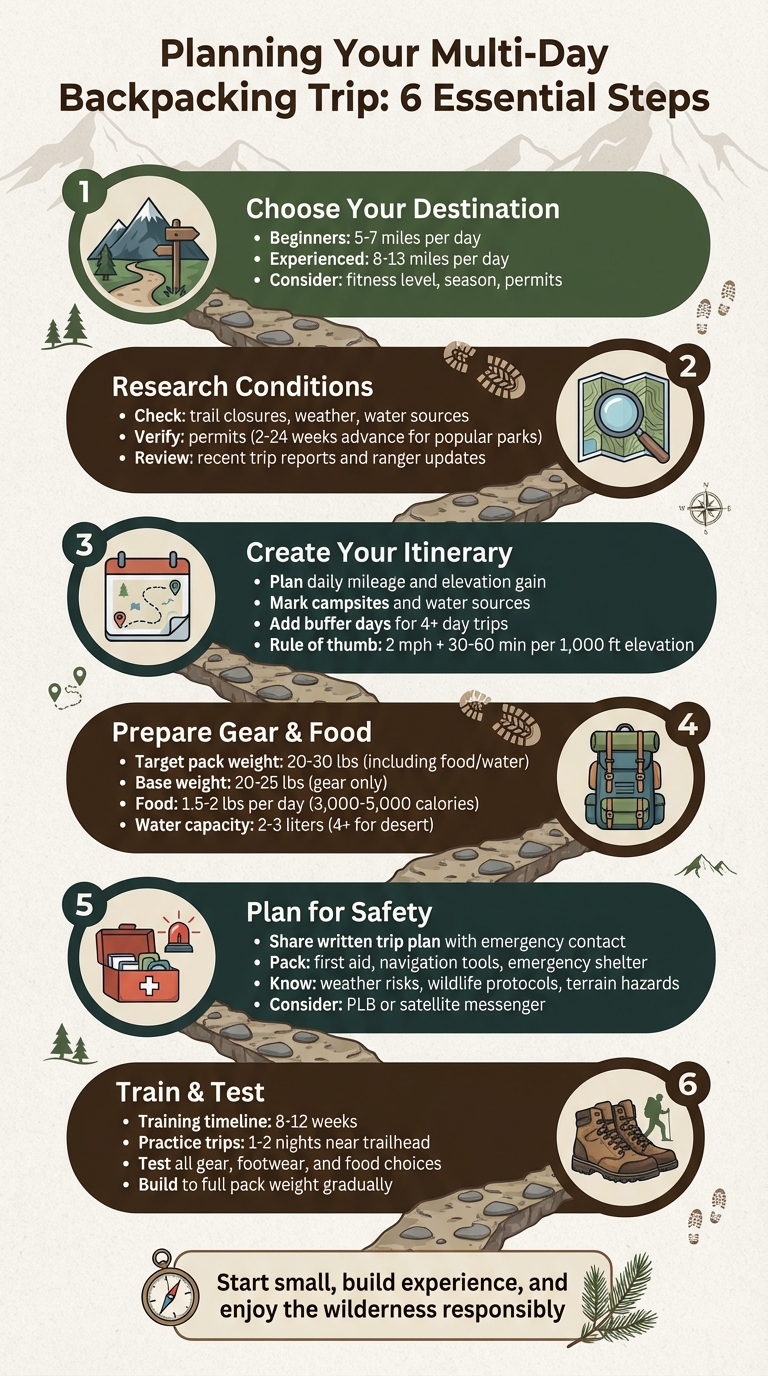
Key Steps to Plan Your Trip:
- Destination: Pick a trail suited to your fitness and schedule.
- Research: Check permits, trail closures, and seasonal conditions.
- Itinerary: Break your route into daily segments with clear mileage and camping spots.
- Gear: Pack essentials like a lightweight tent, warm layers, and navigation tools.
- Food & Water: Plan 1.5–2 pounds of food per day and use reliable water treatment.
- Safety: Prepare for risks like weather, wildlife, and injuries.
- Training: Build stamina and test your gear on short practice trips.
Multi-day backpacking is achievable with careful planning and preparation. Start small, build experience, and enjoy the wilderness responsibly.
6-Step Process for Planning a Multi-Day Backpacking Trip
How I Plan My Backpacking Trips | Choosing Trails, Creating Itineraries + Trip Planning Resources
Picking Your Backpacking Destination
When choosing a backpacking destination, consider how much time you have, the daily mileage you can handle, and the elevation gain you’re prepared to tackle. Most backpackers cover anywhere from 3 to 10 miles a day, depending on fitness levels and terrain. Beginners often stick to 5–7 miles per day, while seasoned hikers might push it to 8–13 miles daily. If this is your first multi-day trip, a 2–3 day loop or out-and-back route in a nearby national forest or state park is a great choice. Look for areas with established campsites and dependable water sources to make things simpler.
Matching Your Trip Goals and Limits
Your trail selection should align with your trip length, the season, group size, and your experience level. If you’re just starting out, shorter trips on well-marked trails can help you build confidence before attempting more remote or higher-elevation routes. Think about what you want from the trip – whether it’s peace and quiet, socializing, striking landscapes (like deserts, forests, mountains, or lakes), photography, or fishing. These preferences can help you decide between popular national parks, quieter wilderness areas, or nearby state parks. For weekend getaways, picking trailheads close to home can cut down on driving time, giving you more hours to hike. Beginners might opt for accessible sections of popular trails, while experienced hikers can take on more demanding routes.
Researching Trails and Current Conditions
Before finalizing your plans, dive into official websites, maps, and recent trip reports to check permits, trail closures, current conditions, and water availability. Pay attention to the climate, daylight hours, trail footing, vegetation, and wildlife you might encounter. It’s crucial to check the projected temperature range, precipitation, snow levels, and wildfire activity for your planned dates. Seasonal flooding, closures, and wildlife advisories are also worth monitoring through official channels. In the summer, many streams and creeks dry up, so confirming water sources is a must. Online communities – like blogs, Facebook groups, and Reddit – can be excellent resources for up-to-date trail insights and destination tips.
Permits and Backcountry Rules
Permit requirements vary depending on the land you’re exploring. Many U.S. national parks require advance backcountry camping permits, often tied to strict quotas, designated camping zones, and specific food-storage rules. For example, Yosemite’s lottery system on Recreation.gov requires applications to be submitted 2 to 24 weeks in advance. On the other hand, national forests and wilderness areas might offer free self-issue permits at trailheads or require permits only in heavily trafficked zones. Even in these areas, fire restrictions and food-storage guidelines still apply. State parks typically manage camping through designated sites and reservations, with simpler booking systems but clear rules about where you can camp and build fires.
Wherever you go, it’s essential to research local backcountry rules. This includes campfire restrictions, whether camping is limited to designated sites or allowed in dispersed areas, group size limits (usually 8–12 people), and requirements for food storage (like bear canisters). You’ll also want to check guidelines for handling human waste, dog policies, and any seasonal closures. For instance, many national parks, especially in the Sierra Nevada, require hard-sided bear canisters and enforce fire bans, while national forests might allow metal bear boxes or bear hangs with fewer restrictions.
Once you’ve chosen your destination and secured the necessary permits, it’s time to start planning a detailed itinerary.
Creating Your Multi-Day Itinerary
Once you’ve picked your destination and secured the necessary permits, it’s time to dive into the details of your trip. A well-thought-out itinerary ensures your adventure is both safe and enjoyable, while also giving you some wiggle room to adapt if conditions change. Focus on key elements like distance, elevation, camping spots, and water access. Break your route into daily segments with clear goals for mileage and elevation, making sure to factor in reliable water sources and legal camping areas.
Setting Daily Mileage and Elevation Targets
Your daily mileage should reflect your fitness level, pack weight, terrain, and expected weather. For beginners, 5–7 miles per day is a comfortable starting point. More seasoned backpackers on moderate trails with manageable elevation gains can aim for 8–13 miles per day. If you’re carrying an 18–26 lb pack over varied terrain, a range of 10–12 miles per day is generally sustainable for experienced hikers. Adjust your plan based on factors like heavier packs, high altitudes, challenging terrain, or harsh weather.
Use tools like topographic maps and GPS apps (Gaia GPS, AllTrails, or CalTopo are great options) to calculate distances and elevation gains for each segment. A good rule of thumb is to plan for a pace of 2 mph, adding 30–60 minutes for every 1,000 feet of elevation gain. For instance, you might plan Day 1 with 5 miles and 800 feet of gain leading to a lakeside campsite, Day 2 with 7 miles and 1,500 feet of gain over a mountain pass, and Day 3 with a 5-mile descent.
Compare your planned route to your recent training hikes and make adjustments as needed. It’s smart to plan conservatively, especially for the first couple of days, to avoid overexertion or injuries. For trips lasting four or more days, consider building in a shorter, "easy" day or even a rest day to provide flexibility if your group is moving slower than expected. Once you’ve finalized your daily distances, pinpoint your overnight campsites and water stops.
Finding Campsites and Water Sources
Your itinerary should clearly identify where you can legally camp and where to find water along the way. Start by checking official resources like national park or forest websites, wilderness maps, and ranger stations. Supplement this information with insights from backpacking blogs, guidebooks, GPS apps with user waypoints, and online forums. Official sources will outline designated campsites, quota zones, and rules for camping near trails or water sources, while community resources can provide updates on dispersed camping spots, dry water sources, and seasonal stream conditions.
Backcountry camping options in the U.S. typically include:
- Designated backcountry campsites: These often require permits or reservations and may feature amenities like bear boxes or pit toilets.
- Camping zones: These allow camping within specific areas but often include rules about distances from water or trails.
- Dispersed camping: Common in national forests and on Bureau of Land Management (BLM) lands, where you’ll need to follow Leave No Trace principles and adhere to local restrictions.
Be sure to verify the rules for each area you’ll visit and align your daily mileage with legal camping options.
For water, confirm the reliability of streams, springs, or lakes during your travel season by checking ranger updates and recent trip reports. Smaller streams and springs shown on maps may only flow in the spring or after heavy rains. Larger creeks, rivers, and lakes – especially those at lower elevations – are typically more dependable. Plan backup water sources within a few miles of your primary choice, and consider carrying extra capacity (3–4 liters per person) for dry stretches. If necessary, adjust your campsite to be closer to a perennial water source or start your hike earlier to ensure you reach the next reliable water stop.
Trailhead Transportation and Parking
Getting to and from the trailhead depends on the type of route you’ve planned. For out-and-back or loop trips, where you return to the same location, check the rules for overnight parking, including fees, permits, and seasonal road closures. For point-to-point routes, you’ll need to arrange transportation, such as a shuttle service, a second vehicle, or public transit options like buses, ferries, or trains.
Plan ahead for parking by confirming rules and fees early. Arriving the night before or early in the morning can help secure a spot, especially in popular areas. Print driving directions since cell service is often unreliable in remote locations. For point-to-point routes, align your transportation schedule with your estimated finish time, and build in a buffer in case your group moves slower than expected. Create a short logistics plan that outlines parking details, transportation arrangements, and departure times.
Before setting out, prepare a trip plan document that includes key details such as the trail description, starting and ending trailheads, dates, expected daily mileage, campsite locations, and mapped waypoints. Include group member names, vehicle descriptions (with license plates), and any transportation details. Share this document with an emergency contact, along with clear check-in instructions (e.g., "We’ll be out by Sunday at 5:00 p.m.; call by 8:00 p.m. if you don’t hear from us"). Adding a simple map with marked start and end points, as well as likely camp areas, can be invaluable for search and rescue teams if needed.
Gear, Clothing, and Food for Multi-Day Trips
When you’re heading out for a multi-day adventure, the gear, clothing, and food you bring can make or break your experience. It’s all about striking a balance – packing what you need for comfort and safety without overloading yourself. For trips lasting 3 to 5 days in the U.S., aim to keep your total pack weight (including food, water, and fuel) between 20–30 pounds, with a base weight (gear only) of 20–25 pounds. Fine-tuning your setup takes time, but focusing on your core essentials – your pack, shelter, and sleep system – can make a huge difference.
Core Backpacking Gear
Start with the essentials that keep you safe and comfortable. A solid three-season tent weighing 2–4 pounds and a sleeping bag or quilt rated for 20–30°F, paired with an insulated pad (R-value of 3 or higher), are must-haves. If you’re new to backpacking, opt for a freestanding or semi-freestanding tent – they’re easier to set up on uneven ground.
For your backpack, choose one in the 45–65 liter range with a supportive hip belt to shift weight off your shoulders. Test packs with 20–30 pounds loaded to ensure a good fit. Navigation tools are non-negotiable: carry a paper topo map, compass, and a GPS device or offline navigation app, and make sure you know how to use them before you head out.
Your cooking setup can be simple but efficient: a lightweight canister stove, fuel, a lighter (plus a backup fire starter), a 0.8–1.0 liter pot, and a long-handled spoon. If you’ll be cooking in windy areas, pack a small windscreen. For hydration, bring bottles or a bladder with a total capacity of 2–3 liters, along with a reliable water treatment method (we’ll get into those shortly). Other essentials include a headlamp with fresh batteries, a backup light, a first-aid kit with blister care supplies, and a repair kit with items like duct tape, cord, a needle, and patches for your gear.
If you’re venturing into bear country, check whether a bear canister is required. Many wilderness areas, such as parts of the Sierra Nevada and Rockies, mandate them. A standard canister typically holds food for 6–7 days.
When it comes to gear weight, there are trade-offs. Traditional setups are durable and budget-friendly but can push your base weight to 25–35+ pounds. Lightweight systems, which involve upgrading key items, can bring your base weight down to 15–20 pounds without sacrificing much comfort. Ultralight setups (under 10–12 pounds base weight) strip things to the essentials with lighter materials and multipurpose items, but they require more skill and care. For beginners, starting with a lightweight goal and gradually upgrading heavier gear is a smart approach.
Clothing Layers for Different Conditions
A reliable three-season layering system for your upper body includes three to four main layers. Begin with a moisture-wicking base layer, like a synthetic or merino wool T-shirt or long sleeve. Avoid cotton – it traps moisture and increases the risk of hypothermia. For cooler temperatures, add a light fleece (100–200 weight) or a synthetic insulated midlayer. Your insulating layer, like a synthetic or down jacket (6–10 ounces), should fit over your other layers and keep you warm during breaks or at camp. Finally, top everything off with a waterproof-breathable rain jacket and, if needed, rain pants for protection against wind and rain.
Adjust your clothing based on the environment. Wet forests call for durable rain gear and synthetic insulation, while desert trips require sun-protective, ventilated clothing. In the mountains, pack extra thermal layers. Always keep a dry set of sleepwear, including socks, reserved for camp and sleeping – this is critical if your daytime clothing gets wet.
For footwear, many backpackers now prefer trail runners or lightweight hiking shoes over traditional boots. They dry faster and reduce fatigue. Ensure there’s about a thumb-width of space at the toes and a snug heel fit to avoid blisters. Use synthetic or merino wool socks (never cotton) and bring 2–3 pairs to rotate daily. Tackle hot spots early with tape or blister patches, and wear moisture-wicking underwear and flat-seam shorts or pants to prevent chafing. Anti-chafe products can also help, especially under pack straps or on thighs.
Food Planning and Water Treatment
Backpacking burns a lot of calories – expect to need 3,000–5,000 per day. Plan for 1.5–2 pounds of food per person daily, aiming for calorie-dense options (100–150 calories per ounce). For a 3,500-calorie day, you might pack:
- Breakfast: Instant oatmeal with nuts and dried fruit, plus coffee (~600–700 calories)
- Snacks: Trail mix, energy bars, jerky, and nut-butter packets (~1,400–1,600 calories)
- Lunch: Tortillas with cheese and salami or tuna packets (~600–700 calories)
- Dinner: A dehydrated meal with added olive oil or instant rice, plus dessert (~900–1,000 calories)
Look for foods that are compact, shelf-stable, and easy to prepare with boiling water or cold soaking. Popular choices include instant rice, ramen, couscous, mashed potatoes, dehydrated meals, nuts, bars, dried fruit, and cheese. Separate snacks for easy access during the day from your cook-in-camp meals. Monitor your hunger and energy levels on shorter trips to fine-tune your food planning – it’s better to finish with a small food surplus than to run out.
Water treatment is critical, even if the source looks pristine. Risks like Giardia, Cryptosporidium, bacteria, and viruses are real. Common treatment methods include:
- Squeeze filters and gravity filters: Easy to use and efficient.
- Chemical treatments: Lightweight and great as a backup.
- UV purifiers: Effective but require batteries.
- Boiling: A reliable option if fuel isn’t an issue.
Choose a primary method, like a squeeze or gravity filter, and carry a lightweight backup, such as chlorine dioxide tablets, in case of failure. Research water sources ahead of time using trip reports or guidebooks, mark them on your map or GPS, and carry at least 2–3 liters of water capacity. For desert hikes or long dry stretches, increase this to 4+ liters.
With the right gear, clothing, and food, you’ll be well-prepared to enjoy your backcountry adventure and handle any challenges that come your way.
sbb-itb-5a98267
Safety and Risk Management
Staying safe in the backcountry hinges on good preparation, staying aware of your surroundings, and making cautious decisions. Many incidents stem from poor planning, getting lost, exposure to harsh weather, or falls. By sharpening your skills, understanding local risks, and having a solid emergency plan, you can turn potential crises into manageable challenges.
Building Backcountry Skills
Before embarking on a multi-day trip, it’s essential to get comfortable with navigation, campsite setup, food storage, and basic first aid. Start by practicing navigation with a topographic map and compass on well-marked trails. Learn to read the contour lines, recognize terrain features, and take bearings. While GPS devices are helpful, they should only serve as a backup to traditional navigation methods.
On overnight trips closer to home, rehearse your camp setup. Practice pitching a tent in less-than-ideal conditions like wind or light rain. Choose campsites away from hazards like dead trees (often called "widowmakers") and areas prone to flooding. Set up a proper "camp triangle" by keeping your sleeping area, cooking spot, and food storage at least 100 feet apart.
Food storage is especially important in bear country. Use a bear canister, Ursack, or the appropriate hanging method as required by local rules. And don’t forget: items like toothpaste, sunscreen, and trash (anything with a scent) need to be stored just like food. Additionally, taking a basic wilderness first-aid course (8–16 hours) can teach you how to handle blisters, minor injuries, and mild hypothermia. Testing these skills on short trips will help you feel more confident when venturing further into the wild.
Handling Weather, Terrain, and Wildlife
Once you’ve built a strong foundation of skills, the next step is learning how to deal with environmental challenges. Thunderstorms and lightning are a serious risk, with 20–30 fatalities reported annually in the U.S., often involving people caught on exposed ridges or open areas. Follow the 30–30 rule: if you hear thunder within 30 seconds of seeing lightning, seek shelter immediately. Wait at least 30 minutes after the last thunder before continuing.
Hypothermia can occur even in mild temperatures (40–60°F), especially when you’re wet and exposed to wind. To prevent it, stay dry, dress in layers, and change out of damp clothing promptly.
For terrain hazards, adjust your pace on challenging ground. Use trekking poles for stability and take short, deliberate steps when navigating scree or loose surfaces. When crossing streams or rivers, unbuckle your backpack’s hip and sternum straps, face upstream, and use trekking poles for extra balance. If the water looks too risky, don’t hesitate to turn back or camp until conditions improve. Snowfields, especially early in the season, require extra caution. Assess the runout in case of a slip, kick steps into the snow for better footing, and bring microspikes if the snow is firm.
Wildlife encounters, particularly with black bears and grizzlies, are manageable with the right approach. Store all food, trash, and scented items in bear-proof containers or lockers, keeping them at least 100 feet from your tent. Cook away from your sleeping area, and make noise while hiking in brushy areas to avoid surprising a bear. Carry bear spray where recommended and know how to use it. For snakes, especially in rocky or desert areas, avoid placing your hands or feet where you can’t see. Stick to trails and give snakes plenty of space – they’re most dangerous when startled or provoked.
Emergency Plans and Communication Tools
A written trip plan is one of the simplest ways to manage risk. Include details like your route, planned campsites, backup options, daily mileage, group members, vehicle information, expected return time, and emergency contacts. Share this plan with someone you trust. Establish clear decision-making rules for the group, such as when to turn back due to weather or terrain concerns.
Your emergency kit should include first-aid supplies, tools for gear repairs, fire-starting materials, an emergency shelter, and signaling devices.
For communication, consider carrying a personal locator beacon (PLB) or a satellite messenger like Garmin inReach or SPOT. These devices can make a huge difference in emergencies, especially when paired with a solid trip plan. Be sure to register your device and set up emergency contact details in advance.
Always maintain a margin of safety by packing extra food, water, and insulation. Regularly assess conditions like weather, group energy levels, and water availability, and adjust your plans early if needed. Making conservative choices, such as turning back or taking an extra rest day, isn’t a sign of failure – it’s a sign of good judgment.
Training and Preparation
Getting ready for a backpacking trip isn’t just about packing your gear – it’s about preparing your body and testing your equipment to avoid mishaps on the trail. Proper physical training and practice trips can save you from injuries, gear failures, and sleepless nights in the wilderness.
Physical Training for Backpacking
Backpacking over multiple days demands stamina, strength, and the ability to navigate uneven terrain without wearing yourself out. If you’re new to this, aim to start with the ability to hike 5–7 miles with 1,000–1,500 feet of elevation gain while carrying a light daypack. You should also feel ready to repeat the effort the next day without major fatigue.
A solid training plan of 8–12 weeks can help you build up gradually. Start with small increases in hiking distance, elevation gain, and pack weight – around 5–10% each week. Here’s a general breakdown:
- Weeks 1–3: Do 2–3 cardio sessions (30–45 minutes of walking, stair climbing, or incline treadmill work) and 1–2 strength sessions with exercises like squats, lunges, and planks. Add a weekend hike of 3–5 miles with a 5–10 pound pack.
- Weeks 4–6: Increase your weekend hike to 5–7 miles on hilly trails with a 10–20 pound pack. Introduce back-to-back hiking days, such as 4 miles on Saturday and another 4 miles on Sunday, to simulate consecutive trail days.
- Weeks 7–9: Extend your longest hike to 7–10 miles with 1,500–2,500 feet of elevation gain while carrying 20–30+ pounds, getting closer to the weight you’ll carry on your trip.
- Final Weeks: Maintain your hiking volume but focus on carrying your full pack weight. This is the time to fine-tune your pace, footwear, and nutrition strategy.
When training with your pack, start by loading it to 25–40% of your expected trip weight. Gradually add 3–5 pounds every week or two, as long as your body feels up to it. Practice on local trails, stairs, or hills to get used to uphill climbs and downhill descents – especially since descending with a heavy pack can strain your knees and quads. Adjust your pack’s hip belt and straps so the weight sits on your hips, not your shoulders.
For strength training, aim for two 20–40 minute sessions per week. Focus on exercises like weighted squats, lunges, step-ups, glute bridges, and core movements such as planks and bird-dogs. Don’t skip mobility work – spend 5–10 minutes after hikes stretching your ankles, hips, hamstrings, and calves. If you feel pain (not just soreness), consider taking a recovery week to avoid further issues.
Once you’ve built enough endurance, it’s time to test your gear and refine your setup.
Testing Gear on Practice Trips
Short practice trips are the perfect way to test your equipment and adjust your plans before committing to a longer journey. These overnight trips let you see how your gear performs together without the pressure of being far from help. Plan 1–2 trips of 1–2 nights on well-marked trails with moderate elevation and reliable water sources. Ideally, these should be within 3–6 miles of a trailhead for easy access.
During these trips, wear your planned footwear, socks, and insoles on several hikes to identify any fit problems or hot spots. Test your full gear setup, including your pack’s weight distribution, your layering system in different weather conditions, and your navigation skills. Pay attention to areas where you overheat or get cold to adjust your clothing layers.
After each outing, review your gear by sorting items into three categories: “used every day,” “used occasionally,” and “never used” (excluding emergency essentials). Items that consistently go unused may not be worth bringing on your trip. Evaluate your food choices too – many beginners overpack bulky or impractical items. Also, take note of how much water you carried compared to what you actually needed. In most U.S. conditions, hikers plan for 0.5–1 liter of water per hour of hiking, adjusting based on personal experience.
Common mistakes spotted during practice trips include carrying unnecessary clothing, packing heavy luxury items, underestimating rain protection, and poor pack organization. Keep track of your findings in a notebook or spreadsheet to fine-tune your setup for longer adventures.
Conclusion
Planning a backpacking trip can feel overwhelming, but breaking it into six simple steps makes it manageable: define your trip parameters (where, when, how long, and with whom), research trails and current conditions (weather, water sources, permits, fire rules), create a realistic itinerary with daily mileage and campsites, prepare your gear, clothing, and food, focus on safety and risk management (navigation, weather contingencies, wildlife precautions, emergency contacts), and train with shorter practice trips to test everything out. These steps simplify the process, turning a daunting task into something achievable.
As you finalize your plan, take a moment to review the essentials. Make sure your pace and pack weight (aim for 18–26 pounds) align with your recovery needs, so your trip stays enjoyable and sustainable. Before heading out, share a written itinerary with someone you trust, carry backup navigation tools like a map, compass, and GPS, verify water availability along your route, and pack critical emergency items – extra layers, food, water treatment, a first-aid kit, and a signaling device.
Set a short-term goal to get started. Within the next week, pick a realistic 1–3 night route close to home and sketch out a daily plan with mileage and campsites using a map or navigation app. Double-check your gear against a checklist, then decide what you need to borrow, rent, or buy. Plan a full-day hike to test your gear, footwear, and nutrition, and make adjustments based on what works – or doesn’t.
Every experienced backpacker starts small, building skills and confidence with shorter trips. For more ideas, checklists, tutorials, and safety tips, visit Adventurism.co to help you move from planning to hitting the trail. With preparation, each trip becomes more rewarding, and as you gain experience, you’ll be ready to tackle even bigger adventures across North America.
FAQs
How do I choose the right destination for a backpacking trip?
When planning a backpacking adventure, think about key factors like trail difficulty, terrain, and weather conditions to make sure they match your experience and comfort level. Take time to research the area’s accessibility, any safety concerns, and whether permits or restrictions are necessary.
Don’t forget to review local rules and seasonal details, like wildlife activity or potential trail closures. Pick a destination that not only sparks your interest but also aligns with your skills, ensuring a safe and enjoyable journey.
How can I make sure I have enough food and water for a multi-day backpacking trip?
When heading out on a hike, it’s crucial to stay hydrated and energized. A good rule of thumb is to bring at least 1 liter of water for every 2 miles you plan to cover. For food, stick to lightweight, calorie-dense options like trail mix, energy bars, or dehydrated meals – they’re easy to carry and pack a nutritional punch. If you need to refill your water from natural sources, make sure to use a water filter or purification tablets to make it safe for drinking. Before you hit the trail, research your route to pinpoint available water sources, and keep track of your water and food intake to avoid dehydration or running low on supplies.
What safety tips should I follow for a multi-day backpacking trip?
Preparation is the cornerstone of a safe and enjoyable multi-day backpacking trip. Make sure to bring along essential navigation tools like a map, compass, or GPS, and always share your itinerary and expected return date with someone you trust. Pack a well-stocked first aid kit, plenty of food and water, and emergency items such as a whistle or a space blanket. Before you set out, check the weather forecast and dress in layers that can handle shifting conditions.
Stick to marked trails to reduce the risk of getting lost, and always maintain a safe distance from wildlife – no matter how harmless they might seem. Take time to learn about the specific hazards in the area, such as steep cliffs or swift rivers, so you can navigate them safely. With careful planning and awareness, you’ll set yourself up to fully enjoy the adventure while staying safe.